LoML Black Shrine Boss Guide
Boss Blitz

By nyaiera
Published: Sep 18, 2023
Updated: Jun 18, 2026
190,855
17

Introduction
The Black Shrine is a weekly boss content unique to the Land of the Morning Light
- The Black Shrine (Boss Blitz) consists of 9 different bosses that you can challenge
- Completing the Bosses for the first time completes a journal for extra rewards
- You can receive rewards for 5 bosses per week, which resets on Sundays
- There are 10 different "Calamity" levels the bosses can be which increases their difficulty
Black Shrine bosses are unlocked by completing the Land of the Morning Light quest chapters!

Requirements
In order to unlock the Black Shrine Boss Blitz, you must first unlock it through the Land of the Morning Light questline.
If you haven't travelled to the Land of the Morning Light yet, we have a guide on how to unlock the Magnus Abyssal Vein letting you teleport right there.
You can find the guide for fast travelling to the Land of the Morning Light here!
Once you've made your way to the island to begin questing, you'll be able to see the "Tale" quests in your quest window (O).

These tales cannot be completed simultaneously, so once you pick one, you'll have to complete it to the end. Completing these small quest chains will end in a boss battle.
After you've defeated the boss and completed the story related to that boss, you'll unlock the Black Shrine version.
New 6th Light Orb
With most Black Shrine bosses now having Calamities 8-10 available, the devs have decided to make calamities 1-7 easier by adding an additional Light Orb which provides more stats.
Each Light Orb grants 50 AP and 100 DP which will make Calamity modes 1 to 7 much easier for players who aren't quite at the gear requirements for Calamity 8 and onwards.
You can accept the new quest "[LoML] Talekkebi's Trials - Calamity 6" from the Black Spirit if you have completed all quests in the Tale of Koo Mihyun and possess the Tale of Koo Mihyun knowledge. This will give you the 6th Light Orb.
Accessing the Black Shrine
Once you've completed at least one of the "Tale" storylines that feature the bosses from the Land of the Morning Light, you'll unlock a new UI icon.
In the top right hand corner of the screen near your mini map you'll see a the Black Shrine icon glowing red.

Clicking on the icon will open up the Black Shrine window, with details about your boss clears or personal best times.

You can also see the leaderboards for each boss stage and if you're into time attacks this can be a great way of progressing seperate to gearing up.

The leaderboards are also based on your class, so don't feel like you have to choose a certain class in order to achieve a high ranking!
You can select which "Calamity" stage of a boss you'd like to fight by clicking one of the talismans beneath it's name.

The "Calamity" stages are basically just the difficulty selection, you'll receive better rewards for higher stages but bosses will be stronger with more HP and extra mechanics.
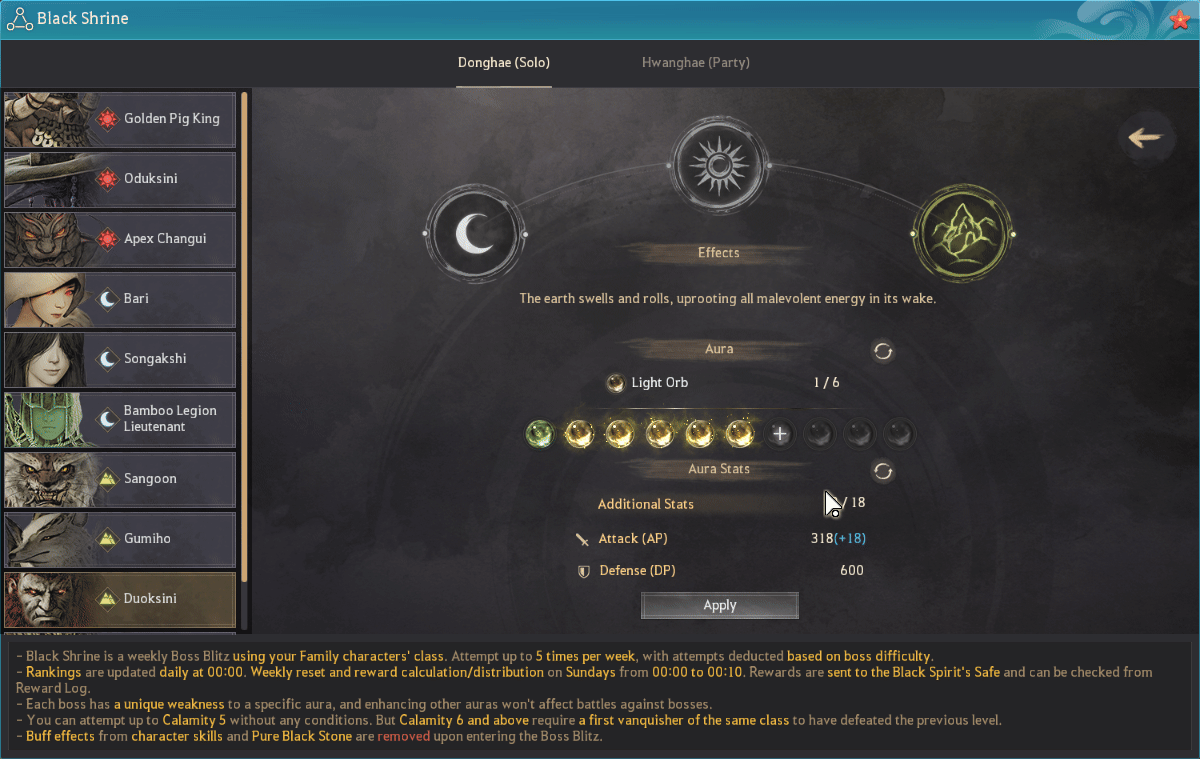
Black Shrine Auras
Similarly to Arena of Arsha or the Magnus quests, the Black Shrine has a way of mostly equalizing gear, however instead of a unique gear set, it uses an Aura system.
This system lets you augment your stats through Light Orbs, at a current cap of 6.
- Only 10% of the skill add-on effects and buff effects related to the character's AP/DP are applied.
- Only critical hits from attribute attacks are displayed during the boss blitz. (Critical hits based on the character's existing stats are applied, but are not displayed.)
- The critical hit rate for attribute attacks is applied at 50% during the boss blitz.
- All debuff resistance is applied at 20% during the boss blitz.
Only 10% of your gear stats will be applied to your stats when fighting bosses, the other 90% will come from the Aura system.

When starting out you'll only have 1 Aura in each Aura type. You can see from the image above that the types are Sun, Moon and Earth.

For example if you were fighting Bari who has the Moon icon, you'd use your Light Orbs to buff your Moon Aura, as you can see in the image above.
Investing a light orb increases attack power (AP) by 50 and defense power (DP) by 100 for that attribute/aura each time you invest one, and it grants you 3 additional stat points.
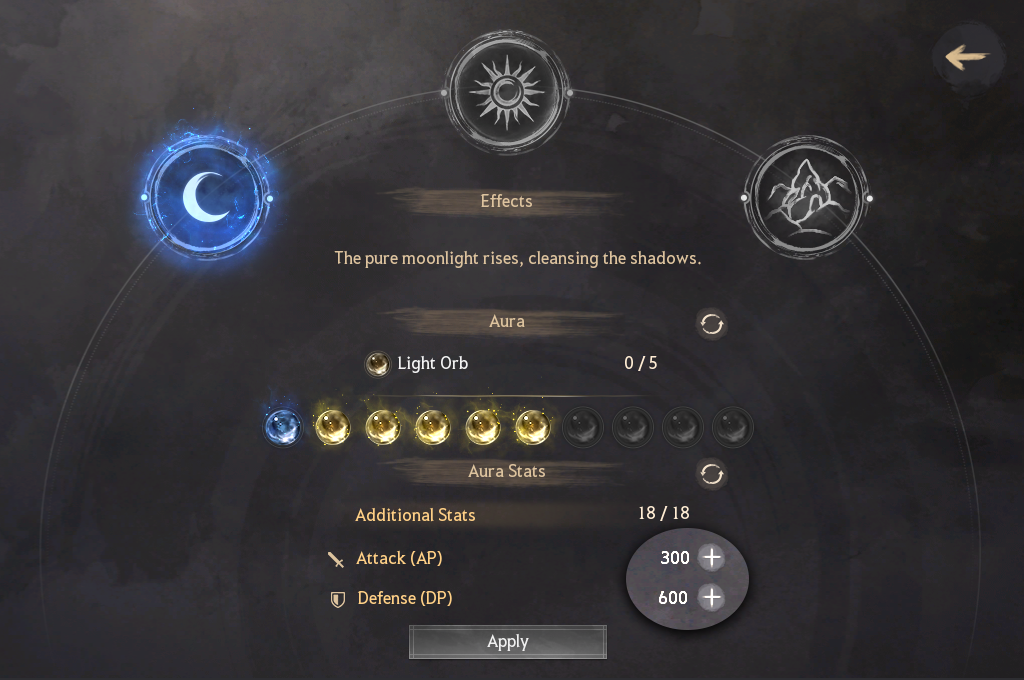
You can spend the additional stat points on either AP or DP however you'd like to for some bonus stats.
Obtaining Light Orbs
To obtain more Light Orbs you'll need to make your way through the Land of the Morning Light questline, but if you want to unlock all of the bosses, you'll have to do that anyway.
Here's an example of the quest "[LoML] Gift from the Black Spirit" which rewards the first bonus Light Orb.

You can find all of the Light Orb quests in the Suggested quest tab (O) under the title [Combat] [Lv.56] Light Orb, Land of the Morning Light.

Once you've completed them you'll be able to slot them into the Aura that you'd like to enhance. If you want to change where your Auras are allocated, just hit the reset button. 
It's actually pretty cheap to reset the Light Orbs so don't worry about having to reallocate them for different bosses.
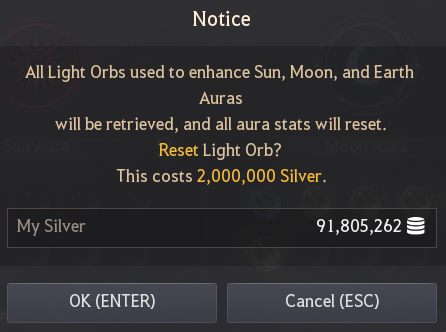
Resetting only your additional stats will be 500k, so even less than resetting your Light Orbs.
Black Shrine Mechanics
Every week you'll have 5 attempts to defeat bosses. Basically, if you defeat a boss and get rewards, this will consume one of your weekly attempts.
You can see the Weekly Boss Blitz Count in the Black Shrine Window when selecting a boss.
This counter will reset at midnight every Sunday. Re-challenging defeated will not consume a boss count.
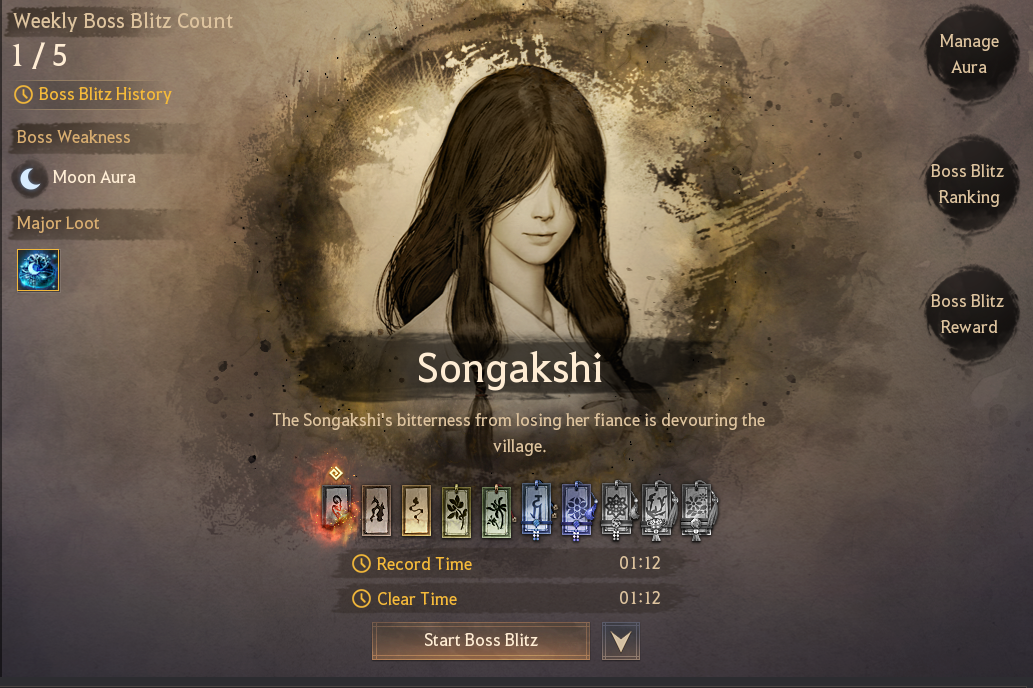
For example, in the above image Calamity 1 Songakshi had been defeated to make the counter 1/5.

As you can see the Record Time has changed but the counter has remained the same. If you happen to die or forfeit you will also not increase your counter.
When fighting bosses, much like Arena of Solare, green orbs will spawn that recover HP. Basically, the bigger the orb is, the more HP it will recover, so it's best to let them grow to full size if you can.
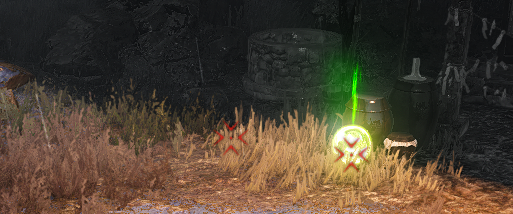
It's important to pay attention to these orbs because you can't use HP pots inside the boss fight. You also can't use consumables.
It's a good idea to buff up before going into the boss area. This can be the usual food rotations, elixirs, drafts, tent buffs whatever you feel like.
If you've already done the Light Orb quests and have all 6, you'll definitely have no problems with the first few Calamity stages.
Boss Mechanics
If you're a new player or a player new to the PvE bosses, some of these mechanics may look intimidating. I just want to note that if you have all 6 Light Orbs unlocked the early stages will be easy.
Calamity 1- 3 can be done with very little difficulty or regard to mechanics, so if you're just looking to try out the content, these can be a good place to learn as repeated attempts dont use your counter.
Blessing of Morning Light
Now when the highest difficulty Calamity is completed, the server will be notified that it has been defeated and that server will be given a buff.

These buffs last for 180 minutes, if the same boss type is defeated within that time, the buff will refresh, you can also have more than just one buff type.
| Defeated Boss | Blessings of the Morning | |
| Golden Pig King, Apex Changui, Oduksini | Blessing of the Warm Sun | AP +1 |
| Mudang Wraith, Songakshi, Bamboo Legion Lieutenant | Blessing of the Soft Moon | DP +1 |
| Gumiho, Duoksini, Sangoon, Imoogi | Blessing of the Thriving Earth | Item Drop Rate +20% |
The Blessing of the Thriving Earth's Item Drop Rate increase buff can be applied up to the maximum limit of 400% including Arsha Server and Territoray Occupation buffs.
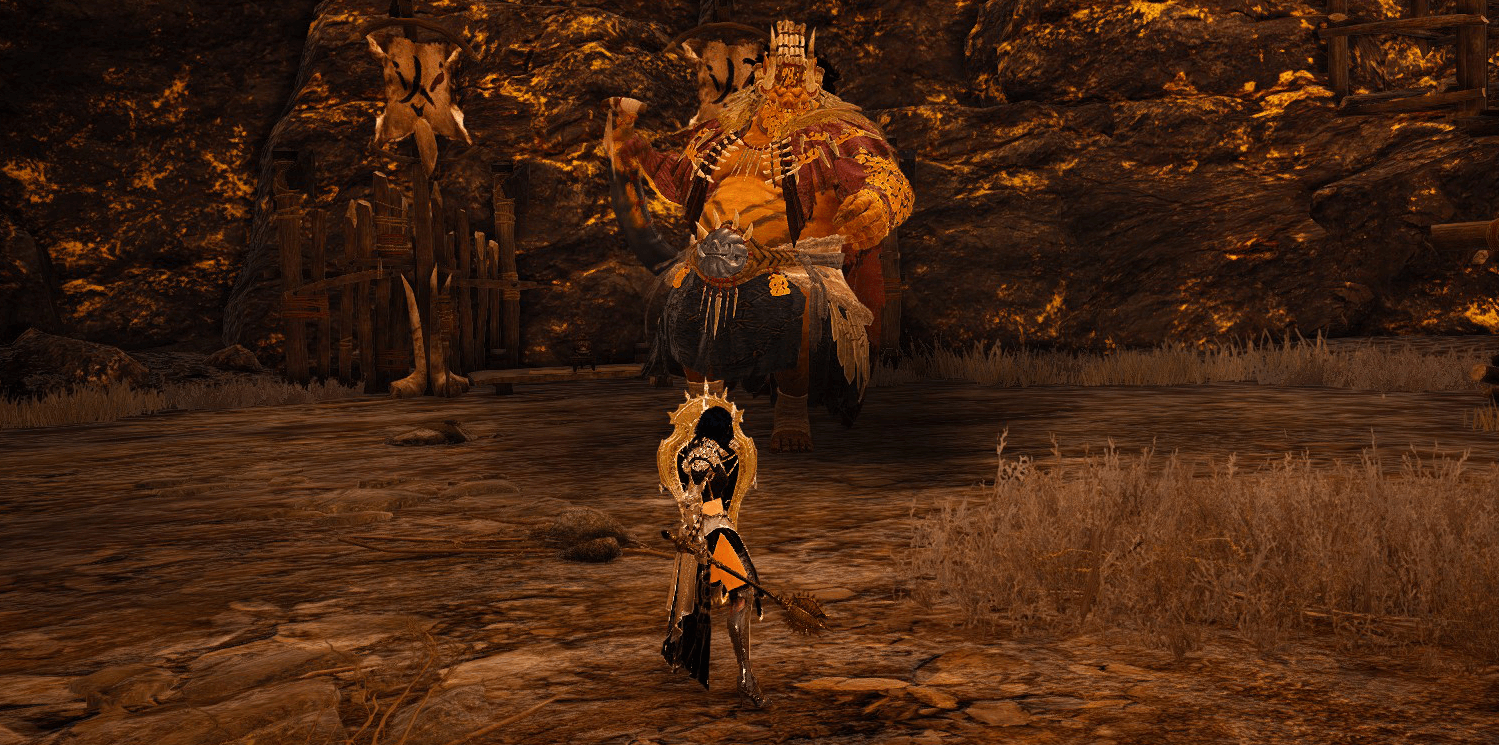
Golden Pig King

Be careful when fighting the Golden Pig King because most of his skills have CCs that can get you punished, after Level 6 he also has a skill that can one shot you.
The timer for this boss is 8 minutes and 20 seconds or you'll be one shot.
1. Aura: At the start of the fight, the boss has a golden protective aura around it. Keep the boss inside this aura and move to a green orb when you need healing. If you go outside the aura, the boss heals itself and gets an AP buff and DP debuff.
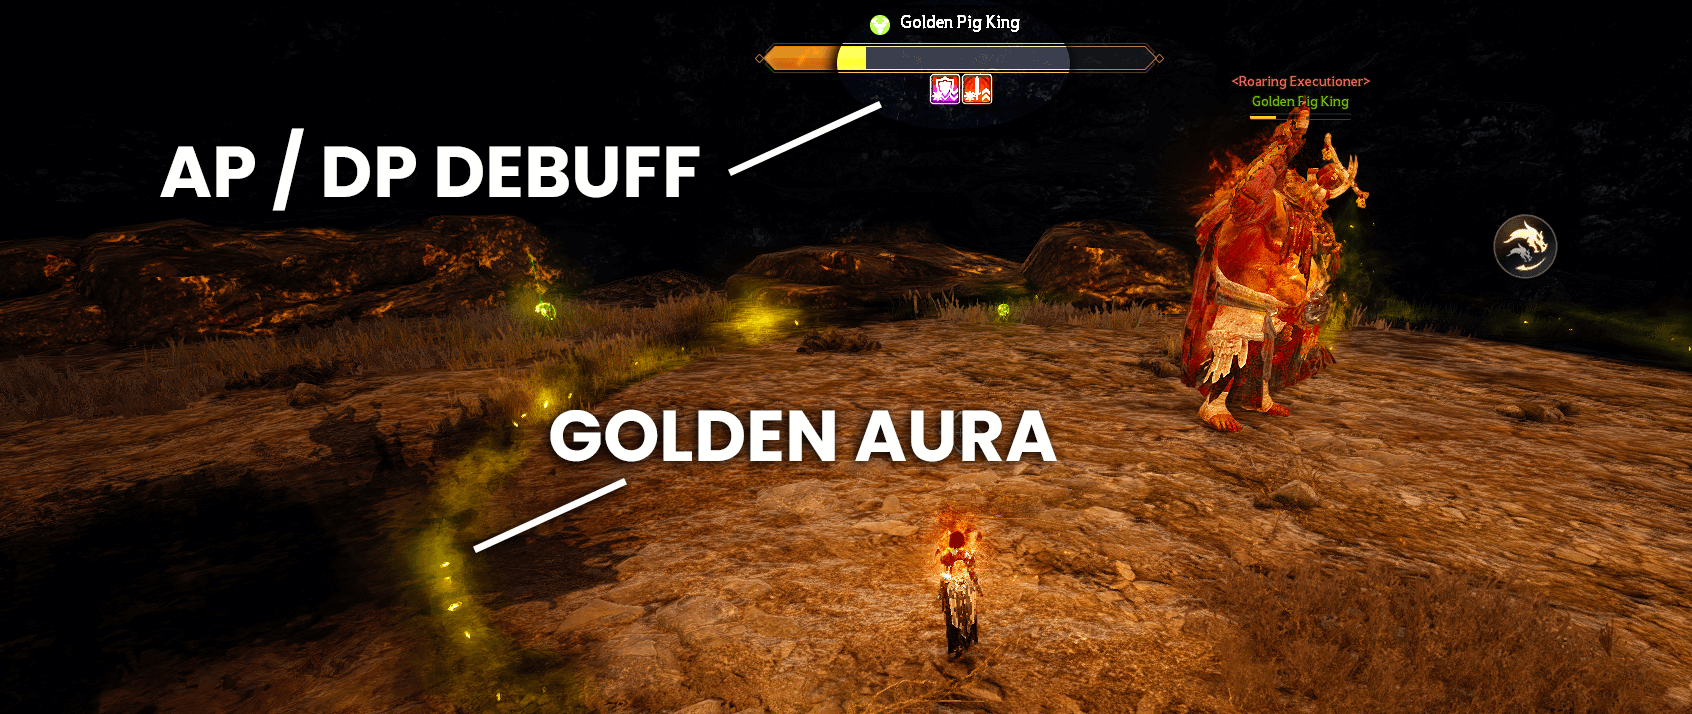
2. One-shot Move: If you move out of the aura more than 3 times the boss will use a one-shot attack.
3. Attack Patterns:
- Basic Attack: A generic sword slash but be careful as it can knock you down
- Roar Attack: AoE's the golden aura's range for a few seconds, use a forward guard or iframes
- Fire Sword Swing: The boss ignites it's sword and swings at you, try to kite or get back attacks
- Spinning Attack: The range on this is pretty big, use a forward guard to be safe.
- Sword Sheath: The boss puts his sword away and explodes golden light for a few seconds, use FG or iframe.
4. Special Messages: The boss says different things during the battle, and each message corresponds to a particular attack or phase change.
“I will fill your bellies with gold, and you will choke on your greed!”
The Golden Pig king will start spinning towards you, if you forward guard it, your guage will stay at 0 for a bit so just iframe it if you've got them.
“I'll show you why I'm king!”
When the boss's health drops below 30%, he gains bigger range and damage but the mechanics remain the same.
“What on earth did we do wrong!?”
The boss will ignite his sword and do two spinning slashes towards you, they're pretty easy to dodge.
5. Calamity 6 + : At around 3 minutes into the fight, the boss disappears and comes back with a shield. Destroy the shield quickly to avoid instant death, if you break the shield you'll stun him.
6. Beserker Mode: At different intervals throughout the fight, the boss will get AP buffs in exchange for debuffing its DP, this mode lasts about a minute.
While it's in this mode it takes more damage and if you lower its HP enough the boss will get stunned. If its HP doesn't lower enough, it'll use a strong attack.
Now for Golden Pig King Calamity 8 - 10 you gain access to your own personal gear, this comes with new requirements:
| Calamity 8 | Calamity 9 | Calamity 10 |
| Displayed AP 330+ | Displayed AP 350+ | Displayed AP 350+ |
Defeating the Calamity 8/9/10 Golden Pig King grants you the following weekly Boss Blitz rewards:
 C-8 Boss Blitz Reward: Golden Pig King (Rank 1 - Rank 9)
|
|
| Guaranteed | Probability-based |
   - Essence of Dawn x5 - 6
- Gold Bar 1,000G x2 - Memory Fragment x8 - 13 - Embers of Hongik x15 - 18 - Sealed Black Magic Crystal x3 - Imperfect Lightstone of Fire x1 - Trace of Nature x10 - 15 - Black Stone x34 - 40 - Sangpyeong Coin x84 - 90 - Trace of Thunderbolt (upon opening Rank 1 Reward) |
   - Dahn's Gloves (Evasion/Damage Reduction)
- DUO (II) Deboreka Earring - PRI (I) Deboreka Earring - Deboreka Earring - Flame of Hongik - Essence of Taebaek - Crystal of Harmony - Crystal of Darkness - Crystal of Bitterness - Crystal of Decimation - Bonghwang's Tear - Haetae's Tear - Girin's Tear - Resplendent Lightstone of Fire - Tear of Illusion - Trace of Thunderbolt (upon opening Rank 2 - 9 Reward) |
|
C-9 Boss Blitz Reward: Golden Pig King (Rank 1 - Rank 9)
|
|
| Guaranteed | Probability-based |
|
- Essence of Dawn x8 - 9
- Gold Bar 1,000G x2 - Memory Fragment x8 - 14 - Embers of Hongik x16 - 19 - Sealed Black Magic Crystal x4 - Imperfect Lightstone of Fire x1 - Trace of Nature x10 - 16 - Black Stone x36 - 42 - Sangpyeong Coin x94 - 100 - Tear of Illusion x1 - Trace of Thunderbolt (upon opening Rank 1 Reward) |
- Dahn's Gloves (Evasion/Damage Reduction)
- DUO (II) Deboreka Earring - PRI (I) Deboreka Earring - Deboreka Earring - Flame of Hongik - Essence of Taebaek - Crystal of Harmony - Crystal of Darkness - Crystal of Bitterness - Crystal of Decimation - Bonghwang's Tear - Haetae's Tear - Girin's Tear - Resplendent Lightstone of Fire - Trace of Thunderbolt (upon opening Rank 2 - 9 Reward) |
|
C-10 Boss Blitz Reward: Golden Pig King (Rank 1 - Rank 9)
|
|
| Guaranteed | Probability-based |
|
- Essence of Dawn x14 - 15
- Gold Bar 1,000G x2 - Memory Fragment x8 - 15 - Embers of Hongik x17 - 20 - Sealed Black Magic Crystal x5 - Imperfect Lightstone of Fire x1 - Trace of Nature x10 - 17 - Black Stone x38 - 44 - Sangpyeong Coin x104 - 110 - Tear of Illusion x1 - Trace of Thunderbolt |
- Dahn's Gloves (Evasion/Damage Reduction)
- DUO (II) Deboreka Earring - PRI (I) Deboreka Earring - Deboreka Earring - Flame of Hongik - Essence of Taebaek - Crystal of Harmony - Crystal of Darkness - Crystal of Bitterness - Crystal of Decimation - Bonghwang's Tear - Haetae's Tear - Girin's Tear - Resplendent Lightstone of Fire |
Oduksini

Oduksini can be one of the hardest bosses due to one shot mechanics and being a DPS race check.
When the fight starts Oduksini will fly up in to the air, leaving him safe from from attack.
To bring him down to the ground, attack the purple flames around the room. Summoned mobs will come at you but just focus on the flames while avoiding Oduksini's attacks.
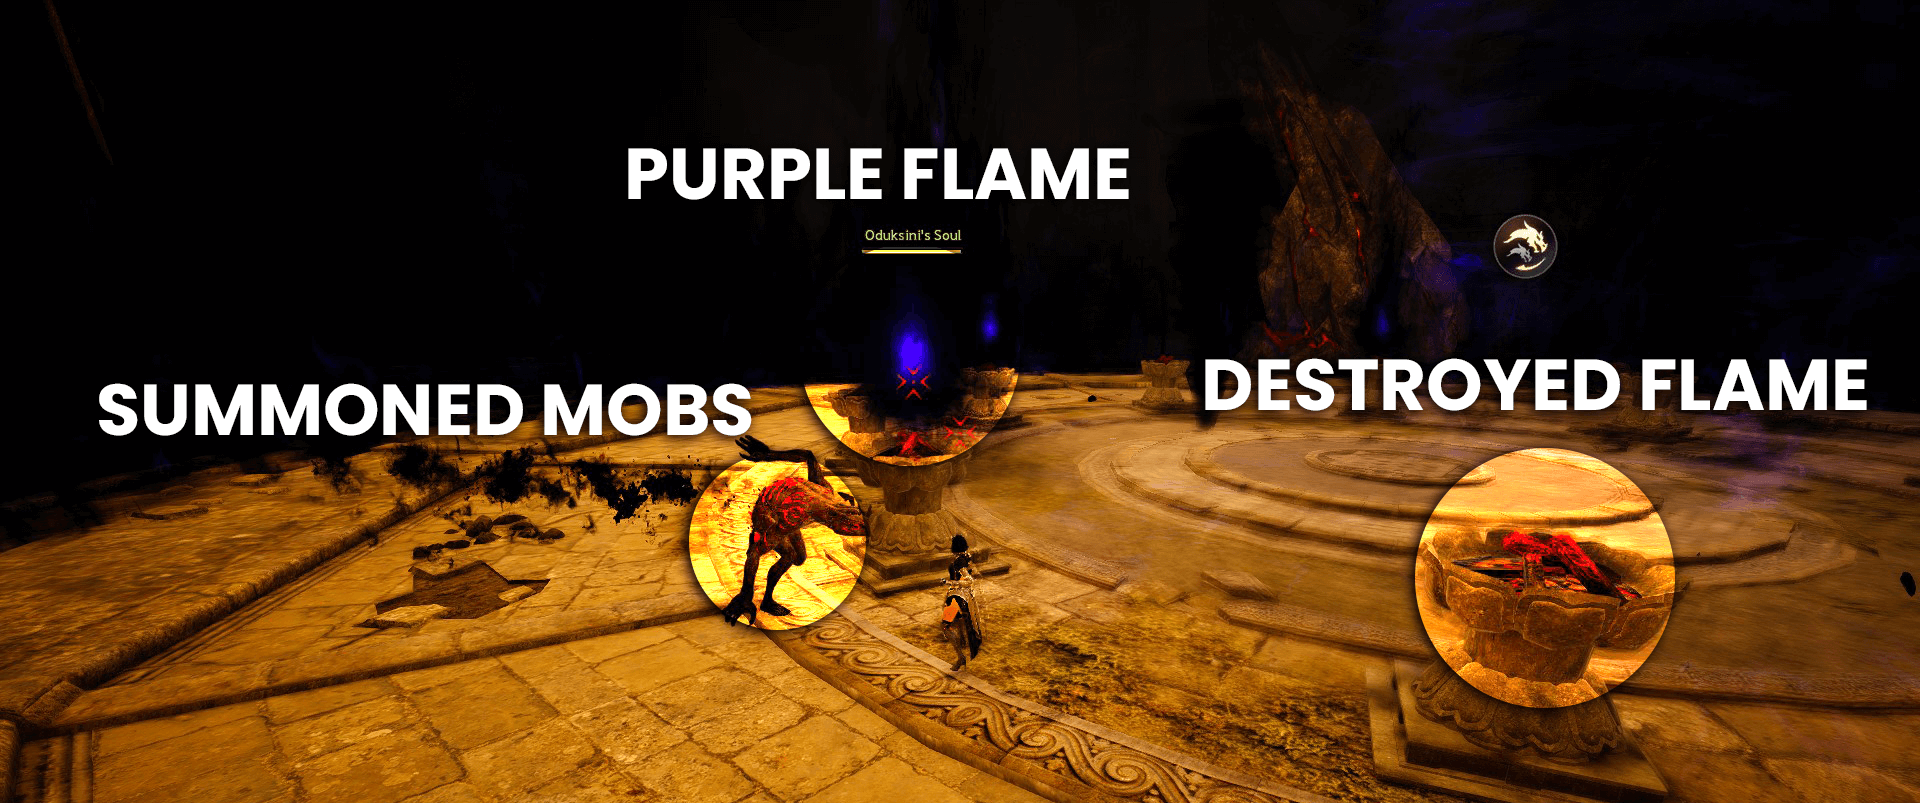
Once he's on the ground he'll have a DP debuff and you'll be able to burst him down, if you don't get him to 50% hp here he'll one shot you, but he stands still and lets you hit him.

You can dodge the one shot this first time if you Emergency Escape (V) with good timing, but if you can't hit the first DPS check you probably won't hit the second.
Once you hit the 50% DPS check successfully Oduksini will fly into the air for a second time.
- At Calamity 6+ two elite monsters appear; defeat them to remove the shield around the purple flames.
- Killing the Elites will give you an AP buff and the shield vanishes, the shields come back every 50 seconds.
- You have 5 minutes to destroy all the flames, after the flames are destroyed or the 5 minutes is up he'll land.
- If you destroyed all flames, the boss gets a defense debuff letting you melt him faster.
- Now that he's landed you can burst him down just like the end of the first phase.
Apex Changui

Apex Changui has 5 different phases, with different mechanics triggering when Apex Changui reaches certain HP amounts. He also has spoken messages similar to other bosses too.
80% HP:
- Changui summons four monsters that will run at you and try to self destruct, its best to dodge them with iframes.
- Kill the summoned Gulgak monsters to stop the monsters from being summoned.
- Make sure you kill the Gulgaks before getting Apex Changu to 60%.
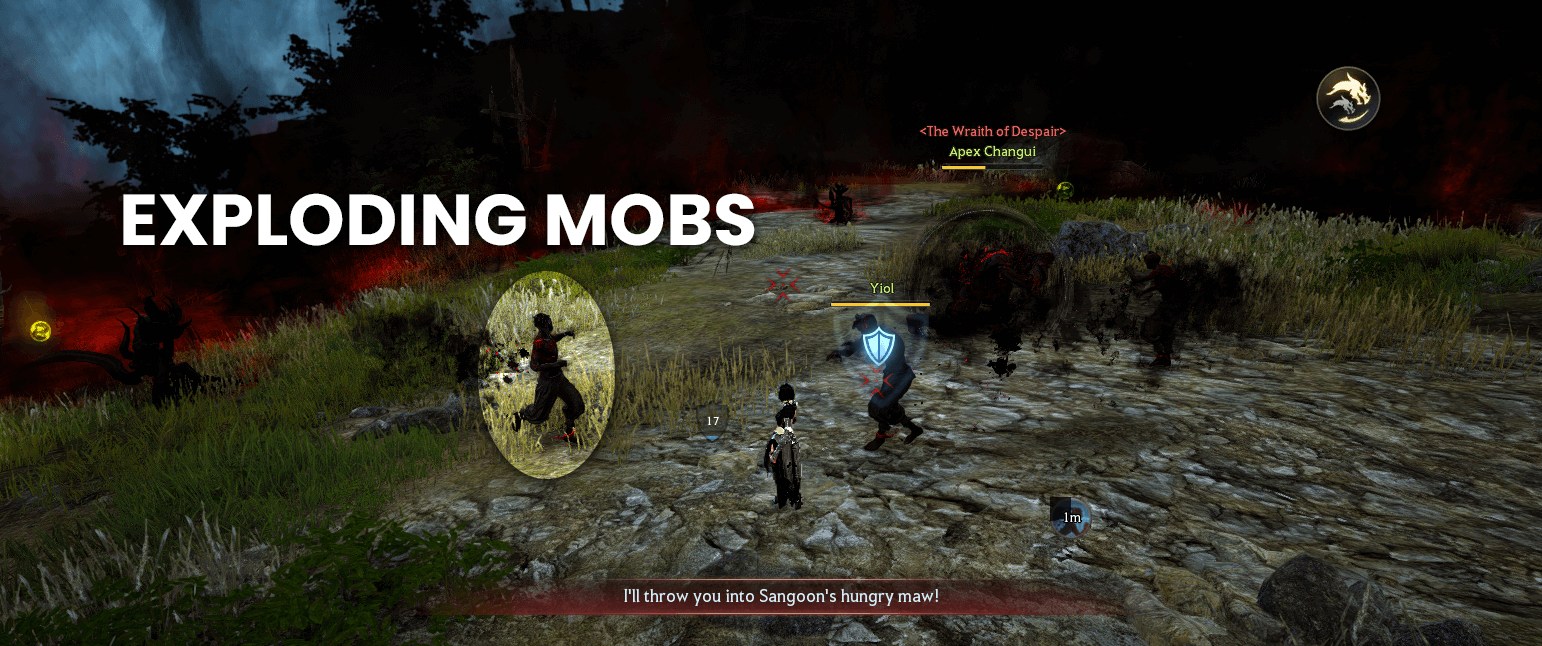
I'll throw you into Sangoon's hungry maw!
60% HP:
- Apex Changui begins enters an animation and that gives him forward guard and a DP buff

- Attack him from the front to attack his block otherwise he'll be healed and gain a DP buff
- After destroying the block, Changui raises his hands and starts charging an ability for 10 seconds.
- Hit him from behind to be able to push past this phase otherwise he ll take less damage
Hehehe… Sangoon will have a feast today!
- To stop the one-shot ability you have to apply 4 Crowd Controls by attacking him from behind
- The CC skills should have more than 5 hits to make sure that they apply
- If you can't do this or are struggling, you can hit (V) to emergency escape, the one shot is easy to dodge with V.
40% HP:
- Once he hits 40% he becomes invincible for 15 seconds.
- Watch out for the fire that spawns here, though its not all that threatening
- From this point you have around 5 minutes to finish off the boss or you'll fail
20% HP:
- At this point Apex Changui will summons three enemies (If you're on Calamity 6+ he'll summon 4).
- You have to kill the elites within the next 50 seconds or Apex Changui will use a one shot ability
- If successful, the following message will appear to show you were successful.
No! I--I Betrayed my own kind...to the tigers!
Apex Changui will then do an AoE attack, just use a guard or iframe to dodge it as normal. After the AOE, Changui becomes vulnerable and can be finished off.
Extra difficulty levels have been added that require the use of your own gear rather than Light orbs, the entry requirements for each boss difficulty are as follows:
| Boss Difficulty | Required Stats |
| Calamity 8 | 360 Displayed AP |
| Calamity 9 | 370 Displayed AP |
| Calamity 10 | 380 Displayed AP |
 C-8 Boss Blitz Reward: Apex Changui (Ranks 1 to 9)
|
|
| Guaranteed Loot | Chance-based Loot |
|
- Tear of Illusion
- Embers of Hongik x17-20
- Memory Fragment x8-15
- Sangpyeong Coin x104-110
- Black Stone x38-44
- Sealed Black Magic Crystal x5
- Imperfect Lightstone of Fire
- Trace of Nature x10-17
- Essence of Dawn x18-19
- Trace of Thunderbolt (for Rank 1)
- Gold Bar 1,000G x2
|
 - Dahn's Gloves
- Deboreka Earring
- PRI (I) Deboreka Earring
- DUO (II) Deboreka Earring
- Flame of Hongik
- Faint Origin of Dark Hunger
- Essence of Taebaek
- Crystal of Harmony
- Crystal of Darkness
- Crystal of Bitterness
- Crystal of Decimation
- Bonghwang's Tear
- Haetae's Tear
- Girin's Tear
- Resplendent Lightstone of Fire
- Trace of Thunderbolt (for Ranks 2 to 9)
|
|
C-9 Boss Blitz Reward: Apex Changui (Ranks 1 to 9)
|
|
| Guaranteed Loot | Chance-based Loot |
|
- Tear of Illusion
- Embers of Hongik x17-20
- Memory Fragment x8-15
- Sangpyeong Coin x104-110
- Black Stone x38-44
- Sealed Black Magic Crystal x5
- Imperfect Lightstone of Fire
- Trace of Nature x10-17
- Essence of Dawn x18-19
- Trace of Thunderbolt (for Rank 1)
- Gold Bar 1,000G x2-3
|
- Dahn's Gloves
- Deboreka Earring
- PRI (I) Deboreka Earring
- DUO (II) Deboreka Earring
- Flame of Hongik
- Faint Origin of Dark Hunger
- Essence of Taebaek
- Crystal of Harmony
- Crystal of Darkness
- Crystal of Bitterness
- Crystal of Decimation
- Bonghwang's Tear
- Haetae's Tear
- Girin's Tear
- Resplendent Lightstone of Fire
- Trace of Thunderbolt (for Ranks 2 to 9)
|
|
C-10 Boss Blitz Reward: Apex Changui (Ranks 1 to 9)
|
|
| Guaranteed Loot | Chance-based Loot |
|
- Faint Origin of Dark Hunger (for Rank 1)
- Tear of Illusion
- Embers of Hongik x17-20
- Memory Fragment x8-15
- Sangpyeong Coin x104-110
- Black Stone x38-44
- Sealed Black Magic Crystal x5
- Imperfect Lightstone of Fire
- Trace of Nature x10-17
- Essence of Dawn x18-19
- Trace of Thunderbolt (for Ranks 1 to 9)
- Gold Bar 1,000G x3
|
- Dahn's Gloves
- Deboreka Earring
- PRI (I) Deboreka Earring
- DUO (II) Deboreka Earring
- Flame of Hongik
- Faint Origin of Dark Hunger (for Ranks 2 to 9)
- Essence of Taebaek
- Crystal of Harmony
- Crystal of Darkness
- Crystal of Bitterness
- Crystal of Decimation
- Bonghwang's Tear
- Haetae's Tear
- Girin's Tear
- Resplendent Lightstone of Fire
|
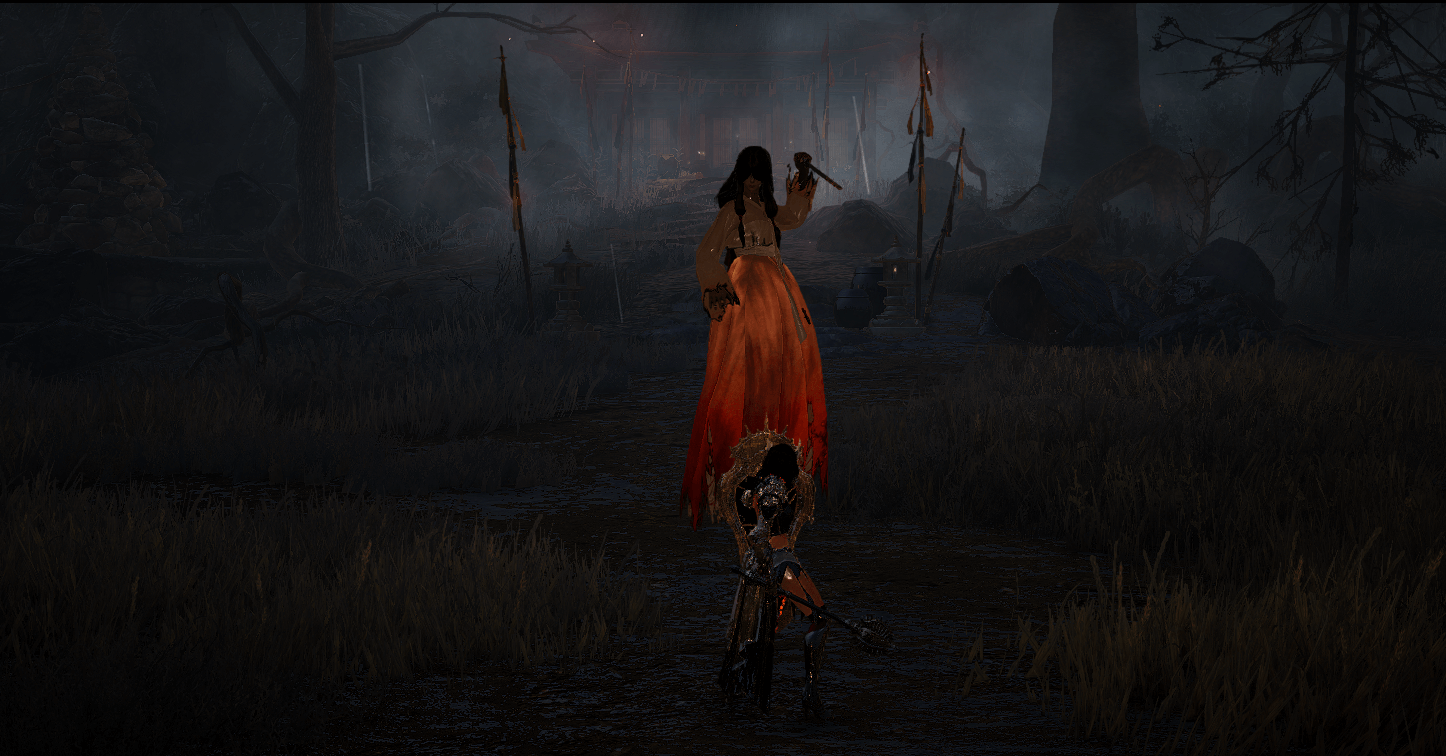
Bari

Bari is one of the easier bosses, especially if you play a class with high mobility. She'll focus on teleporting around her battle arena, so if you can keep up with her she'll go down pretty fast.
Watch out for the zombies that litter the area, they'll explode and apply a stiffness CC.

Bari's other main gimmick is that she summons other bosses to help her in battle, each will have a message prompt.
Yes! Here he comes! The great god general is here!
Bari will teleport and a summon a golden knight to attack you, It's best to use either a forward guard or iframe
Hey, wanna play tag? But you're it! Hehehe!
When Bari hits 50% or 25% HP she can summon Gumiho that will do it's howling attack
How pathetic. You'll soon be torn apart by my teeth
Bari summons Sangoon to use its roar attack, getting hit by it will debuff your Attack Speed and Skill Cooldowns.
Insolent fools, face the thunderous rage of Duoksini!
Bari summons two Duoksini that launch an AoE attack, these can do huge damage and even one hit you, so be careful.
“There will be no place in this forest where my curse will not reach!
Bari will use AoEs around her, be careful because they're also a knockdown CC. Either dodge, forward guard or iframe the AoEs.
Move towards the centre of the arena to Dangsan Tree and attack it until it reaches 85% HP. This stuns Bari for a while, making her an easy target.
Calamity 6 + : When Bari dips below 50% HP she'll make 3 copies of herself, if you hit the wrong copy then she'll fire projectiles at you.
General God, protect the Dansan Tree!
Once Bari gets below 80% of her Max HP, she'll summon a Golden Knight that will spam out attacks every couple of seconds.
Songakshi

Songakshi is another boss with dangerous one shots but she can be pretty fun to fight because there's a lot to dodge and pay attention to, though there's also a 12 minute time limit.
Songakshi Clones: Sometimes Songakshi briefly disappears and reappears while summoning clones around and you'll hear her laugh.
You can look for the original who will be the only one basic attacking you, hit her to dispell the clones.
If you don't find her she can one shot you or nuke your forward guard to 0. You can stop her back attacking you by staying at the edge, but honestly the original is easy enough to spot.
Teleportation Mechanic: After teleporting, Songakshi stands still and laughs. Use a Stun or Stiffness cc on her while she's standing still.
This'll stun her for a few seconds and if you don't CC her she'll one shot you.
Scream Attack: You'll hear Songakshi scream then she'll do a large AOE circle around her which will knock you down even through a forward guard, make sure you iframe.
70% HP: Songakshi teleports and reappears, summoning a large circle AOE in front of her, this can deal some pretty nasty damage, it can one hit you and will debuff you even if you survive it.
Get behind her to stay safe and get in some back attack damage. You'll know when this mechanic is active because she'll also give the message:
How dare you try to trick me with that ugly face?
50% HP: Parts of the arena will go dark, just stay in the light. The dark areas will be attack with a wind attack. This mechanic will happen about every minute or so. You'll see the message prompt below:
Where are you my love? You didn't just leave and abandon me, did you?
Mechanics for Calamity 6+:
- At 50% she'll do a large circle AoE that makes the ground black, stay outside the black ground area.
My Love...Don't tell me you've forgotten me...? Ahahaha! Now, shall we wander this world together?
- Songakshi summons several clones in the center of the boss room.
- To identify the real Songakshi, look for blood dripping down her face and dress, if you hit the wrong clone you'll be one shot.
Bamboo Legion

Bamboo Legion functions a little differently to other bosses, instead of just being 1 on 1 in an open arena, you have to make your way through the forest fighting off the legion before spawning the boss.
You can use Calamity 1 to wander through the forest to learn the route, i'd recommend doing this to get used to the pathing.
Once you learn the route, this will be one of the easiest bosses to defeat.
There are mini-bosses you'll have to face, an Archer, a Sword user and a Spearman There's also an 11 minute timer.
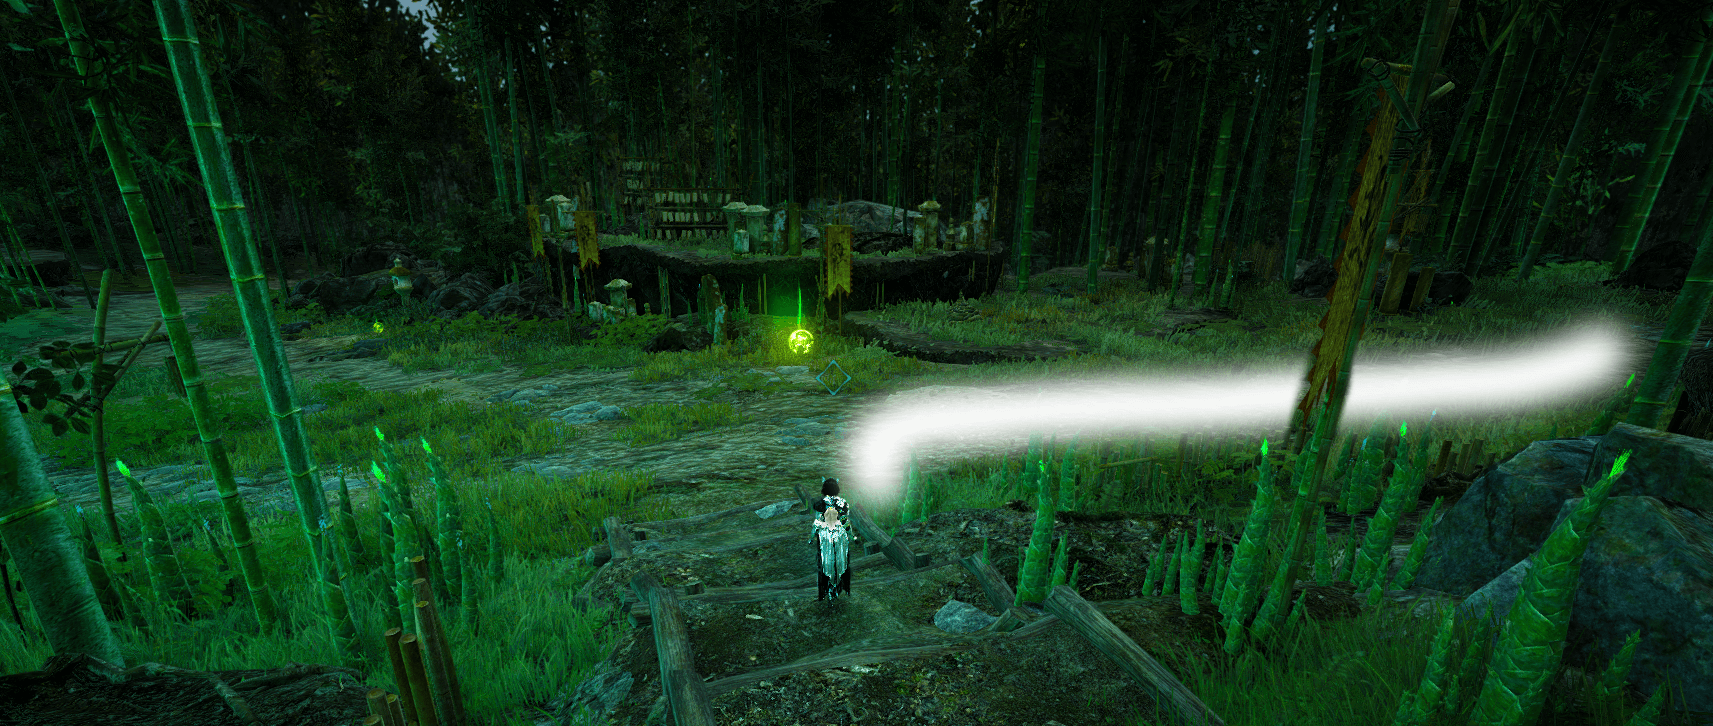
Since you'll have to make your way through the forest, here's images to help.You'll start out at the top of a stair case, head down deeper into the forest:

At the bottom of the stairs we'll head to the right, you can see the yellow boss beacon in through the trees:

The first mini boss you'll come to is the Archer type captain:
The mini bosses are simple, kill the Elite named mobs when they glow purple as they'll have a DP debuff. Once the Elite mobs die, the Mini boss will be DP Debuffed.
The purple mobs can also be CC'd and will then turn red to show that they are CCed.
This will be the mechanic through all the bosses, even the final main boss. For the main boss the Elites will be the mini bosses that you've previously fought.
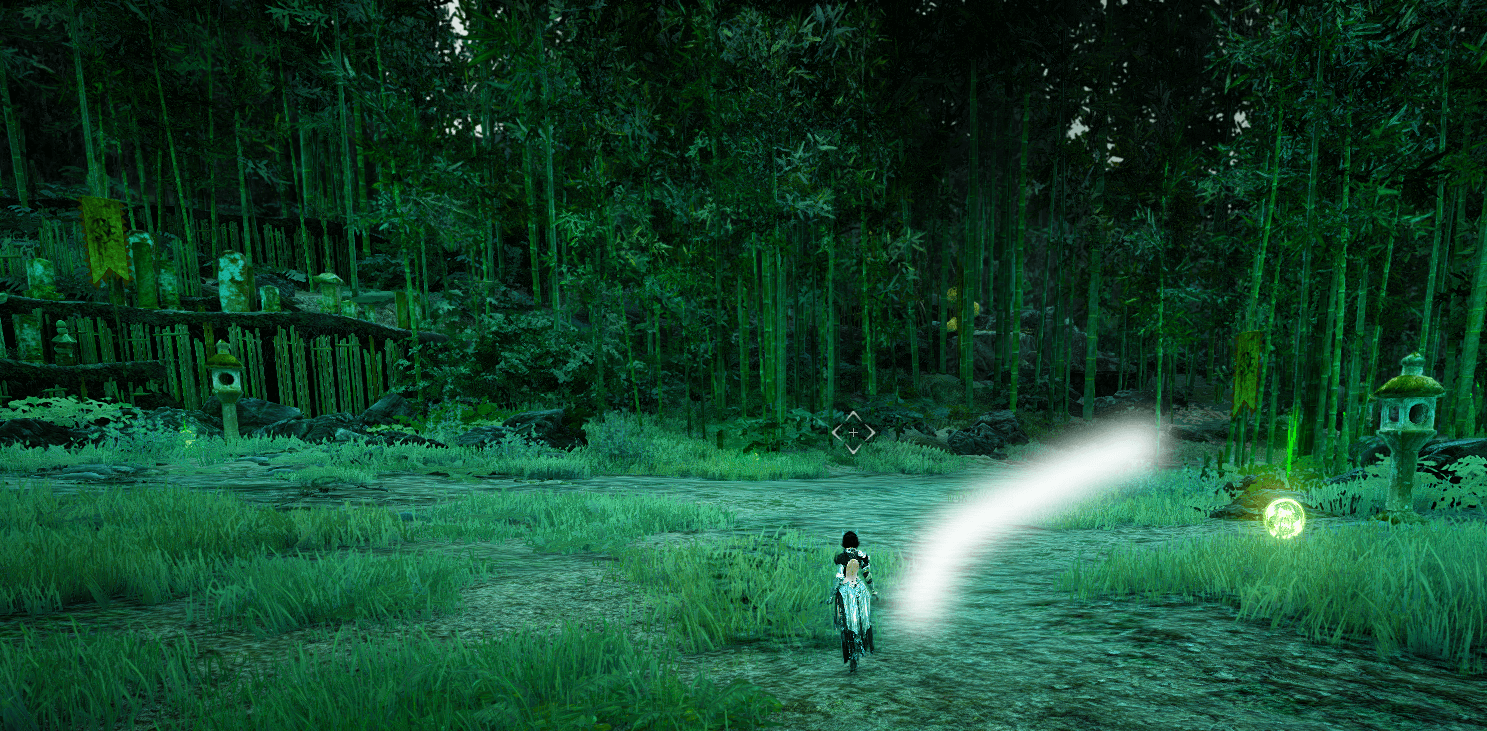
After defeating the Archer, we'll head further down the right, following the path down more stairs: 
Once we're at the bottom of the stairs, we're going to head to the right again towards the next mini boss.
After that you'll see the mobs from above along with the yellow boss beacon, just head down the hill to them:

Then you'll come to the next mini boss, here's an example of the purple aura that was mentioned previously.

After beating the mini boss, turn around towards the hill you just came down, then run towards the rocks between the bamboo trees.

When you make it on to the rocks, just keep heading forward along the path until you come to a cross road

At the cross road, you'll be able to see another yellow beacon through the trees, go left into the main boss room.

Run through the main boss room over to the right, we still have to fight the last mini boss before the main boss will spawn.
Defeat the last mini boss tucked away in this small section of the forest and then head back to the main boss room.

With the main boss, the mini bosses will spawn acting as the elites, kill them first to make the main boss turn purple.
Once he turns purple, hit him with a CC then the DP debuff will apply allowing you to burst him down and get some good damage in on him.
Be careful for the blue shrines around the final boss area, especially in higher Calamitys.
Destroying the blue shrines will stop more enemies from being summoned by the leader and at higher levels they can swarm you.

If you play a class with good AoE life leeches, you can use this to your advantage to keep your HP high along with a draught with life leech, but its easier to destroy the shrines.

Like other bosses at these difficulties, you'll rely on your equipped gear stats for combat, rather than Light Orbs, here's the list of requirements for these new levels!
| Boss Difficulty | Required Stats |
| Calamity 8 | 360 Displayed AP |
| Calamity 9 | 370 Displayed AP |
| Calamity 10 | 380 Displayed AP |
Because of the increased requirements, the rewards have been adjusted to match:
 C-8 Boss Blitz Reward: Bamboo Legion (Rank 1-9)
|
|
| Guaranteed Loot | Chance-Based Loot |
|
- Tear of Illusion
- Embers of Hongik x17-20
- Memory Fragment x8-15
- Sangpyeong Coin x104-110
- Black Stone x38-44
- Sealed Black Magic Crystal x5
- Imperfect Lightstone of Wind
- Trace of Nature x10-17
- Essence of Dawn x18-19
- Trace of Thunderbolt (for Rank 1)
- Gold Bar 1,000G x2
|
- Dahn's Gloves
- Deboreka Earring
- PRI (I) Deboreka Earring
- DUO (II) Deboreka Earring
- Flame of Hongik
- Faint Origin of Dark Hunger
- Essence of Taebaek
- Crystal of Harmony
- Crystal of Darkness
- Crystal of Bitterness
- Crystal of Decimation
- Bonghwang's Tear
- Haetae's Tear
- Girin's Tear
- Resplendent Lightstone of Wind
- Trace of Thunderbolt (for Ranks 2 to 9)
|
|
C-9 Boss Blitz Reward: Bamboo Legion (Rank 1-9)
|
|
| Guaranteed Loot | Chance-Based Loot |
|
- Tear of Illusion
- Embers of Hongik x17-20
- Memory Fragment x8-15
- Sangpyeong Coin x104-110
- Black Stone x38-44
- Sealed Black Magic Crystal x5
- Imperfect Lightstone of Wind
- Trace of Nature x10-17
- Essence of Dawn x18-19
- Trace of Thunderbolt (for Rank 1)
- Gold Bar 1,000G x2-3
|
- Dahn's Gloves
- Deboreka Earring
- PRI (I) Deboreka Earring
- DUO (II) Deboreka Earring
- Flame of Hongik
- Faint Origin of Dark Hunger
- Essence of Taebaek
- Crystal of Harmony
- Crystal of Darkness
- Crystal of Bitterness
- Crystal of Decimation
- Bonghwang's Tear
- Haetae's Tear
- Girin's Tear
- Resplendent Lightstone of Wind
- Trace of Thunderbolt (for Ranks 2 to 9)
|
|
C-10 Boss Blitz Reward: Bamboo Legion (Rank 1-9)
|
|
| Guaranteed Loot | Chance-Based Loot |
|
- Faint Origin of Dark Hunger (for Rank 1)
- Tear of Illusion
- Embers of Hongik x17-20
- Memory Fragment x8-15
- Sangpyeong Coin x104-110
- Black Stone x38-44
- Sealed Black Magic Crystal x5
- Imperfect Lightstone of Wind
- Trace of Nature x10-17
- Essence of Dawn x18-19
- Trace of Thunderbolt (for Ranks 2 to 9)
- Gold Bar 1,000G x3
|
- Dahn's Gloves
- Deboreka Earring
- PRI (I) Deboreka Earring
- DUO (II) Deboreka Earring
- Flame of Hongik
- Faint Origin of Dark Hunger (for Ranks 2 to 9)
- Essence of Taebaek
- Crystal of Harmony
- Crystal of Darkness
- Crystal of Bitterness
- Crystal of Decimation
- Bonghwang's Tear
- Haetae's Tear
- Girin's Tear
- Resplendent Lightstone of Wind
|
Sangoon

Sangoon can be intimidating due to the start of the fight, but honestly once you get used to his patterns he's pretty middle of the pack in terms of challenge.
Pay attention to the big red circles and you'll mostly be fine, there's a lot of chances for back attacks to increase your kill time, so watch out for those.
I'll make you regret ever stepping foot in this place!
At the start of the fight Sangoon uses a ranged roar skill that will CC you then nuke your HP to 30%. If you want you can use Emergency Escape (V) to dodge it.
You'll heal back up pretty fast passively, you can avoid burning your V so early but it's not really needed throughout the fight
Sangoon will also start with an AP / DP buff as well, you can get rid of them by CCing him.

You'll see a non-spoken system message "You feel a chill down your spine" and then Sangoon will leap into the air, trying to land down on you.
Dodge the AoE with an iframe and then hit him with either a Stun, Stiffness or Floating CC while he glows yellow. After you CC him, he'll lose one of his buffs, usually his DP one.
He'll also be open to attack, so hit him from behind for extra back attack damage which can help shred his HP if he lost his DP debuff.
How pathetic. You'll be soon torn apart by my teeth.
This message will appear once he hits 80% HP, he'll then use two knockdown attacks, they're not hard to dodge.
Sangoon will then roar and start charging a strong attack, this is a DPS check. Get behind him for back attacks and deal as much damage as you can.
Kahahaha! I shall tear you to pieces with these claws!
You'll see this message when Sangoon has hit 50% HP, rocks will fall from the ceiling, avoid them as they can do a lot of damage.
These rocks will then stick around, you'll need to hide behind the largest one you can find for cover.
During this time, Sangoon will move to the centre of the arena to use a one shot attack, he'll use it twice in a row, hide behind the rocks for safety.

I shall kill all who walk on two feet.
This is the message that plays before the one shot skill, just stay behind the rocks and you'll be safe. Once the rocks are gone, burst him down to hit the next phase.
The Tiger Palace begins to shake and rocks start to fall.
If you want to leave this place, you'll have to die to do so!
Fight Sangoon towards the centre of the arena as rocks will fall around the edge of the arena, watch out for the red circles of Sangoon's AoEs and you'll be fine for this phase.
I am the ruler of the Tiger Palace of Taebaek, Sangoon!
Sangoon will begin charging in the centre of the arena and will spam AoE attacks in different patterns. There'll be obvious ways to avoid them.
When you enter this phase you'll only have 50 seconds to burst down Sangoon otherwise you'll be hit with a one shot and fail.
Calamity 10 Sangoon
Calamity 8, 9, and 10 bosses are being introduced to the game, with Sangoon being added for some special extra rewards. However the bosses work a little differently to other difficulties.
Unlike Calamity 7 and below, Calamity 8, 9 and 10 no longer use the custom stats given by the light orb and instead you must rely on your own regular gear score.

Entering these difficulties requires certain gear score as you can see by the Required AP section in the image above and materials for Voltarion can be given as part of the rewards.
| Boss Difficulty | Required Stats |
| Calamity 8 | Displayed AP 330 |
| Calamity 9 | Displayed AP 350 |
| Calamity 10 | Displayed AP 350 |
Here are the available rewards for the different levels of difficulty:
 C-8 Boss Blitz Reward: Sangoon (Rank 1 to Rank 9)
|
|
| Guaranteed loot | Loot obtained by chance |
|
- Essence of Dawn x5-6
- Gold Bar 1,000G x2 - Memory Fragment x8-13 - Embers of Hongik x15-18 - Sealed Black Magic Crystal x3 - Imperfect Lightstone of Earth x1 - Trace of Nature x10-15 - Black Stone x34-40 - Sangpyeong Coin x84-90 |
- Dahn's Gloves (Evasion/Damage Reduction)
- DUO (II) Deboreka Earring - PRI (I) Deboreka Earring - Deboreka Earring - Flame of Hongik - Essence of Taebaek - Crystal of Harmony - Crystal of Darkness - Crystal of Bitterness - Crystal of Decimation - Bonghwang's Tear - Haetae's Tear - Girin's Tear - Resplendent Lightstone of Earth - Tear of Illusion |
|
C-9 Boss Blitz Reward: Sangoon (Rank 1 to Rank 9)
|
|
| Guaranteed loot | Loot obtained by chance |
|
- Essence of Dawn x8-9
- Gold Bar 1,000G x2
- Memory Fragment x8-14
- Embers of Hongik x16-19
- Sealed Black Magic Crystal x4
- Imperfect Lightstone of Earth x1
- Trace of Nature x10-16
- Black Stone x36-42
- Sangpyeong Coin x94-100
- Tear of Illusion x1
|
- Dahn's Gloves (Evasion/Damage Reduction)
- DUO (II) Deboreka Earring
- PRI (I) Deboreka Earring
- Deboreka Earring
- Flame of Hongik
- Essence of Taebaek
- Crystal of Harmony
- Crystal of Darkness
- Crystal of Bitterness
- Crystal of Decimation
- Bonghwang's Tear
- Haetae's Tear
- Girin's Tear
- Resplendent Lightstone of Earth
|
|
C-10 Boss Blitz Reward: Sangoon (Rank 1 to Rank 9)
|
|
| Guaranteed loot | Loot obtained by chance |
|
Essence of Dawn x14-15
- Gold Bar 1,000G x2
- Memory Fragment x8-15
- Embers of Hongik x17-20
- Sealed Black Magic Crystal x5
- Imperfect Lightstone of Earth x1
- Trace of Nature x10-17
- Black Stone x38-44
- Sangpyeong Coin x104-110
- Tear of Illusion x1
|
- Dahn's Gloves (Evasion/Damage Reduction)
- DUO (II) Deboreka Earring
- PRI (I) Deboreka Earring
- Deboreka Earring
- Flame of Hongik
- Essence of Taebaek
- Crystal of Harmony
- Crystal of Darkness
- Crystal of Bitterness
- Crystal of Decimation
- Bonghwang's Tear
- Haetae's Tear
- Girin's Tear
- Resplendent Lightstone of Earth
|
Gumiho

Gumiho is one of the most challenging bosses in the Black Shrine, this fight uses special items that interact with the mechanics of the fight.
![]() Red Gourd,
Red Gourd, ![]() Blue Gourd and
Blue Gourd and ![]() Green Gourd can be used throughout the fight. If you lose these items you can grab some more from NPC Seungsan.
Green Gourd can be used throughout the fight. If you lose these items you can grab some more from NPC Seungsan.
You can find Seungsan at Yeowoo Pass, here's his location:

Gumiho has a series of attacks that will be used the entire fight, they'll show you them in Phase 1.
Fire Breath: Gumiho breathes fire in a forward cone AoE, avoid them because they can do pretty nasty damage. Since its animation is long, you can use this as a back attack DPS opportunity.
Growl Attack: Gumiho will jump behind you and growl then unleash flames in a 360 AoE that can do a lot of damage.
Gumiho Clones: Two clones of Gumiho will spawn, the easy way to find the real one is by looking at their HP bars, the clones will have full HP bars.
The original also has red and green on it's necklace but the clones don't. Hitting the original will dispell the clones.
Blue Flames: Gumiho can scatter blue flames around the boss arena, after a while Gumiho will slam the ground with their tail, making the flames explode into small AoEs.
Hey, wanna play tag? But- You're- "It"! Hehehe!
When this message starts, you've hit Phase 2. Gumiho's necklace will change to only 1 colour before they disappear.
Two clones will drop down and one of them will have the same colour necklace as Gumiho had before disappearing. Kill that clone.
If you lower a clone's HP to 50% or 25% HP both clones will be stunned, so if you can, group up the clones and AoE them down, just make sure you only kill the one with the correct necklace.
This is where you can use the ![]() Green Gourd when fighting Calamity 4 Gumiho and below.
Green Gourd when fighting Calamity 4 Gumiho and below.
Using the ![]() Green Gourd on the clone with the wrong necklace while its stunned (at 50% or 25% HP) will let you entangle it for around a minute or so, giving you a much easier time in fighting the correct clone.
Green Gourd on the clone with the wrong necklace while its stunned (at 50% or 25% HP) will let you entangle it for around a minute or so, giving you a much easier time in fighting the correct clone.
Oh, you're tough, huh? Well, how about this!
This message alerts you to the start of Phase 3 and the arena will begin flooding with blue flames, the flames do a lot if you stand in them.
The ![]() Blue Gourd can be used to put out the blue flames, but it can only be used twice.
Blue Gourd can be used to put out the blue flames, but it can only be used twice.
Watch out for Gumiho using a shield as it can restore some of their HP and give them an AP buff.
Tail Shield: Watch out for Gumiho raising their tails over their head to protect themselves, the shield animation will be really obvious.
Get behind Gumiho and use a Knockdown or Stun CC in order to stun them, CCing them will prevent them from gaining an AP buff and healing.
You can practice delaying your CC in order to burst down some of Gumiho's HP with back attacks while they're stationairy in this state.
How...How are you able to withstand my Foxfire?
This marks the start of the next phase and Gumiho will disappear again. This time they'll summon 3 mini Gumiho clones which are squishy but deal a lot of damage.
When you finish off one of the mini clones you need to use the ![]() Red Gourd to properly defeat them, otherwise they'll respawn.
Red Gourd to properly defeat them, otherwise they'll respawn.
After the wave of 3, there'll be a wave of 6 then and finally a wave of 9. Make sure you use the ![]() Red Gourd each time you take a mini Gumiho to 0 HP.
Red Gourd each time you take a mini Gumiho to 0 HP.
You dare repay my kindness with Emnity? Then, die!!
This is just a repeat of Phase 1, Gumiho will just use their standard attack patterns with no additional mechanics to worry about.
Gumiho C8 to C10
The new difficulty has been added for Gumiho, letting players fight them at Calamity 8 to C10. These difficulties all use your own personal gear rather than the usual Boss Blitz mechanics.
Here are the needed gear requirements for each Calamity level:
| Calamity 8 | Calamity 9 | Calamity 10 |
| 345+ Displayed AP | 355+ Displayed AP | 355+ Displayed AP |
From defeating the boss you can get the following rewards:
 C-8 Boss Blitz Rewards: Gumiho (Ranks 1 to 9)
|
|
| Guaranteed Loot | According to a Set Probability |
|
- Essence of Dawn x7–8
- Gold Bar 1,000G x2
- Memory Fragment x8–13
- Embers of Hongik x15–18
- Sealed Black Magic Crystal x3
- Imperfect Lightstone of Earth x1
- Trace of Nature x10–15
- Black Stone x34–40
- Sangpyeong Coin x84–90
- Trace of Thunderbolt (upon opening Rank 1 reward)
|
- Dahn's Gloves (Evasion/Damage Reduction)
- DUO (II) Deboreka Earring
- PRI (I) Deboreka Earring
- Deboreka Earring
- Flame of Hongik
- Essence of Taebaek
- Crystal of Harmony
- Crystal of Darkness
- Crystal of Bitterness
- Crystal of Decimation
- Bonghwang's Tear
- Haetae's Tear
- Girin's Tear
- Resplendent Lightstone of Earth
- Tear of Illusion
- Trace of Thunderbolt (upon opening Ranks 2 to 9 rewards)
|
|
C-9 Boss Blitz Rewards: Gumiho (Ranks 1 to 9)
|
|
| Guaranteed Loot | According to a Set Probability |
|
- Essence of Dawn x10–11
- Gold Bar 1,000G x2
- Memory Fragment x8–14
- Embers of Hongik x16–19
- Sealed Black Magic Crystal x4
- Imperfect Lightstone of Earth x1
- Trace of Nature x10–16
- Black Stone x36–42
- Sangpyeong Coin x94–100
- Tear of Illusion x1
- Trace of Thunderbolt (upon opening Rank 1 reward)
|
- Dahn's Gloves (Evasion/Damage Reduction)
- DUO (II) Deboreka Earring
- PRI (I) Deboreka Earring
- Deboreka Earring
- Flame of Hongik
- Essence of Taebaek
- Crystal of Harmony
- Crystal of Darkness
- Crystal of Bitterness
- Crystal of Decimation
- Bonghwang's Tear
- Haetae's Tear
- Girin's Tear
- Resplendent Lightstone of Earth
- Trace of Thunderbolt (upon opening Ranks 2 to 9 rewards)
|
|
C-10 Boss Blitz Rewards: Gumiho (Ranks 1 to 9)
|
|
| Guaranteed Loot | According to a Set Probability |
|
- Essence of Dawn x18–19
- Gold Bar 1,000G x2
- Memory Fragment x8–15
- Embers of Hongik x17–20
- Sealed Black Magic Crystal x5
- Imperfect Lightstone of Earth x1
- Trace of Nature x10–17
- Black Stone x38–44
- Sangpyeong Coin x104–110
- Tear of Illusion x1
- Trace of Thunderbolt
|
- Dahn's Gloves (Evasion/Damage Reduction)
- DUO (II) Deboreka Earring
- PRI (I) Deboreka Earring
- Deboreka Earring
- Flame of Hongik
- Essence of Taebaek
- Crystal of Harmony
- Crystal of Darkness
- Crystal of Bitterness
- Crystal of Decimation
- Bonghwang's Tear
- Haetae's Tear
- Girin's Tear
- Resplendent Lightstone of Earth
|
Duoksini

Duoksini has a time limit of 12 minutes, if you can't defeat him in the time limit then you'll be hit with a one shot, he also has a lot to dodge, which can make him pretty difficult mechanically.
I, Duoksini, the Dokkebi king, will punish you all!
At the start of the fight Duoksini will immediately charge a skill to pull you to him and deal huge damage, stay away from him at the start of the fight.
Wait for him to come to you. It's best to stay away from the centre of the boss arena because of the mechanics he'll use during the fight.
I will crush and subdue all Mr.Kims!
This message alerts you that Duoksini is at 80% HP. Watch out because now he'll summon blue and yellow spirits to help him.
The spirits look like floating flames, the blue spirit will buff Duoksini while the yellow spirit debuffs you while healing the boss.
You don't have to do anything special here, just keep bursting him down to the next phase.
Rude Mr.Kims! Taste my lightning!
Duoksini will raise his arm into the air and start charging blue flames, he'll also block in coming damage.
The blue circle on the floor is easy to dodge but the fire will remain in place for the rest of the fight, keep them away from the centre of the arena. It'll also summon 2 blue spirits, kill them to stop them buffing Duoksini
The yellow circle is lethal, it will one shot you if it hits. It also summons two yellow spirits that you need to kill immediately or they'll heal the boss and debuff you.
Duoksini also has another pull attack where he'll raise up both of his arms, it'll damage through forward guard so its best to iframe it or keep your distance.
The auras of the sun and moon will make us stronger!
This phase happens when Duoksini is at 50% HP, he'll then teleport to the centre of the arena.
Above him will be a Red Sun or a Blue Moon symbol above his head, pay attention to which one it is.
Monsters will spawn in the arena with the two different symbols, rush down the monster with the same symbol as Duoksini and kill the monster.
They'll always spawn in the same place so remembering where they spawn can increase clear times in the future.
What...how could this be...?
If you kill the correct monster, Duoksini will be stunned in the centre of the room, this is why you needed to avoid the blue flames getting to the centre earlier.
Rude Mr.Kims! Taste my lightning!
Duoksini will revert back to this phase when the stun ends, though usually he'll start out with the yellow spirits attack this time so be careful.
Soldiers! Punish the Mr. Kims!
His Duoksini with a Stun CC in order to CC him and grab another DPS window that you can use to burst him down
I, Duoksini, the Dokkebi king, will punish you all!
If you fail to CC Duoksini he'll target you with a huge blue AoE attack and summon Dokkebi's to attack you.
This attack will still nuke you through Forward guard, but its relatively safe to use if you're not confident with an iframe.
Do not underestimate the power of kkebifire!
This message will appear when Duoksini is at 20% HP, he'll teleport to the centre of the arena and try to heal himself by drinking his potion.
There'll be three dokkebii, one of them will have a blue charging aura to stop him from healing, kill this dokkebi.
If you're not sure which one it is, you can kill all 3 of them.
Soldiers...what in the world is going on?!
Duoksini will be stunned from the last phase, take this time to burst him down and finish the fight.
Duoskini has been given the new difficulty modes, with faster and more powerful attacks than in Calamity 7 and below,
the minimum AP requirement has been set to the same level as the recently updated Oduksini Calamity 8-10.
| Boss Difficulty | Required Stats |
| Calamity 8 | 365 Displayed AP |
| Calamity 9 | 375 Displayed AP |
| Calamity 10 | 385 Displayed AP |
Here are the rewards for the new difficulties:
 C-8 Boss Blitz Reward: Duoksini (Rank 1 - 9)
|
|
| Guaranteed | Chance-based |
|
- Tear of Illusion
- Embers of Hongik x20-23 - Memory Fragment x15-20 - Sangpyeong Coin x105-120 - Black Stone x50 - Sealed Black Magic Crystal x5 - Imperfect Lightstone of Earth - Trace of Nature x15-17 - Essence of Dawn x20-24 - Trace of Thunderbolt (from Rank 1 reward box) - Gold Bar 1,000G x2 - Essence of Dawn Box |
- Dahn's Gloves
- Deboreka Earring - PRI (I) Deboreka Earring - DUO (II) Deboreka Earring - Flame of Hongik - Faint Origin of Dark Hunger - Essence of Taebaek - Crystal of Harmony - Crystal of Darkness - Crystal of Bitterness - Crystal of Decimation - Bonghwang's Tear - Haetae's Tear - Girin's Tear - Resplendent Lightstone of Earth - Trace of Thunderbolt (from Rank 2 - 9 reward boxes) |
|
C-9 Boss Blitz Reward: Duoksini (Rank 1 - 9)
|
|
| Guaranteed | Chance-based |
|
- Tear of Illusion
- Embers of Hongik x22-24 - Memory Fragment x20-25 - Sangpyeong Coin x105-120 - Black Stone x50-55 - Sealed Black Magic Crystal x5 - Imperfect Lightstone of Earth - Trace of Nature x20 - Essence of Dawn x21-24 - Trace of Thunderbolt (from Rank 1 reward box) - Gold Bar 1,000G x2-3 - Essence of Dawn Box x2 |
- Dahn's Gloves
- Deboreka Earring - PRI (I) Deboreka Earring - DUO (II) Deboreka Earring - Flame of Hongik - Faint Origin of Dark Hunger - Essence of Taebaek - Crystal of Harmony - Crystal of Darkness - Crystal of Bitterness - Crystal of Decimation - Bonghwang's Tear - Haetae's Tear - Girin's Tear - Resplendent Lightstone of Earth - Trace of Thunderbolt (from Rank 2 - 9 reward boxes) |
|
C-10 Boss Blitz Reward: Duoksini (Rank 1 - 9)
|
|
| Guaranteed | Chance-based |
|
- Faint Origin of Dark Hunger (from Rank 1 reward box)
- Tear of Illusion - Embers of Hongik x22-24 - Memory Fragment x20-25 - Sangpyeong Coin x110-125 - Black Stone x50-55 - Sealed Black Magic Crystal x5 - Imperfect Lightstone of Earth - Trace of Nature x20 - Essence of Dawn x23-25 - Trace of Thunderbolt - Gold Bar 1,000G x3 - Essence of Dawn Box x3 |
- Dahn's Gloves
- Deboreka Earring - PRI (I) Deboreka Earring - DUO (II) Deboreka Earring - Flame of Hongik - Faint Origin of Dark Hunger (from Rank 2 - 9 reward boxes) - Essence of Taebaek - Crystal of Harmony - Crystal of Darkness - Crystal of Bitterness - Crystal of Decimation - Bonghwang's Tear - Haetae's Tear - Girin's Tear - Resplendent Lightstone of Earth |
Imoogi

Imoogi is a little different to the other bosses, you're limited in the amount of space you have to fight him and will have to pay attention to dodge his attacks while he's invulnerable.
His mechanics can feel clunky and the AoE spam on the platform can make him a tricky boss to fight. A lot of people recommend playing this on Remastered to ensure you can see all the boss effects.
An ominous energy can be felt from the stone lantern.
Before you can damage Imoogi, you have to focus down the lantern in the centre of the platform, after a little while the lantern will stop taking damage and you'll get more messages.
The platform will be struck with several attacks and AoEs that you'll have to survive for a little while, when the lantern stops, you'll be able to DPS Imoogi while he's debuffed for 40 seconds.
After this, there's only two main phases that Imoogi has for the rest of the fight.
While you can't attack Imoogi, watch out for the attack before his breath attack and his bite attack as both of these can Stun you if they land.
Imoogi's scales are falling off.
If you get this message it means Imoogi has hit 25% HP and he'll retreat back into the water to safety. Try to avoid the dark black clouds near the boss otherwise tornado AoEs will spawn.
When you can't attack Imoogi any more, burst down the lantern again to draw him out of the water.
At 0% HP a cutscene will play and Imoogi's HP will reset for Phase 2.
As soon as the cutscene ends you'll be attacked with a breath attack, you can either Forward Guard or iframe it.
A tidal wave will follow, rushing over the platform, iframe through the oncoming wave to avoid it.
After this, there will be an Earth, Moon and Sun aura phase each with their own mechanics.
Earth Aura:
- Run over to the rain clouds when they appear, then move near the Stone lantern
- This will trigger a whirlwind attack on top of it, avoid it and wait for the next message
The earth's aura dissipates, carried by the waterspout.
- Green Earth Aura orbs will spawn lightning one of the orbs won't have a lightning effect
- Destroy all green orbs with the lightning effect, and then wait for the "mysterious energy" message to appear.
- Watch out for his fire breath that he casts on the lantern after this message as this can be fatal
- Once the message appears you can burst down the final green orb
- You'll get another message to confirm that you've completed the mechanic correctly
The earth's aura has imbued the stone lantern.
After this Imoogi will re-emerge from the water and can be damaged but he'll still attack you during this time so be careful.
Moon Aura:
- Run to the rain clouds and then to the lantern to spawn a tornado on the platform
- Two Full Moon-shaped orbs with lightning will spawn, there's also a half moon one without lightning
- Destroy one orb without the lightning effect first, followed by one orb with the electric effect
- A red tornado will spawn, this time, stand in it until the "mysterious energy" message appears
The moon's aura has imbued the stone lantern.
Again this will draw Imoogi out of the water and you'll be able to attack him again.
Sun Aura:
- Stand in rain clouds near the Stone lantern to activate the tornado attack like usual
- This time look for sun orbs with lightning effects around the platform's edges
- You'll need to defeat the sun orbs with water splash effects behind them
- Afterwards burst down the central sun orb that doesn't have a lightning effect
The sun's aura has imbued the stone lantern.
Imoogi will do a sweeping attack here that can be deadly, its a knockdown and can do a huge amount of damage or even kill you.
Look out for him swinging his body from right to left, if you see him do it, run to the other side of the platform to safety.
Final Phase:
- Inspect the lantern in the center of the platform and find the missing symbol (Earth, Moon, or Sun).
- Destroy the orb that matches the missing aura symbol.
- Imoogi will re-surface and you'll be able to attack him, this will repeat until the boss is defeated.
Black Shrine Rewards
After you successfully defeat bosses in the Black Shrine, on Sunday at 00:00 (server time), you will receive rewards based on your kill record and ranking.
Basically you'll be given an RNG bundle that you can obtain the following items in:
|
Boss Blitz Reward (Example :Golden Pig King) |
|
|
|
– RMB to obtain all of the following items: Imperfect Lightstone of Fire Sealed Black Magic Crystal Memory Fragment Sangpyeong Coin Trace of Battle Embers of Hongik Black Stone (Weapon) Black Stone (Armor)
– Obtain the following items according to a set probability: Dahn's Gloves Flame of Hongik Bonghwang's Tear (Calamity 8 - 10) Haetae's Tear (Calamity 8 - 10) Girin's Tear (Calamity 8 - 10) Deboreka Earring (Calamity 6 - 7) Bonghwang's Crystal (Calamity 5 - 7) Haetae's Crystal (Calamity 5 - 7) Girin's Crystal (Calamity 5 - 7) Bonghwang's Fragment (Calamity 1 - 4) Haetae's Fragment (Calamity 1 - 4) Girin's Fragment (Calamity 1 - 4) Jewel of Illusion (Calamity 4 - 10) Tear of Illusion (Calamity 4 - 10) Essence of Taebaek Crystal of Harmony Crystal of Darkness Crystal of Bitterness Crystal of Decimation Resplendent Lightstone of Fire |
|
Rewards by Rank (Example: Calamity 10 Golden Pig King) |
|
|
|
|


There was also a change made to enhance the rewards from Calamity 1-7 that added Essence of Dawn and Gold Bars to the rewards obtainable from Calamity 2-7 in Black Shrine.
| Calamity | Grade | Added Rewards |
| 2 | Rank 1 | Essence of Dawn x0-1 |
| Rank 2 | ||
| Rank 3 | ||
| Rank 9 | ||
| 3 | Rank 1 | Essence of Dawn x1 |
| Rank 2 | ||
| Rank 3 | ||
| Rank 9 | ||
| 4 | Rank 1 | Essence of Dawn x1 Gold Bar 100G x2 |
| Rank 2 | ||
| Rank 3 | ||
| Rank 9 | ||
| 5 | Rank 1 | Essence of Dawn x1 Gold Bar 100G x5 |
| Rank 2 | ||
| Rank 3 | ||
| Rank 9 | ||
| 6 | Rank 1 | Essence of Dawn x2 Gold Bar 1,000G x1 |
| Rank 2 | ||
| Rank 3 | ||
| Rank 9 | Essence of Dawn x1-2 Gold Bar 1,000G x1 |
|
| 7 | Rank 1 | Essence of Dawn x4 Gold Bar 1,000G x1 |
| Rank 2 | ||
| Rank 3 | ||
| Rank 9 | Essence of Dawn x3-4 Gold Bar 1,000G x1 |
Black Shrine Journal
When completing a Calamity level for the first time you'll be given an extra reward bundle through a journal, this journal also gives a small amount of stats.
Currently you're able to get rewards from defeating a boss for the first time on Calamity levels 1-7, meaning each boss will give you extra rewards 7 times.

For completing the journal you'll also receive +12 Max HP, +20 Accuracy, +12 Stamina and +10LT Weight Limit Increase.
Have you been enjoying the Black Shrine game mode? Maybe you've got a favourite boss to fight? Let us know!