Muiquun's Red Player/Karma Guide
Muiquun's complete guide to Karma and Redlife

By sklema
Published: Mar 22, 2024
Updated: Apr 18, 2026
70,516
48

Introduction
Hello from Muiquun o/.
We are a Permared group from the EU region.
This guide's purpose is to make information about redlife more readily available.
In this guide we will cover the karma system within Black Desert in detail, the different types of reds, how negative karma affects the way you play, the penalties tied to negative karma and more.
Reading the entire guide is not essential, and you can skip to parts you require more information about on the left or in the table of contents above. If you have any more questions after reading the guide or need any help, feel free to join Permared community on the Muiquun Community Discord, comment on the YouTube channel, or PM us on Reddit.
The Family wide Karma System
The karma system shows which players actively kill in open world pvp, and those who only kill to defend their spot or would rather solve issues amicably.
In Black Desert, there are two karma states ranging from 300,000 (Maximum Positive) and -10,000,000 (Ten Million, Maximum Negative). Your karma is viewable from your character stats screen (Escape > F2 > 1 or just P on your keyboard) and should look something like the below image. Your karma is indicated by the first symbol on the left under status, and naval karma under that.

As well as this menu, your character's name colour will also reflect your karma. Your name will range from shades of blue to white if you're at positive karma, and will go from white to varying shades of red if you're at negative karma. There's also another state (green) which indicates the player is not PVP ready (under Lv50) even with your family karma being negative, this green character can not be killed by PVP.
Depending on your karma, your PVP icon (circled in white) to the right of your name will change colour. At first it will start out as a light red, turning into a brownish orange, a pinky-purple then becoming a deep red as shown below

You are able to lose karma by killing wild animals, Calpheon protestors and on some grind spots (up to maximum -500 karma, the grind spots will recover the lost karma instantly) but most karma loss is going to be given by flagging (Alt+C/forced PVP) on another player for any reason.
The first initial hit up on flagging is always -3k karma.
On a player kill, you lose karma based on a varying ratio (from -50k to -120k) depending on the gap in your AP+DP (minimum loss when your AP+DP is a lot lower and max loss when your AP+DP is a lot higher than the enemy).
Karma loss for killing Player Horses is -20k and for Wagons -100k.
When killing an enemy that does flag on you first, is negative karma, is on Marni server, a nodewar is active that you participate in or they are a war enemy, you will not lose Karma! This also goes for negative karma players!
Basics of Negative Karma Penalties & What To Expect
Whilst you are a Red Player or just simply negative karma, there are certain penalties to your deaths except during a nodewar, duels, in a PVP arena or if your guild has been declared for war; these penalties also extend to Arsha servers.
As a general overview, when blue during PVP death you lose nothing and on PVE death you lose XP and have a very low chance for crystals to break.
When red however, dying in PVP means you will always lose 2% of your XP* and will lose between 2-6 (2-4 in PVE) magic crystals per death on average. Also between 0-4 lightstones can break on death while negative karma. Depending on the amount of crystals that are equipped, the chance of lightstones breaking gets a lot slimmer.
Upgrades for Sovereign Weapons can not break.
If you were to die in PvE either to monsters (including World & Field Bosses**) or to guards in towns, the normal PVP death penalties will occur as well as the chance for your gear to downgrade. The only way to mitigate the downgrade is to slot magic crystals into a crystal preset and apply it.
While being negative karma, you are not protected from losses when someone feeds you to monsters.
To be protected the other person has to alt+c. Because you are negative karma, the alt+c does not apply to you.
The best crystals for red life and avoiding downgrades will be explained further down and in more detail later.
Overall the system follows a simple rule for PvE deaths.
If a positive karma player loses crystals/xp on death, the negative karma player will also have all penalties applied. If the positive karma player loses nothing, it is also safe for the negative karma player
(Dieing to an NPC while PvPing can still apply death penaltys while negative karma!)
When negative karma you are completely free of death penalties from:
Arena of Arsha, Battle Arena, Town Arenas, Red Battlefield
Arena of Solare, Node War, Conquest War, Guild War Declarations, Scroll Bosses, Guild Bosses, Boss Blitz (Black Shrine), Pit of the Undying, Fall Deaths, Player Duells, World Bosses, Edania Throne fight (10v10), Edania Bosses.
(Though, Jordine is currently bugged and will sometimes pop them).
Do be careful as soon as a Node/Conquest war ends penalties will return.
There's also no death penalty in Seasonal/Regular Atoraxxion Dungeons but there is a death penalty in Elvia Atoraxxion Dungeons and Orzekea grind spots, except in the final boss rooms.
As an Edania (after winning the throne through the PVP gamemode), you are completely free from all death and kill penalties until the next Edania has been chosen, even while negative karma. This comes with several other benefits such as: Free world chat, full hp instant revive, no channel swap cooldown, and a teleport to your owned castle. These penalties return once you leave your territory, but whether you are inside or not is indicated by an icon above your head as of 28/08/25's patch.
As a Red Player, you will face a lot of struggles. These will range from being PKed in a safezone (or even your own house), to being hunted because you killed the wrong person.
It's not all downsides though, a negative karma player will be very hard to camp as when you die and respawn to a safezone (also known as a node), you will respawn randomly between the three closest nodes to you. Spawning to town, however, is consistent and will respawn to the closest town. You are also free to kill just about anyone given you have the skill and gear.
* Using Elion's/Fairy tears completely negates this XP loss
** Scroll, Some Bosses & Black Shrine Bosses are the exception to this and do not punish you on death.
Crystals + Gear Penalties & How To Avoid Them
Crystals being the one of the only ways to stop a gear downgrade, not all of them are equal.
With yellow crystals you can be saved from gear degrades with 7 of them equipped!
(Exception, ex-blue grade crystals. More infos in the table down below)
Less gear i.e., no gloves equipped, as well as a lower chance of the crystal breaking, heightens the chance of a downgrade by a lot.
Gear and crystals will never degrade and break at the same time, it will always be one or the other.
Tuvala items (like the armour and weapons) cannot be re-enhanced to HEX once degraded, this is confirmed to be correct as per ambassador contacts and CMs.
The new Sovereign crystals are completely safe from breakage, as well as Dawn crystals.
Yellow border (Black Magic) crystals are safe as long as they have a high chance to break, but you can still downgrade with as many as six of them equipped (7 are needed to be save), and are all in all very risky to run if you plan on PvPing in spots where mob feeding is easier.
Red border (Ancients) crystals are the least safe crystal to run as even with a full set of ancient crystals equipped, we were still able to downgrade within a few deaths.
Whilst we have researched and found this out, we are not sure of the actual percentages. Our estimates are below.
| Crystal Grade |
Protection % (Estimate) |
| Yellow EX-blue grade crystals (Includes following yellow grade crystals: Magic crystals of infinity - [Special attack], [Armor], [Max HP], [MP Recovery], [Submergence]) |
100% WARNING. This is something that is likely to change in the future. So keep an eye on the patch notes! |
 Yellow Yellow |
~15% |
 Red Red |
~5% |
Outfit crystals won't break and also seem to affect the downgrade chance, but we have not researched into it as it would take too much in the way of resources. You can also use trade items to protect from crystal loss and degrade but is considered completely unviable as even with a maxed weight limit, you cannot carry enough trade items to protect them 100%; lightstones have a slight protection rate ranging from 5-20% but are by no means a viable resource of gear protection that should be considered.
It's important to include that accessories have not, do not and will not downgrade at all.
An optional video demonstrating our research can be found here
Further Death Penalty Reduction
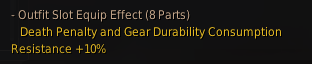
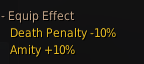
Penalty reduction is a Pay to Win (P2W) aspect of redlife. It allows you to completely negate any gear penalties and XP loss incurred by death via RNG. Outfit chest piece grants you 10%, having all 8 outfit parts equipped grants you another 10% and using 5 of the specific P2W pets from the pearl shop grant you 4% each at tier 4 plus one pet at tier 5 (5%). It is also possible to buy the fairy skin “Kibelius”, giving another 5%. Putting the penalty reduction cap at 46%.
Example with 4x t4 and 1x t5 pet, outfit and fairy skin:


Naval Fame (Sea Karma)
There's also a separate stat underneath your normal land karma that indicates whether or not you're a pirate (maximum of 300k positive naval fame and minimum of -10 million negative naval fame). Naval fame is also family wide and will be used on all of your characters. One of the penalties for negative sea karma, like normal karma, is forced naval PVP in a safezone both on land and on the sea.
The other penalties consist of:
Not able to use normal wharf managers; you will have to go to Kuit (Pirate) Island in order to repair and resupply.
Like gear, at least one of your ship's items will drop an enhancement level if it is destroyed.
At the current moment the Muiquun community is actively testing the Naval Fame content and we will soon deliver a big update to this section!
What Is A Red Player?
A Red Player is simply someone who is negative karma, and shouldn't be confused with a Permared player. The main distinction being that a Permared player always has negative karma, whereas an average red player will often switch between the two states.
Different Red Playstyles
Being red is all about how you want to play and doesn't follow just one set of rules or a meta. The most common forms of being red are:
Permared - Always keeping your main character's karma negative.
Semi Red - Swapping between positive/negative karma on your main character, usually to defend your spot or just to murder people.
Bounty Hunter - Going negative for a task or a request. They enjoy hunting and are often used to kill protected players of enemy guilds.
Desert Red - Spending most/all of your time in the desert whilst negative karma. Due to the desert mitigating the punishments to being red, this used to be a common way to play.
Pirate - Any player with negative naval fame.
Whilst most of them fall into either semi red or Permared, not all of them fit into a certain box. Different red players have different personalities. Some of them will find and kill AFK players who are lifeskilling, others will only kill in self defence or to protect their spot. In the end, it boils down to what kind of red you want to play as.
Negative Karma And The Game
Black Desert's negative karma drawbacks aren't just limited to losing crystals and xp on death like explained in Basics of Negative Karma Penalties & What To Expect. It also extends further into the game. As a negative karma player, guards will begin to hunt you as you walk/ride by.
Most guards can be outscaled by pure DP, damage reduction, and evasion, but the guards in Duvencrune, Grana and O'draxxia deal percentage damage, making these an awful choice as a home base if you plan on going negative.
Different types of guards and how to avoid their damage/ccs will be explained further down.
At night time, some cities will have more or less guards and most of them can CC you.
In game, time zones will also affect night/day as Grana has its night one hour later than Valencia (in game time).
When negative you also cannot use any non-degradable gear. This includes the TET versions of Jetina gear (the PENs work fine), Oasis TRI gear, and any non-degradable quest gear will not work (including the Narchillan set.). However, items like: base Fallen God, base Labreska, and base Godr-Ayed weapons are fine to use when negative karma. When in doubt, consult the item descriptions as they will often times say something along the lines of “※ The item effects are not applied if your character has negative karma.”
As for tagging and tagged gear, tagging works fine without any issues and the XP share can be used to level up other characters that you don't die on.
(XP change coupons can be used to transfer the level from the tag over to the main char)
Cloning gear while negative karma is not possible.
Gear can be cloned before going negative karma, but dying on a negative karma char with cloned gear makes the cloned gear disappear entirely.
The gear on the main char is not affected by this in any way.
Negative karma includes all of your characters.
This also includes Trial chars, and most importantly, Season chars.
Season chars can not flag up on normal (non-arsha) season servers, because these servers count as PVP free zones. They can still be killed by other players without any way to defend themselves.
It is recommended to play a red season char always on season Arsha or normal server.
As well as these penalties, you also are completely unable to access certain functions and areas within the game, most notably the instanced private grind spot (Marni Realm, Edania Marni, Golden Pig Cave).
The Desert
The desert as a red player used to be a safe haven, as none of the normal death penalties (PVP & PVE degrades) apply there. Whilst negative if you die in the desert to mobs, and decide to respawn town, you will always respawn in Muiquun. This makes the journey easier, as you can take your gear off in Sand Grain and die to Desert Nagas. You can also hop to Valencia through the new fast travel system implemented (Magnus) as well as by using a traveller's map.
Muiquun is mostly a useless town, as it's still a safezone and you're still able to be PKed by blue players.
Not many people play around the desert anymore, but it still is very much possible. There's only one risk when negative in the desert and that's dying to a player and being sent to jail.
In the desert there's also an outlaw status that is given to you regardless of your karma state when you PK someone outside of GvG and Nodewars. This status will prevent you from going to the battle arena, RBF, Magnus and the likes. If you are killed with this effect, you will be sent to jail.
The effect lasts 30 minutes (or until you're jailed)* and does not apply on Arsha (PVP) servers.
The outlaw status does not affect guild manor TPs, and you are still able to teleport to them whilst flagged as an outlaw. You also do not need to unflag.
After entering the jail you will get a 60 minute debuff. You can either wait it out and then simply leave the jail by talking to the npc next to you, you can also try to escape the jail by escaping through the maze or doing the quest offered by the jail guard.
The quest tells you to farm 180 Sulfur ur yourself and give it to the guard. You can then simply escape by talking to him again. To finish this quest quickly, high gathering mastery, the use of Agris, the use of a gathering quantity increase pet and the use of the gathering minigame (Golden touch) is recommended.
The jail is a maze filled with powerful mobs that do not apply any death penalties. Below is a map that will help you get your bearings in the jail and hopefully help you leave.
To get through the jail you need to run, but you have a heavy slow effect on your character that makes dodging the mobs a lot harder. This effect will be removed after escaping.
To guarantee an easy escape out of the jail it is recommended to max out max hp, hp recovery, % movespeed and using a Trina axe.
Max HP and HP Recovery can be maxed out with crystals, lightstones and food buff etc. Movespeed can be maxed out by having max Stat Boost speed, using a Khalk Elixir or Charm Perfume and some class passives.
The Trina axe allows you to jump with a boosted jump allowing you to counter the slowed jump speed from the debuff.
For more details and an detailed explanation, check out our video
“Muiquun | How to escape the desert jail - Traditional way! -”

After escaping the jail if you are positive karma, you will be placed at the Illiab Oasis and as a red player, you will be placed at Muiquun. You will also regain 30,000 land karma upon escaping.
It's important to note that grind spots like Gahaz and Upper Sulfur do NOT count as the desert and that it's important to not treat it like such, as you do run the risk of downgrading on PvE death. The easiest way to tell if where you're grinding is in the desert is to check your map, if you cannot see your position then you are in the Desert**.
*Reds will always go to jail when killed in the desert (Exeption Arsha)
** You can still see the map even in the desert, when you have a compass activated.
Muiquun City
As described before, Muiquun is sadly useless for many reasons but it is useful for short stays after a long grind at Pila-Ku or Desert Fogans to repair gear, access the marketplace and just relax for a moment. The NPCs here will refuse to interact with blue players, giving them no reason to be there except for griefing.
Overall, Muiquun's positioning is awful and just isn't worth spending time in. The grind spots it's surrounded by are also not very good and aren't worth the time aside from the grinding for the map pieces.
Muiquun isn't just useless for this, however. It's treated as a normal safezone, meaning you still can't fight back in Muiquun if you're attacked by a blue player. The guards (at the entrance) of Muiquun also deal lower damage than the normal city guards, so even lower geared blue players can still stay safe in the city without any fear.
The only real benefit to Muiquun is that you don't receive any penalties when you're killed in the city, but this doesn't negate the fact that there are very few benefits.
Muiquun's Quests
Aside from the design of the city itself, while at negative karma, the NPCs of Muiquun will offer you certain quests. These range from dailies to even a main quest offering knowledge that allows you to maximise your energy or to get elephant gear for your guild*.
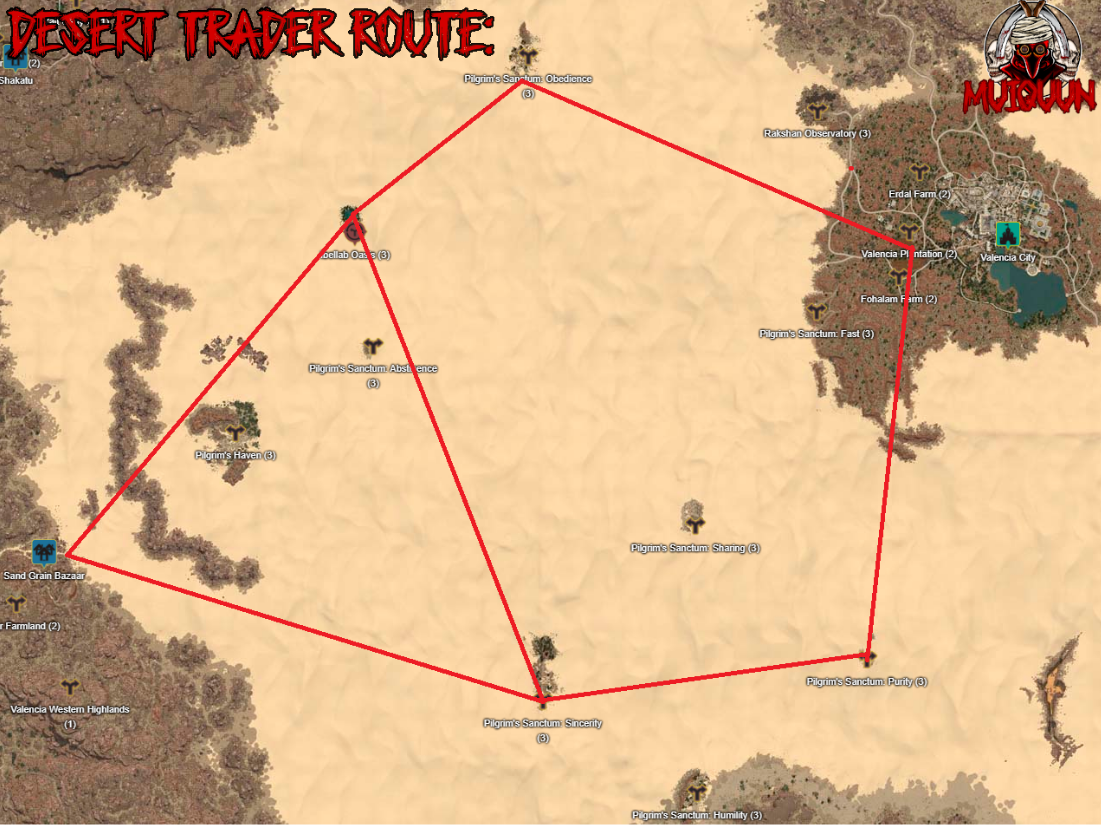
The main quest is called “Muiquun's Law” and can be started at the NPC named Bertod. The quest line is relatively simple except for the final quest with the desert traders.
The desert traders are a large group of melee mobs, ranged mobs and 2 traders sat on camels. In order to kill this caravan you must activate forced PVP (Alt+C) and every kill will decrease your karma further (-350,000 to kill the full caravan).
The mobs themselves deal quite a lot of damage at lower DP brackets and will CC you through your protections and ignore the CC counter. Killing the normal mobs will net you raw silver drops, but after killing the traders (recommended to be killed last), you can get some worthwhile items such as Blue Whale Tendons/Molars, 1G gold bars and even the very small chance to get a piece of the Rich Merchant Ring. They also drop trade items, which can be very inconvenient as they force you to put away your weapon and limit you from fighting any more mobs.
Finding this caravan can be quite tedious and difficult as they follow a set path through the desert, but we have created a guide (below) to aid you in your search. Unfortunately, with this being a game developed by Pearl Abyss, the traders will sometimes get stuck.
The rest of the main quests are very self-explanatory and we will refrain from going into more detail here, however let us know through our Discord if you'd like a dedicated guide to the questline.
Aside from the main quest, there are a few repeatable quests you can do for small rewards such as HP/Mana potions, a 30% XP buff and a Muiquun supply chest (RNG item, containing carrots, hunter seals and HP/Mana potions). These quests, in no particular order, are:
- [Daily] Argos Black Crystal - Kill 300 Crescent Shrine mobs
- Pila-Ku Extermination - Kill 100 Pila-Ku mobs
- The Happiest Moment - Kill 3 positive karma players (anywhere works, including the BA)
- [Co-op] Trade Raid: Kill a full trade caravan.
* For the elephant gear ([Guild] Capotia Golden Elephant Mask), you need Oberin's Gold which can be purchased from Oberin at the Ibellab Oasis.
Cities And Towns
For whatever reason, small towns like Glish or Keplan are filled to the brim with guards and are generally a big pain to navigate as a red player. The larger towns like Heidel (except for the ones listed under the main header), although you run the risk of being PKed, are generally much safer as they offer more space for mobility and there aren't as many guards.
The best towns without any Guards are following:
Valencia, Eilton, Old Wisdom Tree, All Desert Towns, Altinova (Only at night), All Land of The Morning Light towns, all winter region towns, all of Ulukita and all of Edania
The Guild Manor can be used for a quick trip to an instanced save zone for redplayers.
However, you are still able to be PKed and griefed through other instances of the same manor.
Staying Safe in Cities
Usually, you can be killed and griefed in safe zones with no way to fight back, but from the times of 10pm until 7am (Night time), red players are completely safe from PVP in cities and towns.
The tradeoff for this is that guards will cc you during this time. Despite the minimal damage they deal it can be annoying if you're moving items to and from your storage/warehouse. This can be easily avoided by exploiting rooftops, using mousemove to interact with NPCs or sitting on a mount to tank the damage without getting cc'd.
Sitting on a wagon stops the guards from aggroing on you and also players can not attack you while being in a safezone!
Mouse movement also helps when you don't have the DP yet to tank the damage of the guards.
This can be activated by going into:
ESC > Settings > Interface > Mouse Interface > Use Mouse to Move and sliding it on.
Here are a few example locations where accessing NPCs via mousemove and rooftops is crucial to not getting attacked whilst in storage or market place.
Velia and Heidel Storage


Red Life
Classes
It is completely possible to go red on all classes in BDO and boils down to personal preference.
However, when searching for a class to go red on, you should prioritise mobility, burst and survivability. For example, a class like Musa who's designed around SA trading is not automatically the best choice (but still very much possible), whereas Ninja/Kuno are better as they give you a lot of burst mobility, damage and also have access to a 15+ second invisibility and overall very good survivability.
If you're looking for the most meta way to choose a class for permared or just red activities in general, you should prioritise a few things: The aforementioned burst, mobility and survivability, as well as:
Their engage/disengage potential. This will allow you to take control of the fight by choosing when to stop and when to start. This is tied somewhat to mobility as being able to get in and out quickly is of utmost importance.
Their TTK (Time To Kill). Focusing on how long a fight will last, their 1vX capabilities and so on. Being able to end a fight quickly will allow you to avoid huge 1vX situations.
Finally, their overall survivability and tankiness. Being able to engage and be engaged by one or more enemies is always useful. Good Iframes and good SA mobility skills as well as a good amount of AoE CCs to stop the enemy.
PVP As A Red
In addition to a good class, most of your chances at survival depend on where you start the fight. Always fight in an area you don't instantly feel at a disadvantage. If it does become unavoidable, take it more as training than a serious fight.
When fighting in a 1vX situation, you need to be completely unwavering in your confidence and ability. Unfortunately, these are not completely avoidable and when the fight becomes too much, always know you have the option to leave.
As you PVP, you will notice that a lot of people use Elion's to revive themselves, it's always a smart idea to watch and wait for a second to make sure they don't revive and attack you in the back. If they respawn, it's also a good idea to figure out where they've respawned to, in order to prevent the same scenario of you getting caught unaware.
Also try to avoid fighting close to nodes. Player will always respawn there and can instantly attack you. Thanks to the non existing loading screen they have nearly no waiting time.
When you respawn out of PVP after dying, you receive a short, temporary invincibility period that is nullified by taking out your weapon. Everyone receives this iframe on respawn, and it's a good idea to abuse it when in a tough situation i.e., getting spawn camped.
Even while using Emergency escape (V), pets with the ability “Hostility detection” will ping you and show the enemy where you V to, because you are seen as Hostile.
Only way to avoid this is trying to take changing paths while V'ing hoping that the pets did not ping your change of paths.
The pets will not ping you while being in invisibility (usable skills from Ninja, Kunoichi, Sorc, Sage)
It's also of great importance to understand that you can leave any fight, at any time, for any reason. Don't play into their provocation as they don't lose anything when they die, you do.
Leaving is nothing to be ashamed of.
As PVP is a very complex matter in BDO, we won't touch on it further as that would require a guide of its own. Here (Book of Combat) is a link to a well written guide showing you the basics and what to look for when PVPing.
Getting Hunted
As this is not a PVP guide, we'll keep it brief here. During your time as a red, you will be hunted by people and you will hunt people.
The easiest way to hunt people used to be knowing their character name and using the Robed Man but as of December 6th 2023, he was retired by PA and is no longer available for use. Now it's preferable to find guildies that will feed you information, or utilising the ranking system to find a player (i.e., a big grinder who is Lv66 appearing near #1).
As for shaking hunters off your trail, you have a few options. Firstly, you can swap channels or you can go into private mode via the character select, hiding your online status.
As a more blanket fix, you can hide all your character info on the official PA website.
If you're a red streamer, you can hide your channel information through Settings > Edit UI and hiding the channel info.
Grinding As A Red
As you are never safe and are permanently flagged for non consensual PVP, it's important that you look for empty spots to grind in peace.
Unfortunately, the Golden Pig Cave grindspot blocks entry for any karma <0.
This is also not a one-size-fits-all circumstance, as contested spots generally rely on the state of the game and not all of the top silver/hr spots are going to automatically be contested.
As of the writing of this guide some of the most contested spots are: Calpheon Elvia, Elvia Orcs, Stars End, Centaurs, Pot Spots (Manshaum, Ronaros, Blood Wolf etc.) and so on.
The general guideline we would use when trying to find an empty spot would be something like spots that not many people are willing to travel to or are difficult to get to like Sycraia (Lower). As well as spots that have a lot of rotations away from main roads and paths.
It's also important, when grinding, to have an escape plan ready when needed. Keep emergency escape available and quickslot a tough whale potion for its damage reduction buff to help in a pinch if someone attempts to feed you to mobs.
Using expensive crystals is perfectly viable to PvE with, just be wary of crystal protection rates. With how many grind spots there are, it's certainly feasible, but the risk of downgrading and losing crystals is still there!
Gearing Up
The gear progression changed a lot over the recent times. This section will soon be reworked!
The crystal section further down is still up to date!
Due to the evershifting meta that BDO's PVP resides in, gearing is a crucial step recommended to be taken before you go red. If you decide to go red before you're around 720+ gearscore, it will be drastically harder.
The following section of the guide will be referencing a example progress build prepared on garmoth.com
“Red Speedrun Example build”
As of the damage reduction and evasion changes and special evasion removal, to go red your requirement is being able to kill standard glass/non DP focused setups, the AP required to this varies from class to class but as an average rule 700-740 PvP AP (as shown on Garmoth's gear planner) is enough in most cases.
Gearing as newer/lower geared player looking to go red
Due to the aforementioned PvP AP, aiming for a higher PvP AP as early as possible is our priority.
The following build is primarily focused as a guideline for a brand new player looking to go red but if you are just generally low gear or wanting to look at red-viable gear then we'd recommend following along.
|
0 - Off-Limits items: While gearing as a red is generally similar, some items have karma requirements and are therefore not equippable:
Though this doesn't adjust progression massively, it does mean that you will have to reform items separate to your main gear and/or make use of boss exchange coupons. We also will NOT be going evasion within this guide. Evasion is reserved for much higher gear and should only be explored as an option once you reach the end of the guide. |
|
1 - Post-Season and free upgrades: We will start off assuming you have full PEN Tuvala armours and we will begin taking our free upgrades and setting up future ones. Upgrades:
Here you will want to do ALL of the above for the increase in stats.
While many people will contest the TET Off-hand, PRI Godr is EXTREMELY cheap on all servers for both the Main hand and Awakening weapons and so we will pick that up instead in the next section. This will also allow us to focus our Jetina off-hand on a Nouver instead of a Kutum as we will be reforming the following through Jetina:
These will be DIRECTLY swapped via a quest at Jetina, NOT via Fughar as it allows us to pick the DR options over Muskan's Shoes. Do note that you will not be able to equip these items if you have already gone red, so make sure to get 2 sets of PEN Tuvala if you do plan on going red this early on. If you are already negative karma at this stage, then make sure to swap your helmet to a Giaths Helmet via the boss exchange coupons.
Lastly is our choice in Jetina Accessories:
Another thing that people will contest however it fulfils a few of benefits over crescents.
|
|
2 - Progression to 700gs: From this point onwards it is just finishing Jetinas reforms and such and you will be 301-305AP + with a Nouver. With this level of AP and adequate buffs you will be able to gain a high enough PvP AP to kill somebody within a combo or contribute with ranged DPS in group fights dependent on your class, you will however be one-shot by most things in the game so this is of course a risky way to play.
From here you have a solid baseline for PvE and a good foundation we will build upon for PvP. I highly recommend following the Garmoth Planner from this point onwards to see how to optimally hit the brackets and what armours to upgrade first.
|
Once you're comfortable enough with your gear and ability, you can go red. It is very recommended that you test out your gear in BA (Battle Arena).
Crystals/Lightstones/Artifacts
As of January 4th 2023, the entire crystal system was overhauled*. There were several changes made to the system itself i.e., crystals being family wide.
This simplifies how crystals work and is a lot easier to understand for newer reds.
Unfortunately because of these changes a lot of basic crystals are very expensive or sold out.
Crystal choices are heavily influenced by the price of the crystal and what your class needs. Some classes need to stock up on accuracy while others just try to stack extra hidden AP or more evasion.
*Protection and degrades still work the same as before.
Detailed Crystal Guide
The majority of these crystals are cheap, most under 10 million silver and a large amount being even in the 2-5m range.
Just remember, crystal prices fluctuate over time, so always keep an eye out on the market of your region. The beneath is purely looking at EU market availability as well.
With the new system came a quality of life feature where you can swap crystals almost on-demand. Done so by holding the “ALT” key and clicking the preset you wish to bind. Using this has a small wind-up similar to the new “Escape Escape” timer. This is incredibly useful when grinding end-game spots where you need the more expensive “blue player” crystal sets.
Main Crystals:
Required!
The vast majority of builds should run these. Too much value to pass up.
Can only take 2 of each
| Crystal Name |
Notes |
|
Black Magic Crystal - Precision |
Best cheap acc |
|
Magic Crystal of Infinity - Max HP |
Best defensive crystal for a red, it's very much worth the 2 slots |
|
Magic Crystal of Infinity - Critical Hit |
One of the best damage increases we can get. |
Secondary Crystals:
Non filler crystals to take depending on build.
Can only take 2 of each
|
Crystal Name |
Notes |
|
Ancient Magic Crystal of Enchantment - Agility |
Best in slot evasion, very budget as well. 20 evasion is nothing to sneeze at |
|
Ancient Magic Crystal - Agility |
Second best in slot evasion crystal. |
|
Ancient Magic Crystal of Abundance - Armor |
Best in slot Damage reduction, very budget as well. 5 DR is nothing to sneeze at |
|
Ancient Magic Abundance - Armor |
Second best in slot DR crystal (+2dr). |
|
Black Magic Crystal - Ensnare |
Accuracy crystal |
|
Black Magic Crystal - Ascension |
Jump-Hight when needed for your class |
Best Filler Crystals:
Best bang for the buck filler with the best stats.
(Can be ignored when you are to low geared or the price is to high)
Add as needed.
|
Crystal Name |
Notes |
|
Combined Magic Crystal - Hoom |
“Filler” crystal, provides good tankyness. Note, you HAVE to run 2 or 4. MUST replace when they are lost, due to the stats coming only from the set effect. |
|
Combined Magic Crystal - Macalod |
“Filler” crystal, provides good dps. Note, you HAVE to run 2 or 4. MUST replace when they are lost, due to the stats coming only from the set effect. Good for PvE as well. |
Infinite Filler Crystals:
Use as a cheap fill up on crystals, when you do not want to spend a lot of silver or are low gear.
|
Crystal Name |
Notes |
|
Ancient Magic Crystal of Abundance - Healing |
+ 50 hp , +3 hp recovery |
|
Magic Crystal of Infinity - HP Recovery |
Recovers 3 hp on hit. Not very good but when you are very low gear, it is a nice and very very cheap filler. |
Niche Crystals:
Only for the most unique of setups.
|
Crystal Name |
Notes |
|
Magic Crystal of Infinity - Air Attack |
Very class dependent, only taken for very specific reasons. Back attack does have some use for PvE. |
|
Magic Crystal of Infinity - Absorption |
Has some use in PvE or as a pure DP build, but most of the time, not worth the loss of other stats. |
|
Ancient Magic Crystal - Carmae |
Gives 1 attack speed and 1 critical hit rate. Used with 4 food rotation, to make up the missing attack speed and crit hit rate. |
Expensive Tastes:
For the players with too much silver.
|
Crystal Name |
Notes |
|
Olucas' Crystal |
5 human damage, it's a bit expensive for PvP, but for human damage PvE spots, it's worthwhile. (ex: giants, bloody monastery, or abandoned monastery) |
|
Valtarra Spirit's Crystal |
+5 ap, +150hp. it's a bit expensive for PvP but depending on the current market price, its for endgame a must pick! |
|
Bonghwang's Fragment |
+4 ap, +5acc, +5dr, +7 eva |
|
Haetae's Fragment |
Best bang for your buck DP crystal, great for high dp meme builds who don't die often. |
|
Black Magic Crystal - Hystria |
Purely for PvP, it's somewhat affordable with a ton of stamina. Potentially worthwhile, but very niche. |
|
Black Magic Crystal - Viper |
Great accuracy additions, considering the lack of options we have these days |
|
Corrupted Magic Crystal |
Upgrade of “Magic Crystal of Infinity - |
|
Crystal of Frozen Bitterness |
The best defensive crystal. But veeeeery expensive. Use is only recommended for very high dp meme. |
Using expensive crystals is perfectly viable to PvE with, just be wary of crystal protection rates. With how many grind spots there are, it's certainly feasible, but the risk of downgrading and losing crystals is still there!
To get the best degrade protection using a full on expensive PvE crystal builds, you can either slot 1x Max HP. Or you slot 4x yellow grade crystal. (with the 4x yellow crystal builds, you will also need to have a full 16 crystals slotted in total!)
(example: 2x Power (+5 ap), 2x Ancient magic crystal resistance. Or just 4x Power)
Detailed Lightstone + Artifacts Guide
Artifacts:
Artifacts can be used for everything. They can not break on death.
It is the best choice so pick the artifact fitting to your current situation.
Examples are the very obvious differences between PvP and PvE choices.
The Dehkia Artifacts are a must have. After upgrading them to their Heralding version, they both give the best Defensive and offensive stats!
|
Artifact Name |
Stats | Notes |
|
Dehkia's Artifact - All Damage Reduction |
|
Best pick for dr classes. With Edania upgrade, 6 hidden ap gets added. |
|
Dehkia's Artifact - All Evasion |
24 evasion, 250hp, 50 stamina |
Best pick for evasion classes. With Edania upgrade, 6 hidden ap gets added. |
|
Artifact Name |
Stats | Notes |
|
Marsh's Artifact - Melee AP |
4 ap | Use vs dr or squishy targets |
|
Marsh's Artifact - Ranged Accuracy |
8 acc | Use vs dr or squishy targets Use vs evasion targets. Also good in combination with every lightstone combo, to always have more acc for possible enemy evasion |
|
Artifact Name |
Stats | Notes |
|
Lesha's Artifact - All Damage Reduction |
3 dr | For dr builds, use when surrounded by many players |
|
Lesha's Artifact - Melee Damage Reduction Lesha's Artifact - Ranged Damage Reduction Lesha's Artifact - Magic Damage Reduction |
6 melee/ranged/magic dr | For dr builds, swap as needed |
|
Lesha's Artifact - All Evasion |
6 eva | For evasion builds |
|
Lesha's Artifact - Melee Evasion Lesha's Artifact - Magic Evasion |
12 melee/ranged/magic dr |
For evasion builds, swap as needed |
|
Kehelle's Artifact - Max HP |
75 hp | Potentially good for specific classes, like caster and succ drak |
|
Kabua's Artifact |
100 hp 20 monster dr 7 monster ap 75 stam |
A bit unique. BIS hp, and great when fighting around mobs a lot BIS for PvE |
|
Artifact Name |
Stats | Notes |
|
Kehelle's Artifact - Max Stamina |
50 stam |
More iframes please |
|
Artifact Name |
Stats | Notes |
| Marsh's Artifact - Extra AP Against Monsters | 6 Monster ap | Budget BIS PvE artifact |
|
Kabua's Artifact |
100 hp 20 monster dr 7 monster ap 75 stam |
BIS PvE artifact |
Lightstones:
Lightstones can break on pvp and pve death while being negative karma, that is why it is important to minmax the use of the perfect lightstone set without spending too much money.
| Set Name |
Lightstone Combination |
Set Effect |
Notes |
| Savage |
4x Lightstone of Fire: Rage |
17 ap |
Use vs dr or squishy targets |
| Focused | 4x Lightstone of Fire: Marked | 28 acc |
Use vs eva targets |
| Set Name |
Lightstone Combination |
Set Effect |
Notes |
| Rigid Shield | 4x Lightstone of Earth: Iron Wall |
30 dr |
Great for DR stacking classes like valk, war, or nova |
| Centaurus | 4x Lightstone of Earth: Waves |
48 eva |
BIS evasion setup |
| Steel Shield | 2x Lightstone of Earth: Iron Wall 2x Lightstone of Earth: Waves |
18 dr 30 eva |
A bit of a niche setup for evasion. Efficient evasion to dr tradeoff. |
| Steel Heart |
4x Lightstone of Wind: Heart |
450 hp |
A bit of a niche setup for hp stackers, potentially good for succ drak or valks |
| Set Name |
Lightstone Combination |
Set Effect |
Notes |
| Trained Fists |
2x Lightstone of Fire: Rage |
14 ap 12 acc 75 stam |
Niche setup, be aware that replacing these will be a pain |
| Enhanced Focus |
1x Lightstone of Fire: Rage |
7 ap 24 acc 75 stam |
Niche setup, be aware that replacing these will be a pain |
| Improved Breathing |
1x Lightstone of Fire: Rage |
7 ap 12 acc150 stam |
Niche setup, be aware that replacing these will be a pain |
| Marathon |
4x Lightstone of Wind: Lungs |
250 stam |
More Iframes please |
| Set Name |
Lightstone Combination |
Set Effect |
Notes |
| Savage | 4x Lightstone of Fire: Rage | 17 ap | Budget BIS setup for PvE |
EXPENSIVE! Use at your own risk! These are very very good, but are very risky.
There are for sure more sets that are potentially worth using, but they won't be listed here.
| Set Name |
Lightstone Combination |
Set Effect |
Notes |
| The Wild: Humans | 3x Lightstone of Fire: Blight 1x Iridescent Lightstone |
30 human | Kind of niche due to the price, not many useful spots for it outside of Giants |
| The Wild: Demihumans | 3x Lightstone of Fire: Roar 1x Iridescent Lightstone |
30 demi human |
Great setup for lots of spots while being somewhat “affordable” |
| The Wild: Kamasylvia | 3x Lightstone of Fire: Fallen 1x Iridescent Lightstone |
30 kama | Great setup for lots of spots while being somewhat “affordable” |
Buff/Meal Rotations
As a red it's important to always be buffed. This is because you're both at a disadvantage due to your crystals but also because you are permanently flagged for pvp and need to be on your toes.
The normal buff rotation would usually be an Exquisite Cron Meal*, Full Church (Attack + Protection), Giant's Draughts. It is possible to use a full elixir rotation, but isn't commonly done anymore since harmony elixirs exist. Harmony elixirs are a better version of usal elixir rotations and count as a draugh. They are mandatory for late game redlife to boost your stats to be able to defeat high geared players.
You can already use them early on, but they cost a lot of silver that can stack up very quickly if you die alot.
Also useful are House Item buffs. They give you immense benefits for a reasonable amount of money. These buffs often stay up to over 3 hours and help in PVP and PVE.
House Item buffs can not be stacked with each other.
*This is because the trade off in DR and Human damage for an Exquisite Cron Meal compared to full buffs (Special Kamasylvia, Special Valencia, Jumbo King Hamburg and Knight Combat.) is minimal and Cron Meals are far more convenient.
Server Region Differences
This entire guide focuses on the EU/NA Region.
Most of this info is also true for other regions that currently exist like NA, EU, Asia, Korea, Russia, and MENA
Some of these regions, however, have slight differences compared to the basic information in this guide.
Korea + Global labs:
- PVP death includes the gear degrade penalty. Ways to avoid the degrade are still the same.
- TOS of Korea include a rule that does not allow spawn camping. This rule does not exist on EU/NA
- Minimum and maximum on karma loss ranges from -80k to -200k karma
- Karma loss on initial hit is -10k Karma
- On initial hit on a mounted horse and wagon, karma value decreases by 110,000
For subsequent hits, the karma value per hit decreases by 100,000. These hits include the use of the following: Horse skills, Matchlock, Traps, Rage Skills, Horse kills by using normal Skills. - Dieing to the Sangoon, Golden Pig King, Uturi, Bulgasal World Boss does apply penalties for negative karma players, but not for positive karma players.
SEA (Asia):
- PVP death includes the gear degrade penalty. Ways to avoid the degrade are still the same.
- Currently further tests are getting done.
Japan:
- Shares KR's penalties, as well as the following:
- TOS of Japan also includes a rule that does not allow spawn camping.
- ALT+C to kill people can now get you punished.
- Killing those with lower gearscores can get you punished.
- Repeatedly killing and hunting can get you punished.
- Griefing and blocking content can get you punished.
- Mob feeding can get you punished.
- Karma bombing can get you punished.
- Dragging fishers away can get you punished.
- GMs maintain their own discretion for each case
- Minimum and maximum on karma loss ranges from -80k to -200k karma
Warning: The Muiquun community is based on EU/NA servers. All information from other servers often reach us delayed or are tested alot later. So when you do not play on EU/NA, please keep an eye out for possible changes in the patchnotes.
If we did not add something here that is special for your server, please message us directly.
Passing Remarks
- Ghillies used to be very useful as they would hide your red nameplate, this was unfortunately nerfed and ghillies are no longer a necessity.
- If a player is using the enemy ping skill on their pet, you will always be pinged unless using ninja/kuno invis. You will also be pinged while being in Emergency Escape (V).
- Up until recently, beds were a good way to stay safe at home as you were in an iframe with them, this has since been problematic as classes with a pet (Tamer, Wiz, etc.) can cc you out of it.
- Fall damage does not count as PVE or PVP death and does not incur penalties.
- AFKing on your main character isn't advised and you're better off doing one of a few things: Swapping to a 2nd character that can't degrade anything important, sitting in dead, far away spots from the road, AFKing in the Magnus, sitting in character select or in BA.
- Although blue players don't receive the same penalties as red players, killing them will still destroy their trade items and fish.
- If you ever want to recover your karma back to a positive state, the following grind spots will give you the highest karma recovery:
Pila Ku Jail (Valencia region)
Upper Sycraia (Balenos/Ocean Region)
Polly Forest (Kamasylve Region)
Other notable mentions: Elrics, Helms, Nagas, Fogans, Tshira ruins, Blood Wolves, Lower Gyfin, Upper Gyfin.
It is also recommended to use the +50% karma recovery buff from Lost Angel Wings lightstone set, use pets with the karma recovery skill and check if your guild has the karma recovery skill maxed out. - As a Semi-Redplayer, you can simply place an alt char with tuvalu gear at Pilaku Jail and swap to it in order to quickly grind karma.
- Being red land karma but positive karma on the ocean, boats can still hit your boat (The boat that hits you gets his ocean karma reduced!)
- Mob Feeding War enemies, duels or negative karma players, does not protect them from punishments like crystal loss.
- You can exploit BAs 1-10 to avoid people when swapping around skill addons or practising.
- The Guild Manor can be used for a quick save location to tp your main to.
Addendum
Whilst it seems like there are entirely negatives to going red, there are certainly positives. As a red you receive a red nameplate signifying that you're a badass, you also can't be affected by the exploiters known as karma-bombers, and griefers just don't matter to you anymore. You have the opportunity to become known across channels, and BDO never becomes stale as you're always kept on your toes with PVP around the corner.
IMPORTANT NOTE:
No matter your karma state, when a player breaks the TOS of BDO, like heavy insults (example: “kys”, or “kill yourself”, etc.), always go to the official BDO website or the Ingame Report function and report them as fast as possible.
Q&A
Question:
What happens to Caphra levels when the gear degrades to PvE death?
Answer:
On a degradation from Pen to Tet, and Tet to Tri, the Caphra level adjusts to the new enchantment level. Everything that goes over Caphra level 20 disappears permanently. On a degradation from Tri to Duo, all Caphra levels permanently disappear
Question:
Tagged char and negative karma. How does it work and how is cloned gear applied to it?
Tagging and cloning gear as a redplayer. What changed with the family karma?
Answer:
Easy Answer: As a Permared, cloning gear is impossible. As a semi-red it is possible but not really worth it for most people.
You can use positive karma to clone the gear and then go negative karma but when you die on the tagged char, the cloned items disappear. The best idea is to tag a char without cloned gear, allowing you to use escape and treasure items more than once.
Question:
XP Share between Tagged chars. Can you level up as a red player without punishments?
Answer:
Yes! You can tag a char and freely grind on your main.
The tagged char also gains the same amount of XP as the main character and is claimed by using the “Collect XP” interaction.
While dying still reduces the XP of the character that you died on, it does not reduce the XP of the character that is tagged. You can simply level up the tagged character and then, when the desired level is reached, simply transfer the level onto your main.
Question:
Can you lose crystals, or even degrade, in the Land of The Morning light black shrines?
Answer:
No. You can't lose anything doing the black shrines in the LOML except for your temporary buffs, like elixirs. You can be attacked after leaving the black shrine but even while being CC'd or fighting back, you can start a new black shrine and it will swap you into the instance.
Glossary
AoE - Area of Effect, skills that encompass a large area i.e., Wizard's Meteor Shower
AP - Attack Points, a rough estimation of how much damage you deal.
DP - Defence Points, a rough estimation of how much damage you tank.
AFK - Away From Keyboard.
Arsha servers - Special servers that allow you to PVP without losing karma.
Artifacts - An item that grants you extra stats similar to crystals. These can also be slotted with lightstones for extra bonuses.
BA - Battle Arena, a place where players can PVP in an arena.
Brackets - A bonus to your AP/DP gained by hitting a certain amount.
CC - Crowd Control, being knocked down, grabbed, stiffened etc.
DP/Damage Reduction - A defence stat that lowers incoming damage.
Etc. - Et cetera, used to show the list isn't exhaustive and doesn't contain everything.
Flagging - Using the bind Alt+C to enable forced PVP.
GvG - Guild vs Guild, a war.
Iframe - A protection state where your character takes zero damage.
I.e., - Id est, used to show an example
Karma - BDO's system to track evil players and a way of punishing them.
LOML - The new region replacing Port Ratt, Land of The Morning Light
Mob fed/Mob feeding - A strategy in which players get you to low health in order to “feed” you to mobs.
Muiquun - A town in the desert designed as a safe haven for red players.
Naval Karma - A separate stat that is lowered by forcefully PVPing boats.
Nodewars - A large-scale war usually played by large guilds.
PK - Player Kill(ing).
PVP - Player vs Player.
RBF - Red Battlefield, a PVP conquest/domination type gamemode.
Sand Grain - Sand Grain Bazaar, the town you encounter before the desert.
SA - Super Armor, a protection state where you cannot be CCed by skills, only grabbed.
V - Emergency escape skill
Credits & Special Thanks
Sklema - Permared, Muiquun's Leader, Screenshots, Writer, Informations, Reviewer, Accessibility.
Akito - Permared, Provided useful information, Jail Map.
Kino - Permared, Muiquun Officer, Reviewer, Provided tweaks.
Remminialux - Permared, Proofreader, Provided useful info, Accessibility.
Inq - Permared, Writer, Screenshots.
Twigstalker - providing a detailed list of useful crystals, artifacts and lightstones
Corvo - Accessibility reviewer.
& You, for reading.
Changelog
April 2026:
- Added Server region difference for SEA (Asia) Server
- Updated Lightstone section
- Updated Artifact section
- Updated Crystal section to the current balance and market
- Added info to gear section
- Fixed typos
- Fixed other small sentences to make them easier understandable
- Fixed missing info that only got updated in the google doc form
- Added info to Passing Remarks
August 2025:
- Added information for Edania
- Added information for Dawn crystals
- Added information for Sovereign crystals
- Fixed Typos
- Added information for Dec Tuvala degrade
- Updated information for limited content by adding Pig Cave and Edania Marni
- Updated information for Guild Manors
- Updated Crystal, Lightstone and Artifact infos
- Updated Gearing infos
- Added passing remarks about the lightstone bug
- Updated server differences for Japan servers.
October 2024:
- Updated Gear guide (from noob to red) added
- Land of the Morning light: Soul World boss infos added
- Land of the Morning light: Soul World Black shrine added
- Land of the Morning light: Soul World Sovereign Wepons and Upgrades info added
- Harmony elexier info added
- Guild Manor info added
May 2024:
- Added -500 karma loss on animals
- Added info on Horse and Wagon kills
- added more infos and tactics under "PvP as a red"
- Added info to when karma loss does not apply in pvp
- Added info that karma max karma loss is calculated by ap+dp
- Added extra info to naval fame
- added more infos to server difference
- Added Horse karma loss update from Korea to server difference (Will be updated to the normal text as soon as it comes to other servers)
- Updated the Glossary
- Added infos to 100% degrade protection
April 2024:
- Updated the minimum Negative karma to -10.000.000
- Updated missing information to punishments in Atroxian dungeons
- Added important bug notice regarding the current punishments bug.
- Removed important bug notice because the bug got fixed
- added note "active retesting of the crystal protection rate"
- added note "active testing of the death penalty resistence chance"
- added note "Server region difference"
March 2024:
- Added info to Wagons interaction with players and guards (Thanks to @cannabismj comment under the Garmoth.com guide
- Updated Basics of Negative karma with more Infos (Thanks to @cannabismj comment under the Garmoth.com guide)
- Fixed Typos
- added the Muiquun Guide to Garmoth.com