OCCUPATION - BALENOS FORT LOCATIONS

By justamadmad
Published: Jun 04, 2026
Updated: Jun 15, 2026
8,076
3
BALENOS MINIMAP
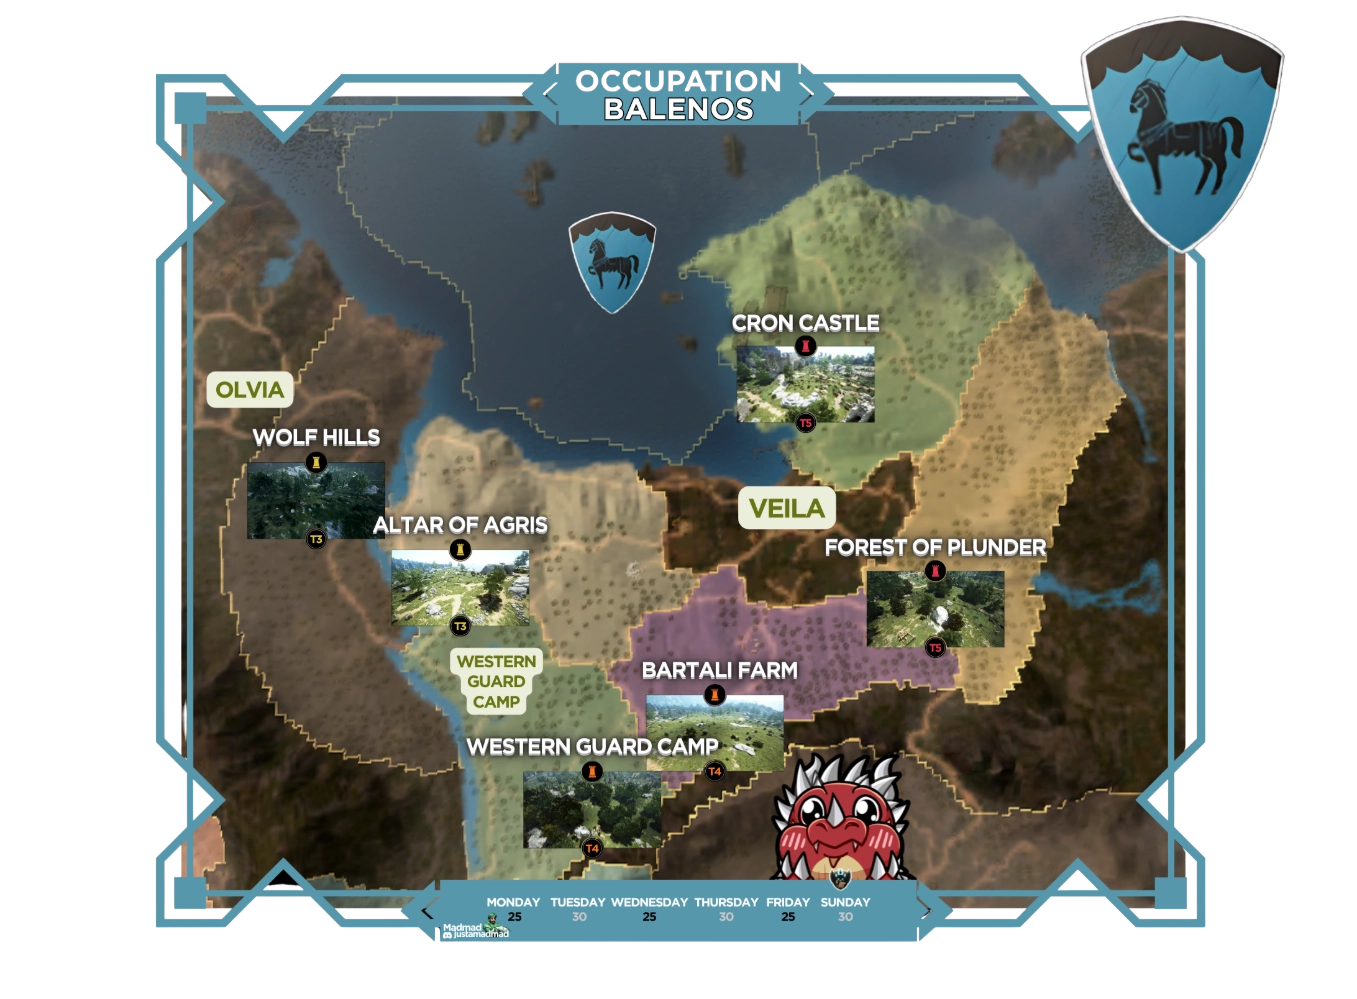
Balenos OCCUPATION mode map with fort locations:
- TIER 5 - CRON CALSTE and FOREST OF PLUNDER
- TIER 4 - BARTALI FARM and WESTERN GUARD CAMP
- TIER 3 - ALTAR OF AGRIS and WOLF HILLS
TOWN SPAWN - VELIA, OLVIA or WESTER GUARD CAMP
This guide is intended to share knowledge gained from years of experience to help improve the PVP scene and make it become more competitive. The information below is common location used by best guild/alliances that contest a specific fort – that is not the only correct way to play on each location. Every guild has its own playstyle, so find yours and adjust it to your preferences. See you on the battlefield.
MADPOT - the location that offers the biggest potential to increasing your chances of fighting effectively around the fort - secure a stick, defend it from others and keep offensive pressure on it.

IF YOU NEED GOOD RESOLUTION PHOTOS JOIN OUR DISCORD - https://discord.gg/npNygq8ZaF
CRON CASTLE
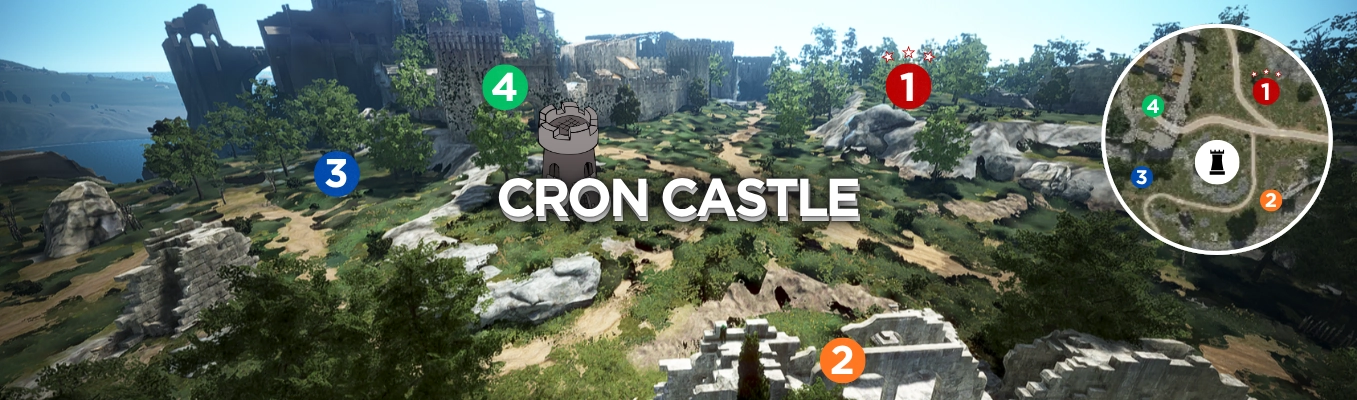
1. NORTH/EAST - MADPOT
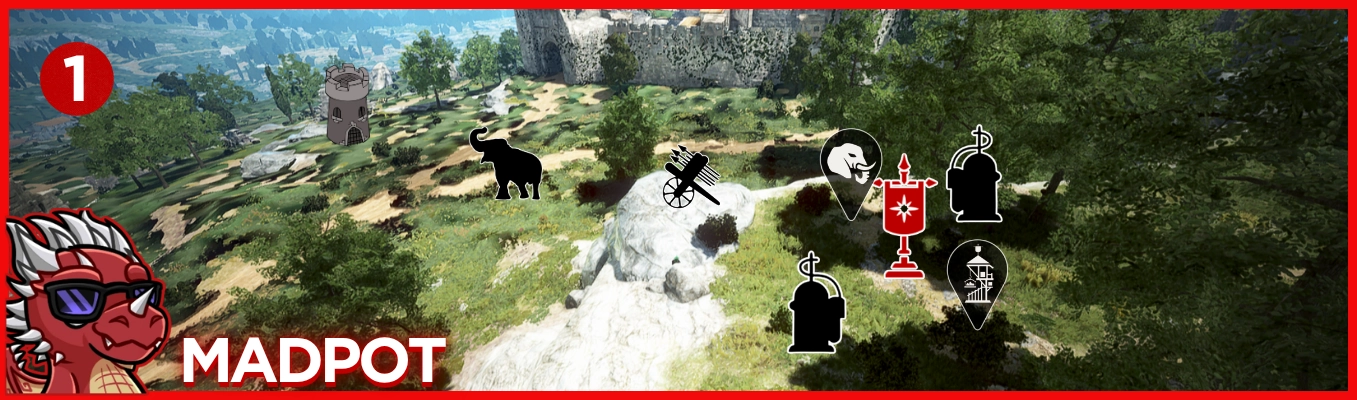
Natrual borders / highground / flexible location / challenging / perfect vision / perfect fort pressure / perfect hwacha
Flexible position with plenty of space, you can place both flames around the flag or offensive to keep your pressure around the fort, perfect vision and very good hwacha placement, gives you a lot of options to rotate, far enough from velia to avoid frequent flanking and far enough from fort to avoid enemy attacks.
2. SOUTH/EAST
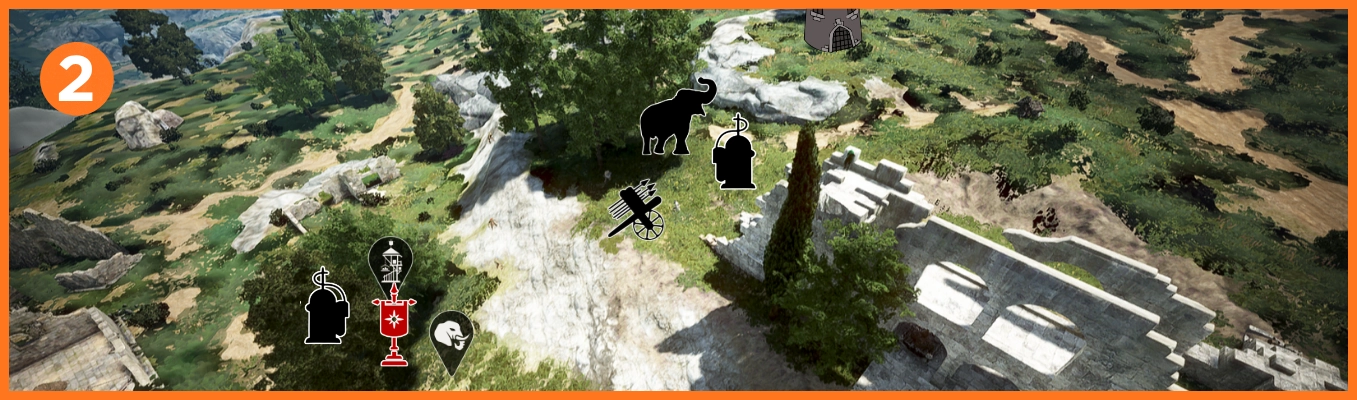
Natrual borders / flexible-risky location / challenging / good vision / good fort pressure / decent hwacha
This site is vulnerable to attacks by newly joining guilds, try to abuse as much as you can natural borders for maximum defense potential, if you are strong enough offesnive flame will help you keep pressure around the fort, be careful not to get pushed into the ruins, spread out in case of disengage.
3. WEST
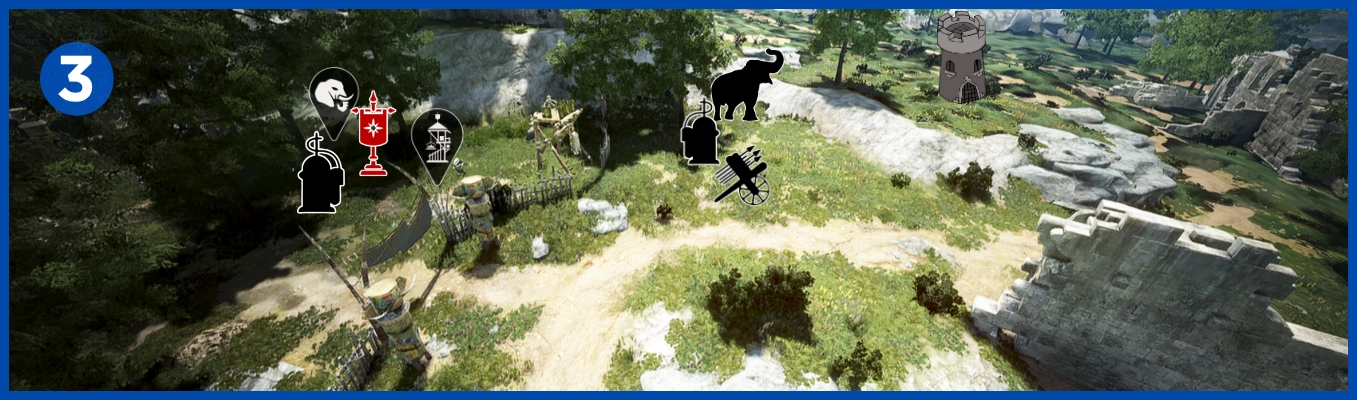
Natrual borders / flexible location / hazardous location / perfect vision / perfect fort pressure / good hwacha
This site is also vulnerable to attacks by newly joining guilds, natural borders are risky if you are not strong enough because they become an arena of death for weaker players, plenty of space to disengage and flexible enough to relocate your setup as close as you need to keep required pressure around.
4. NORTH/WEST
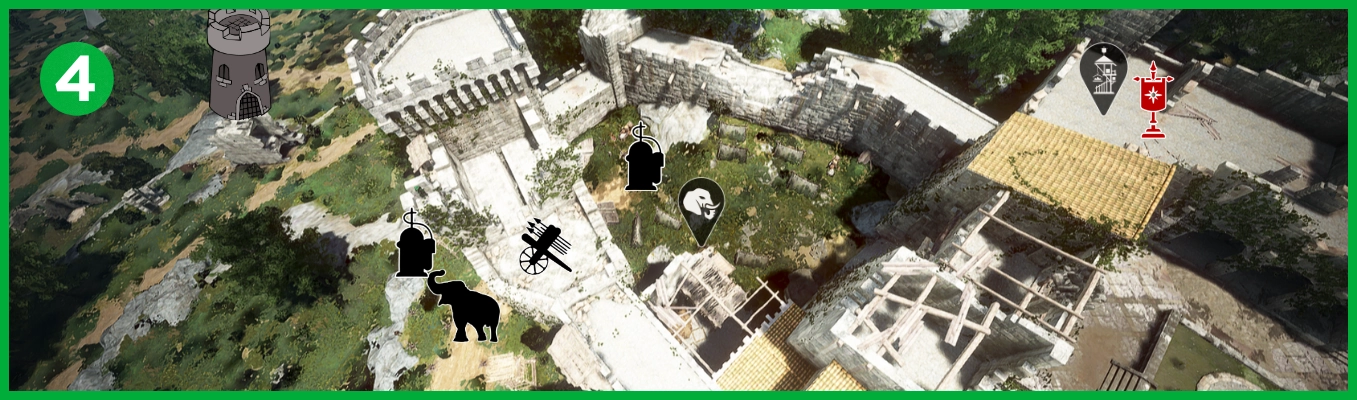
Natural borders / gate choke / flexible location / hazardous location / good vision / perfect fort pressure / perfect hwacha
Strongest natural borders in this location, on one hand - very easy to defend yourself, on the other hand if your enemies can use the environment [gate choke] they can trap you inside the castle by vacuums, elephant and hwacha shots every time you try push a fort, risky location but not impossible to use for your advantage.
FOREST OF PLUNDER
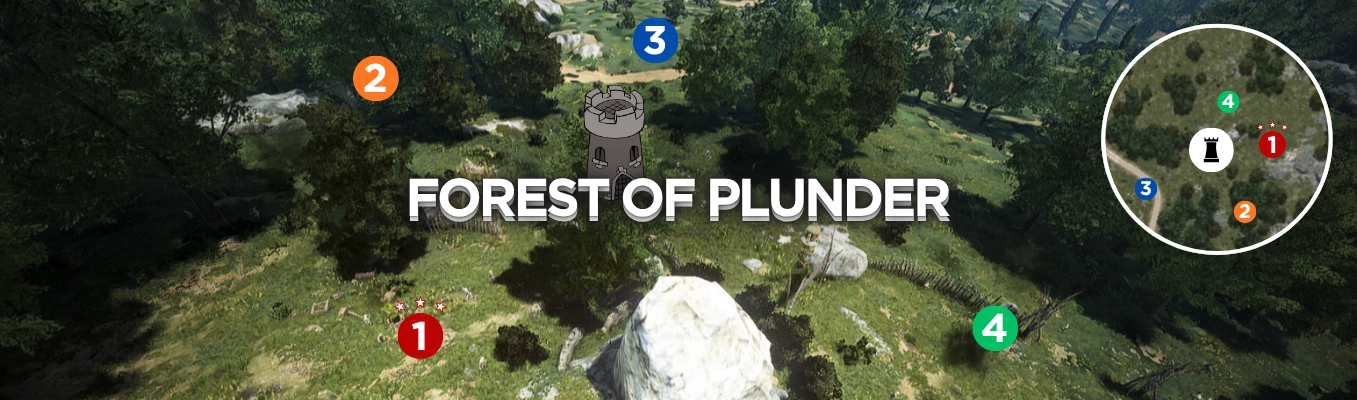
1. EAST - MADPOT
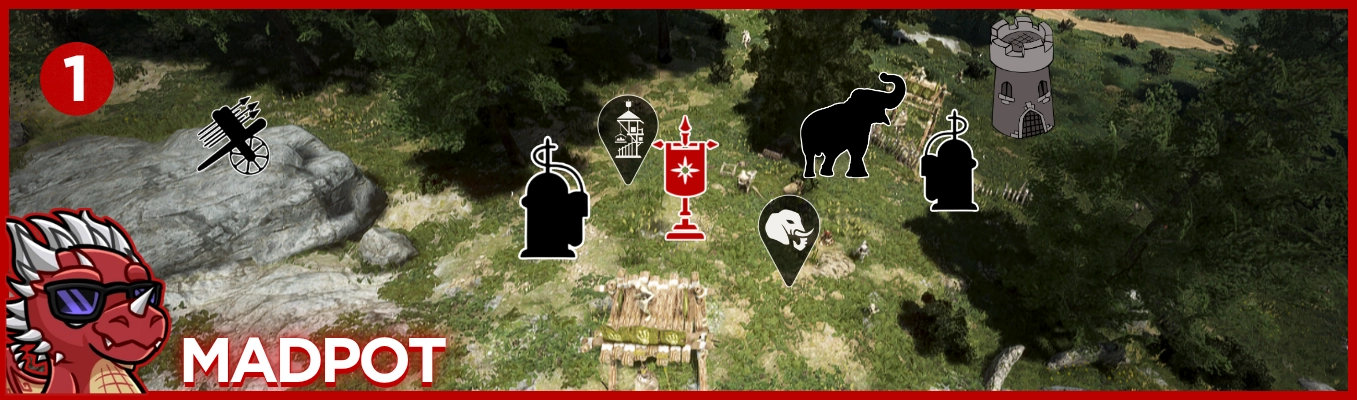
Natural borders / hazardous location / challenging / perfect vision / perfect fort pressure / perfect hwacha
Very agressive location - plenty of space from both side with small chokes that you can use to gain advantage in combat vs enemy guilds, very rewarding with proper coordination and mainblob, perfect hwacha and vision with strongest fort pressure potential and option to rotate around.
2. SOUTH/EAST
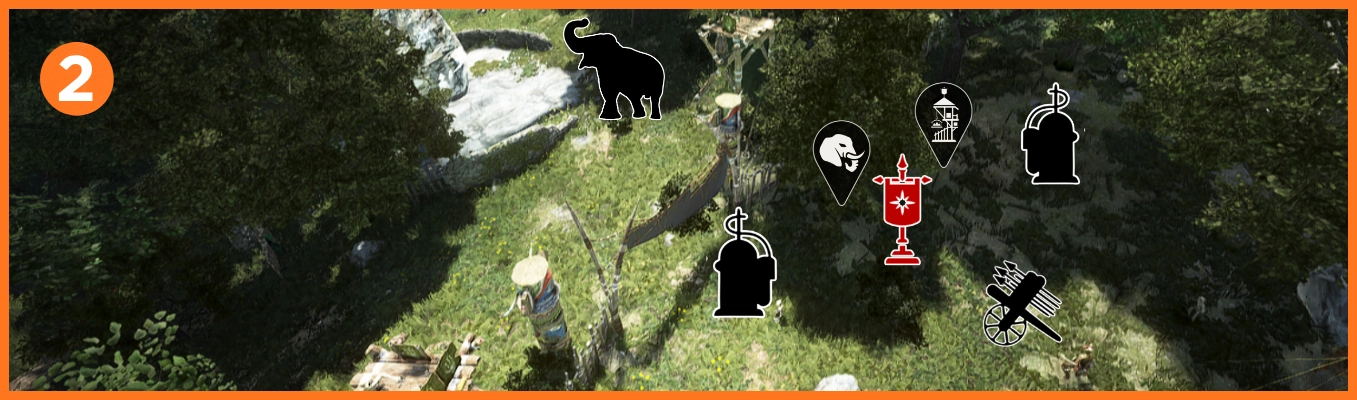
Natrual borders / flexible position / decent vision / good fort pressure / good hwacha
Some natural borders that help you in defense and a lot of trees make you less visible, but at the same time they limit your own visibility, flexible position that you can protect better with both flames around the flag, strong on offense and at maintaining pressure all around the fort, plenty of space to rotate.
3. SOUTH/WEST
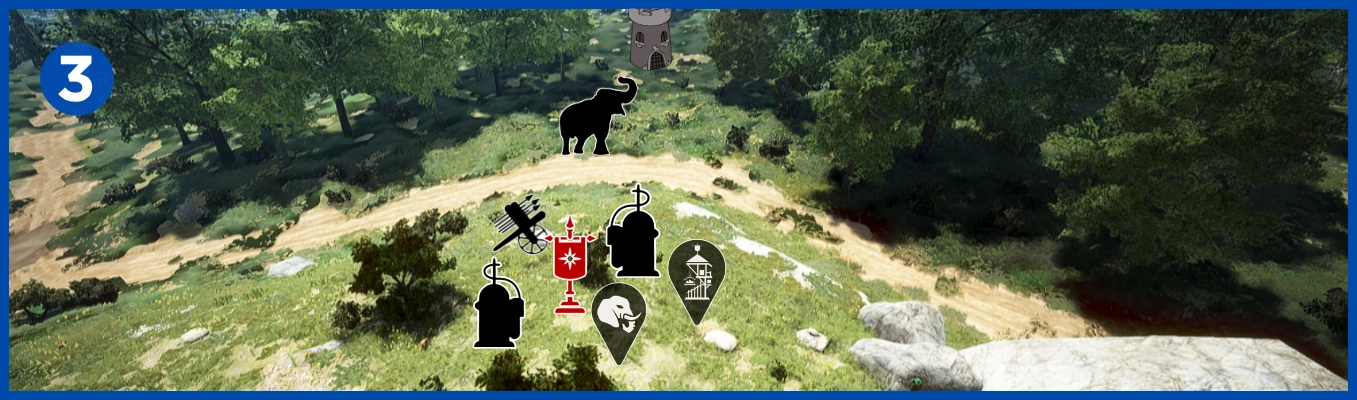
Open environment / flexible location / good vision / good fort pressure / good hwacha
Flexible position with plenty of space, both flames around flag should keep your minibase safe from potential pushes, good to rotate around and keep range pressure to the stick, strong hwacha with good vision around, a bit challenging when new guilds start showing to join the fight.
4. NORTH
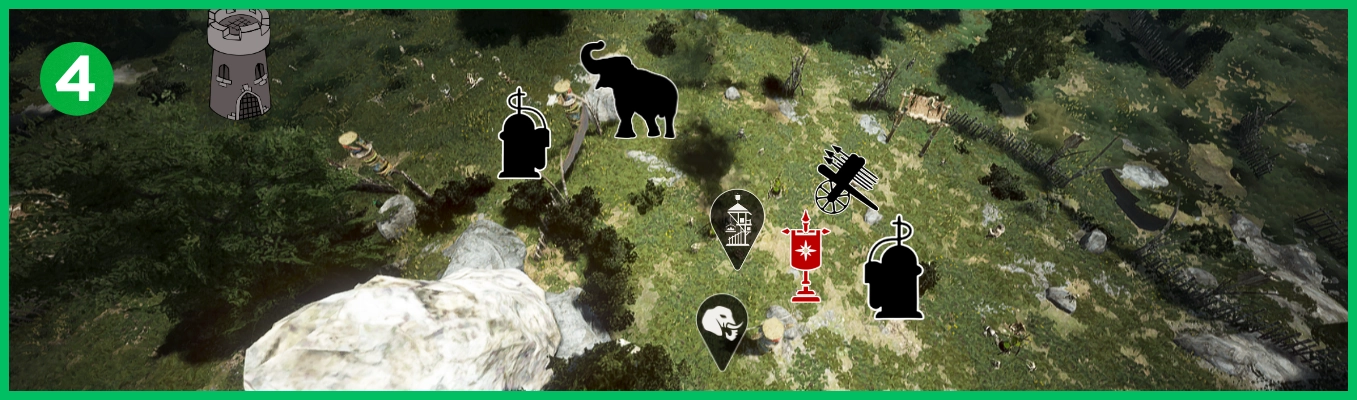
Natural borders / hazardous location / challenging / perfect vision / perfect fort pressure / good hwacha
Location right next to madpot, natural fences that help you with defense, but at the same time, they turn your base into an arena from which it is hard to escape, requires strong mainblob and coordination to use full potential of this spot place elephant and flame in the choke between fort and your flag.
BARTALI FARM
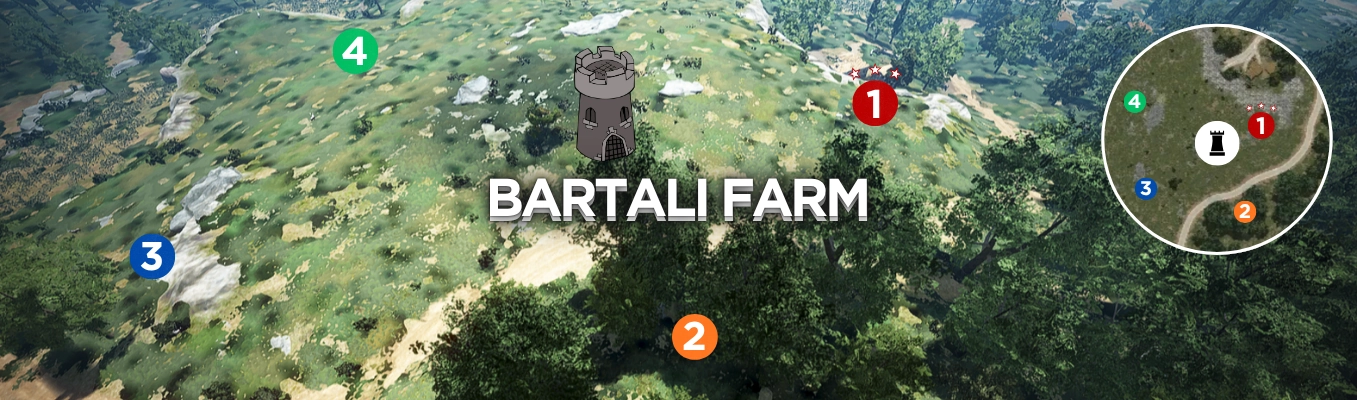
1. EAST - MADPOT
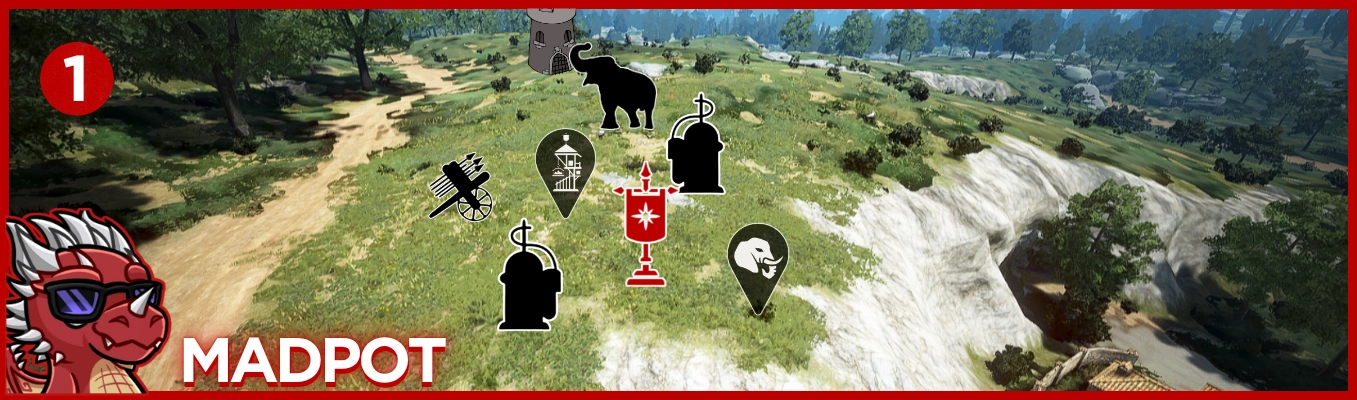
East hill / challenging / perfect fort pressure / good vision / good hwacha
Natural east side hill protect you from whole blob flanks, very flexible location with option to place flag far on east side, very good vision and rotate potential, very good to keep pressure around the stick and nuke potential offensive flames of enemy guilds, care of your east flank from new enemies joining the fight.
2. SOUTH
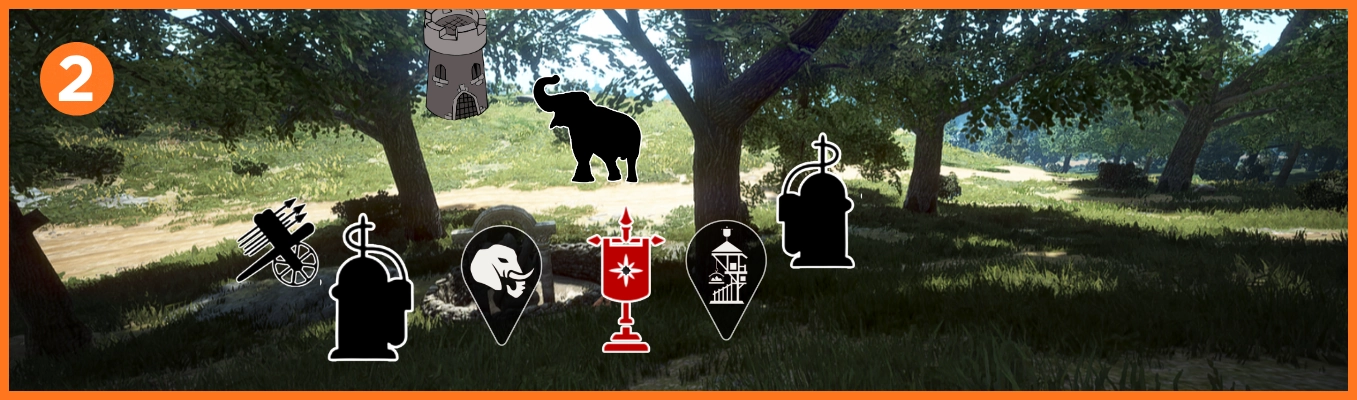
Flexible location / decent vision / good fort pressure / decent hwacha
Base hiden in trees, easy to keep fort pressure but keep your eyes open to avoid being sandwiched by other guilds, decent hwacha and good potential to rotate around, protect your flag with both flames, in case of big focus on your side you can move the setup a bit more on the south side.
3. WEST
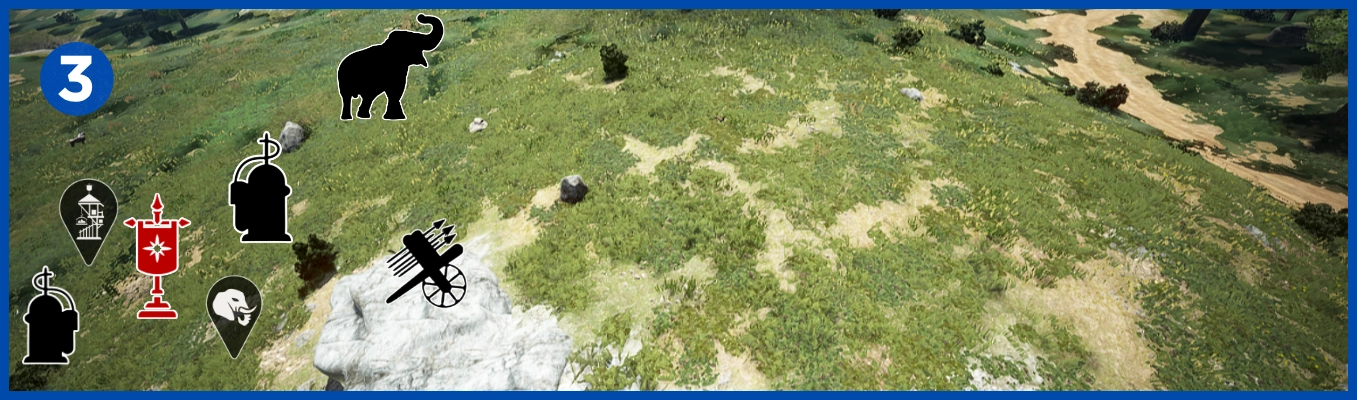
Wide open terrain / flexible location / good vision / good fort pressure / good hwacha
Wide open terrain, flexible location with option to move your structures closer or more far away, plenty of space to rotate with mainblob, good vision and fort pressure, be mindful of new enemies spawning from wester guard camp or leaving guard camp fort, both flames on flag should keep you safe.
4. NORTH
Gentle hills / flexible position / good vision / good fort pressure / good hwacha
Wide open location with a bit of hills, very flexible location because of plenty of space around, with two defensive towers on the flag, care of new guilds joining a fight, decent location to keep pressure on fort and good vision, be more proactive and rotate around with your main blob.
WESTERN GUARD CAMP
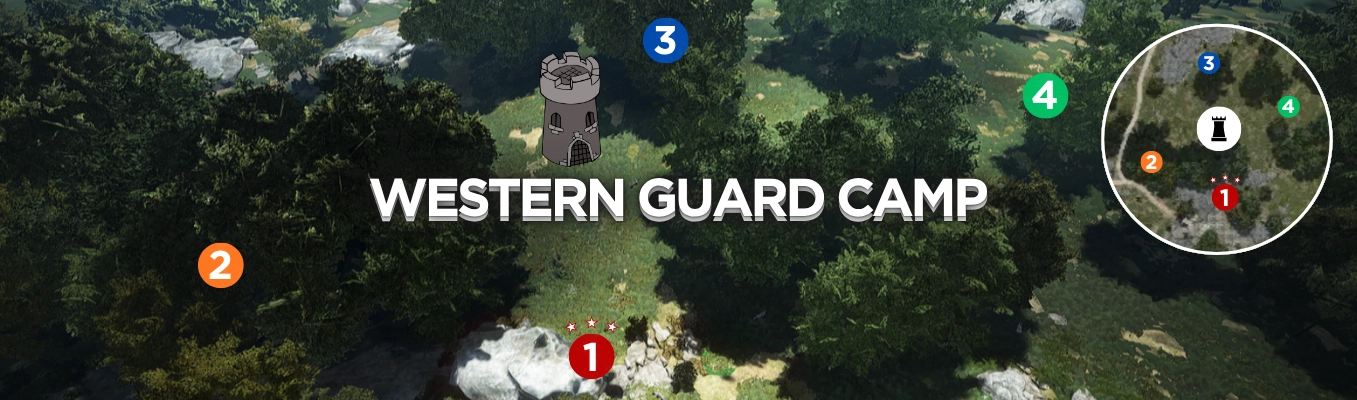
1. SOUTH - MADPOT
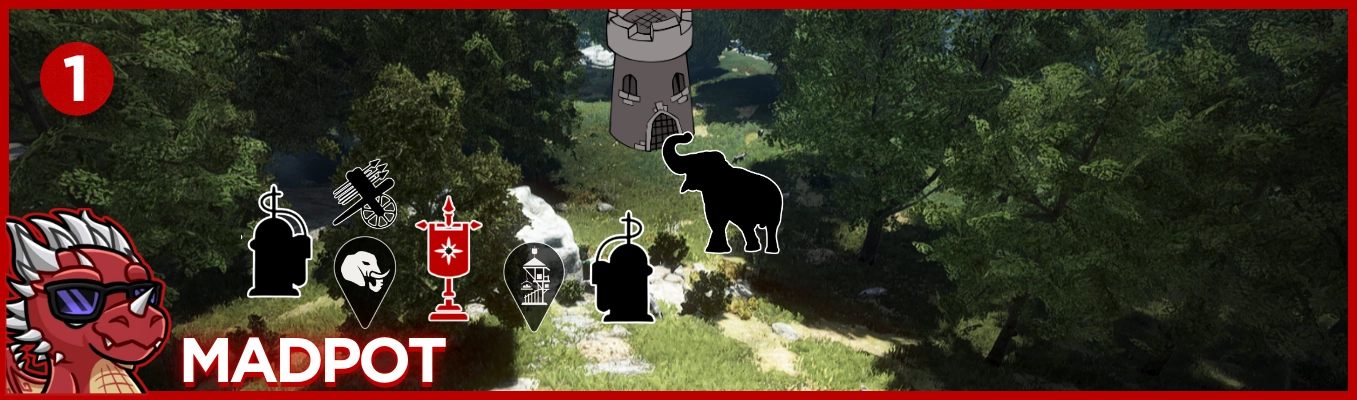
Natural borders / hazardous location / challenging / perfect vision / perfect fort pressure / perfect hwacha
very agressive location - requires good coordination to keep your minibase safe, natural border from west side and mountains r, excellent vision and rotate option on east side, free from respawn town bombers, flexible enough to replace your flag a bit futher south side if needed to avoid hard focus.
2. WEST
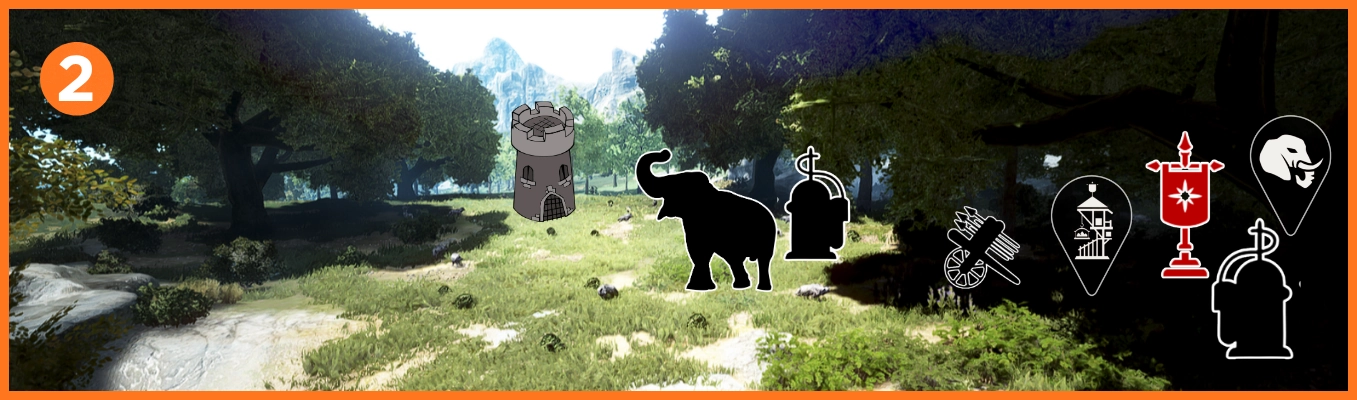
Open environment / flexible position / good vision / good fort pressure / decent hwacha
Wide open location with only rock from madpot side, good and safe spot, far from potential enemies willing to join the fight, plent of space around to rotate and keep pressure around the fort, with both defensive flames you should not worries about the flag, good vision and fort push potential.
3. NORTH
Natural borders / downhill / challenging / good fort pressure / good vision / good hwacha
Safe location, far enough to avoid focus on your flag, flexible flame that can be placeed offensively to open you better push potential around the fort, with hwacha near it make it very very strong position that can become main player around, keep in mind that wester guard camp respawn is from north side.
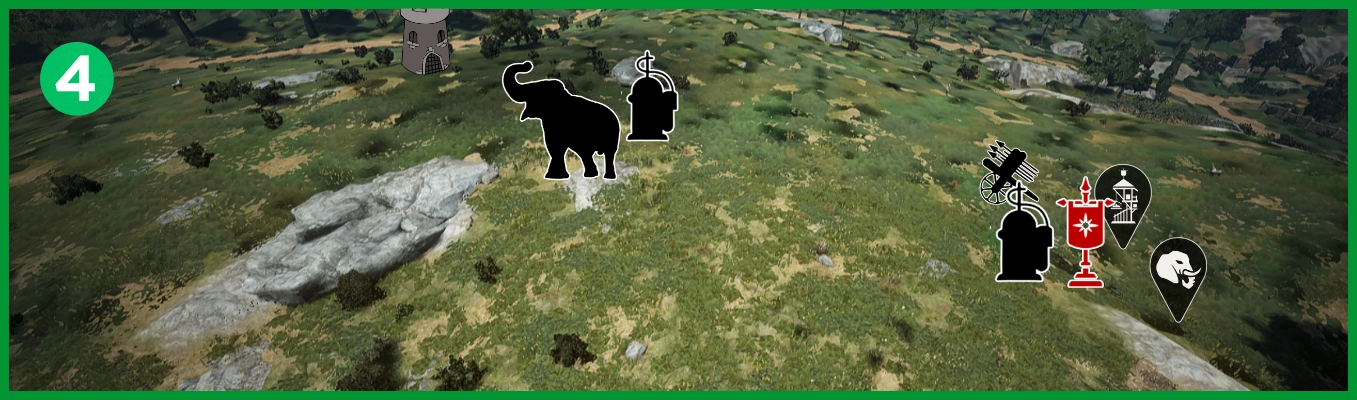
4. EAST
Rock as natural barricade / challenging / flexible position / decent fort pressure / decent hwacha
Small single natural border, hard to keep base safe because of western guard camp respawn and potential enemies willing to join the fight, whole east side is mostly one big place fight, keep both flames around flag, decent vision around the stick and decent fort pressure if you don't need to worry about flanks
ALTAR OF AGRIS
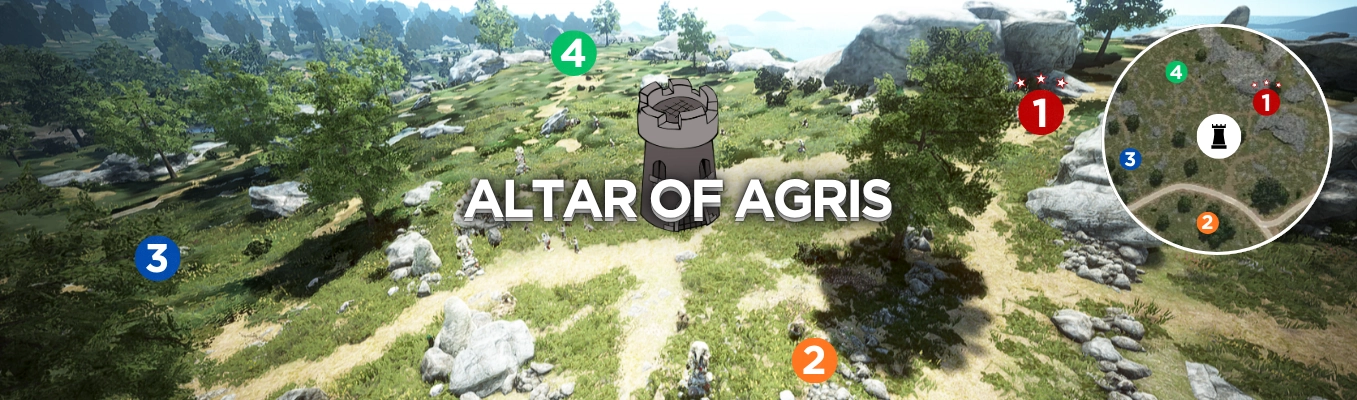
1. NORTH/EAST - MADPOT
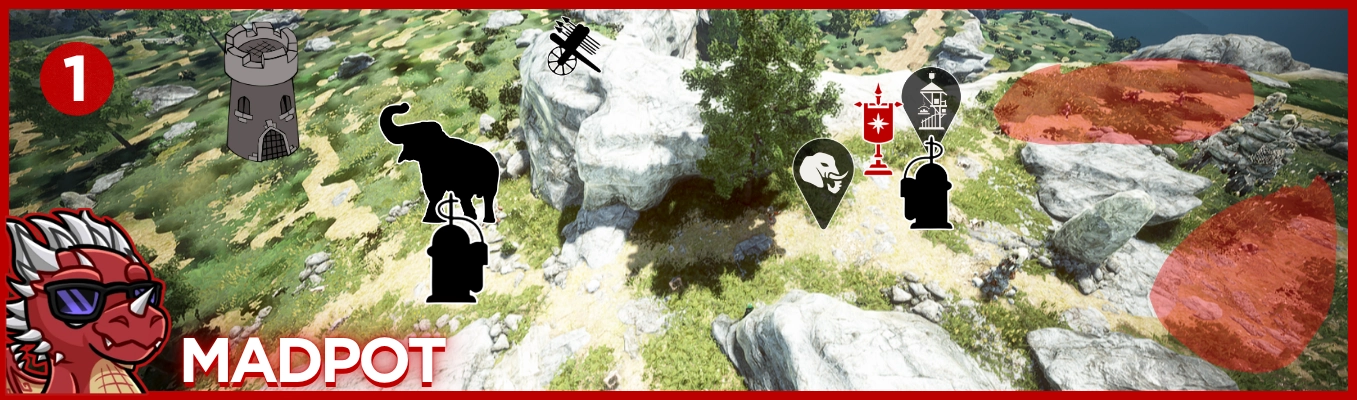
Natural borders / highground / perfect vision / challenging / perfect fort pressure / perfect hwacha / choke
Perfect place to keep pressure on fort and defend it, minibase is almost impossible to push (care from potential danger from east side) - felxible flame that you can locate on your flag, hwacha with best vision from all spots, broken choke protected by elephant and potential flame.
2. SOUTH
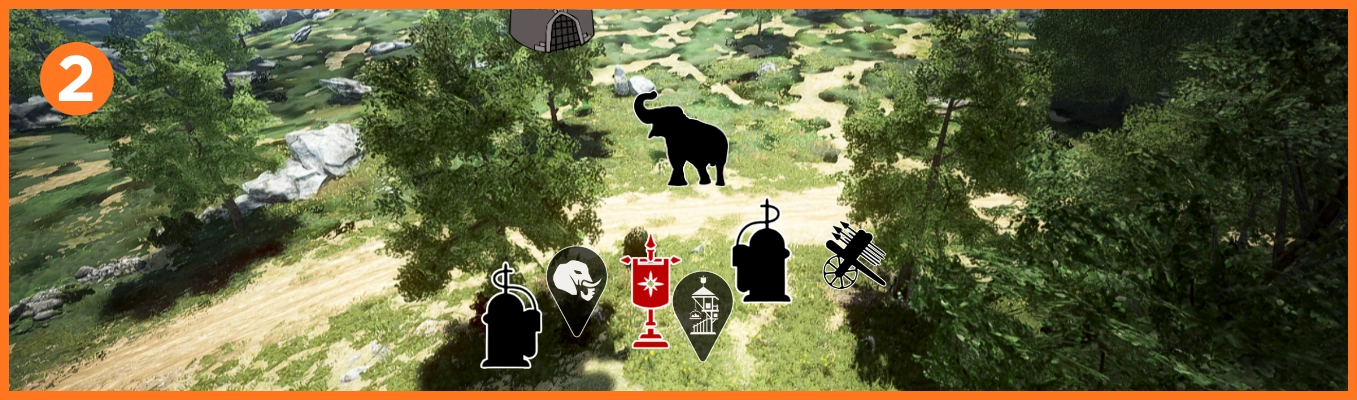
Open environment / guard camp spawn behind / challenging / decent fort pressure / decent hwacha
Wide open environment, hard to keep base safe because of western guard camp respawn and potential enemies that may join the fight, keep both flames around flag, decent vision around the stick and potential for pushes, decent hwacha give you more offensive options around the stick.
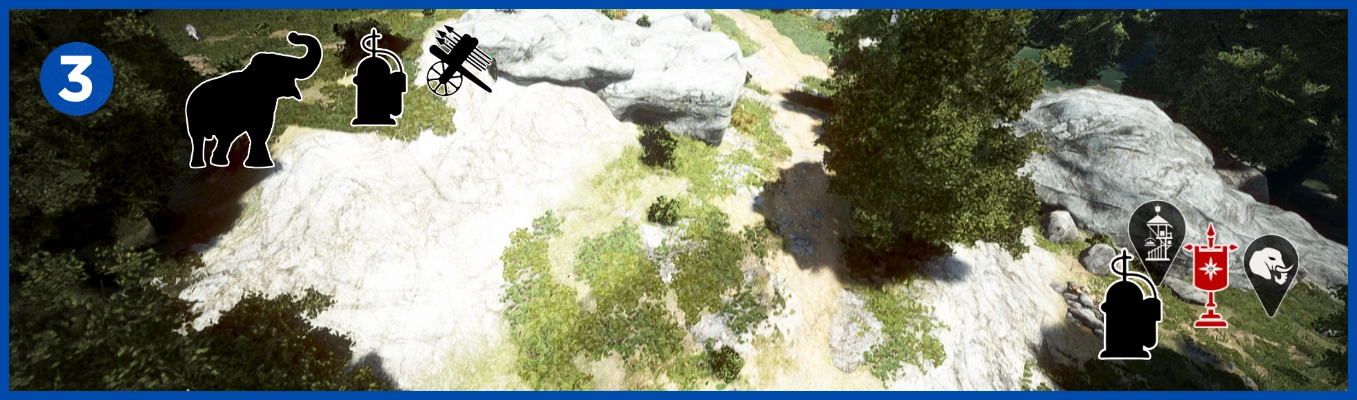
3. WEST
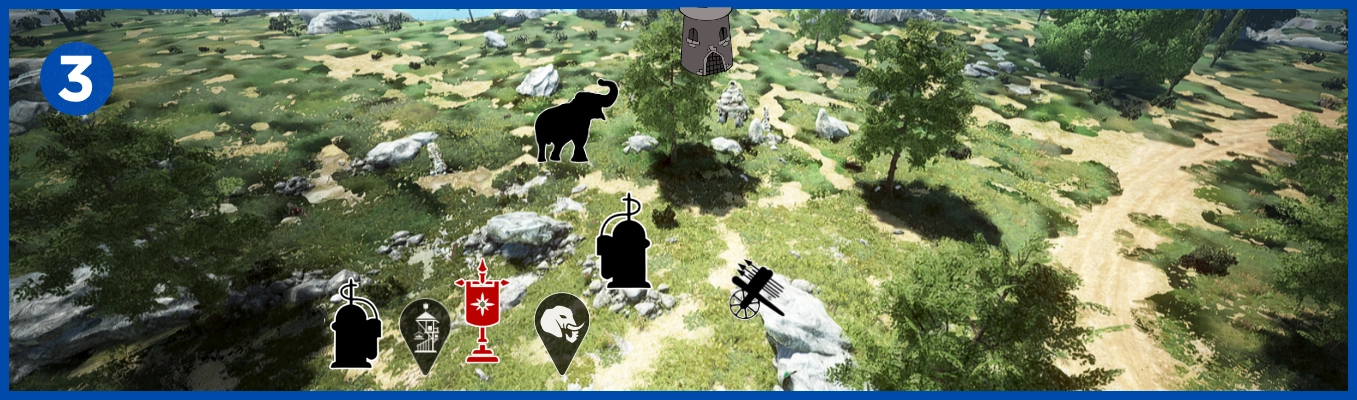
Little natural borders / challenging / flexible position / good fort pressure / good hwacha
Few rocks that protect a bit your minibase, keep both flames defensive because of potential enemies who might join the fight from south side, with offensive elephant is easy to keep pressure on the fort, hard to protect the stick, easy to push base from 2nd location and have more space to play around.
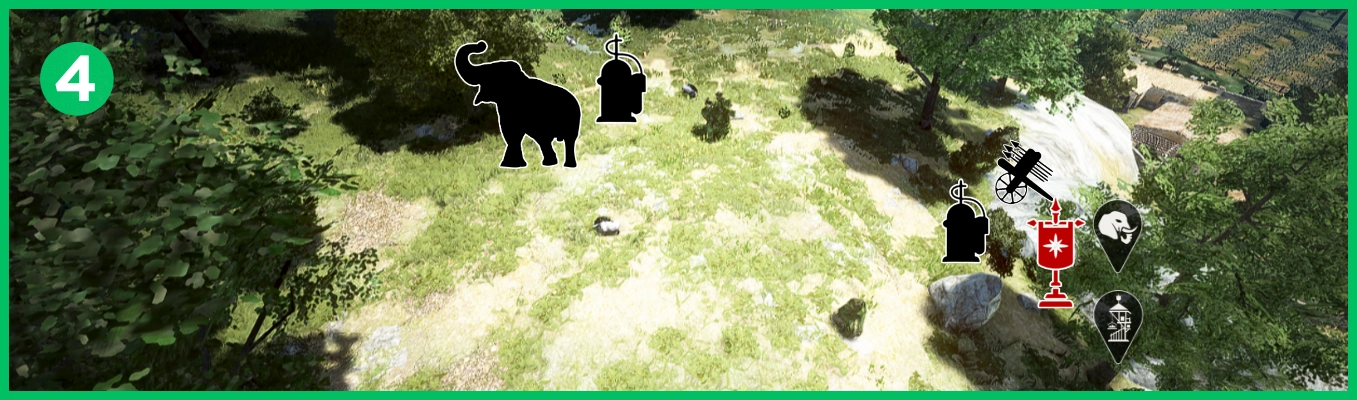
4. NORTH/WEST
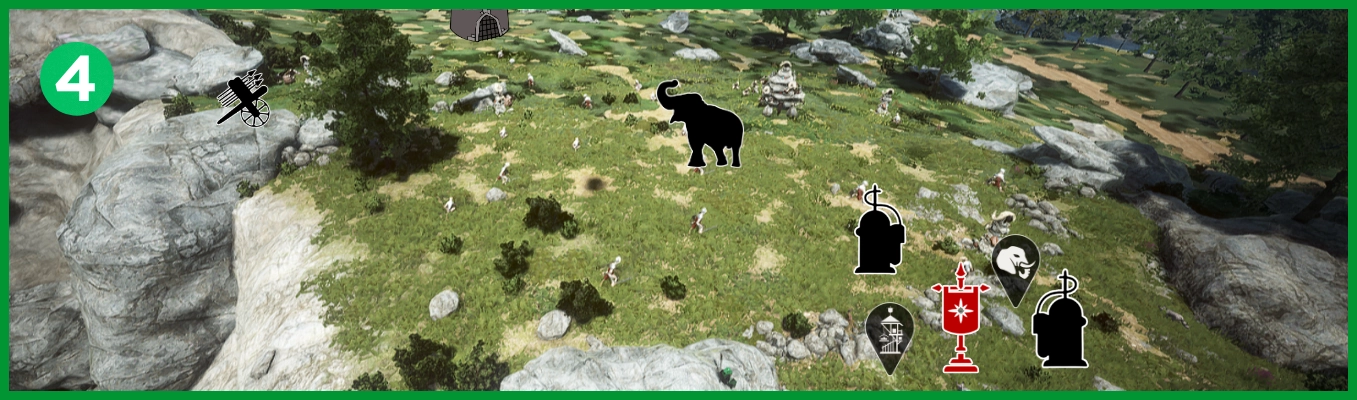
Some natural borders / flexible position / challenging / good fort pressure / perfect hwacha
Pleasant location with good vision around and lack of danger from hill side, plenty of space to play around and rotate if needed, flexible location that you can place offensive or defensive flame, very good fort pressure, care of enemies that can palce flag behind your setup more far on north side.
WOLF HILL
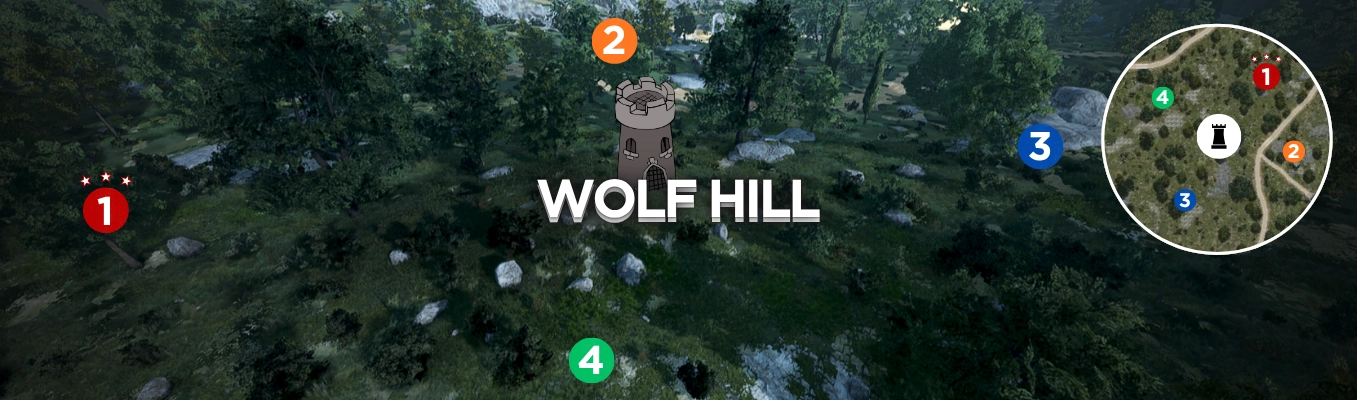
1. NORTH - MADPOT
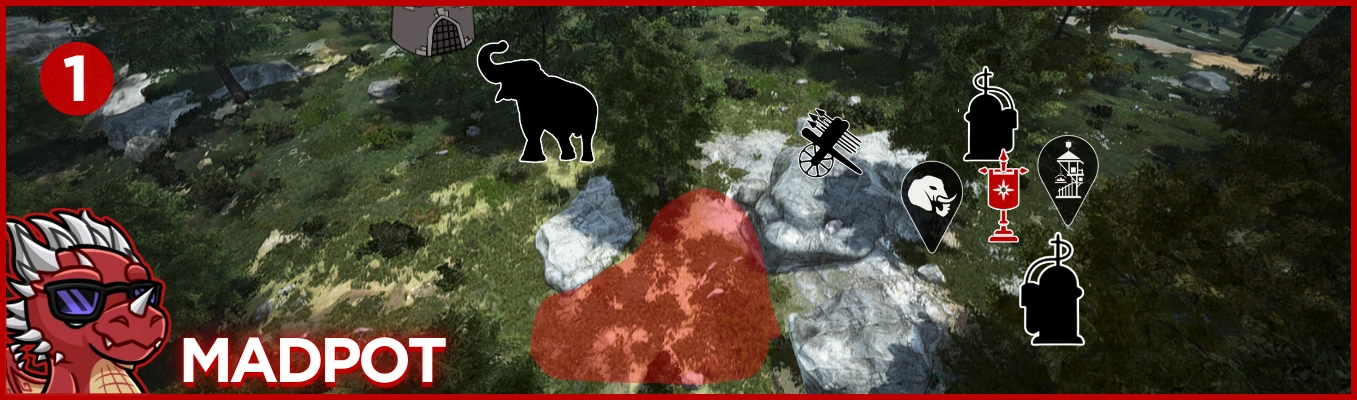
Some natural borders / flexible position / challenging / perfect fort pressure / perfect hwacha
Very flexible location, you can put one flame offensive or keep both to protect your flag, medium rocks give you a bit of advantage in defense, you can also place structure a bit far on north, keep in mind that olvia spawn is very close to you, clear vision and a lot of space for fight and pressure a fort.
2. NORTH/EAST
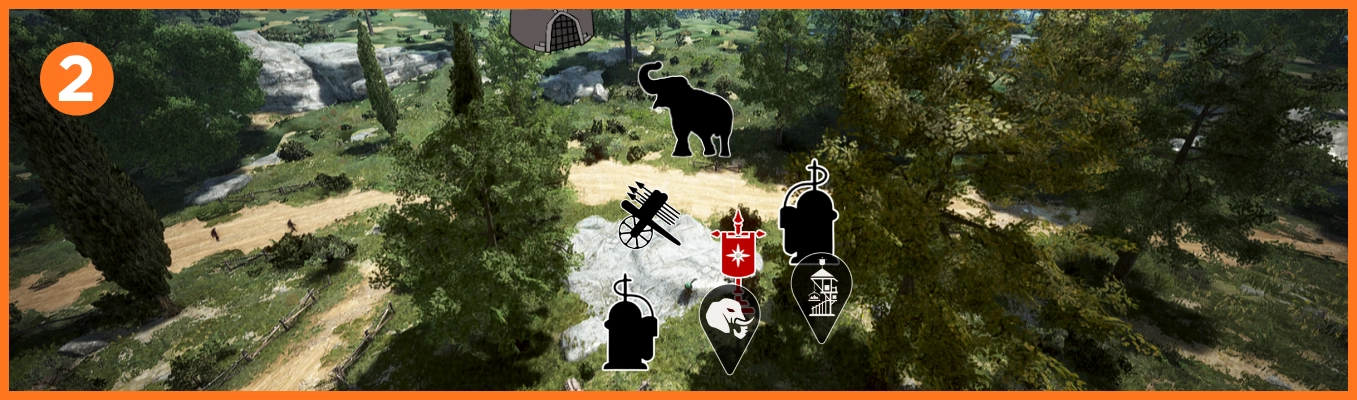
Downhill / poor vision / challenging / decent hwacha / decent fort pressure
The environment put you in a bit harder situation to push, decent location with option to place a offensive and defensive second flame, easy to disengage and poor vision what is goin on around the fort, most of the time spot is free when you joining the fight, require additional scout to know location of enemy blob.
3. SOUTH
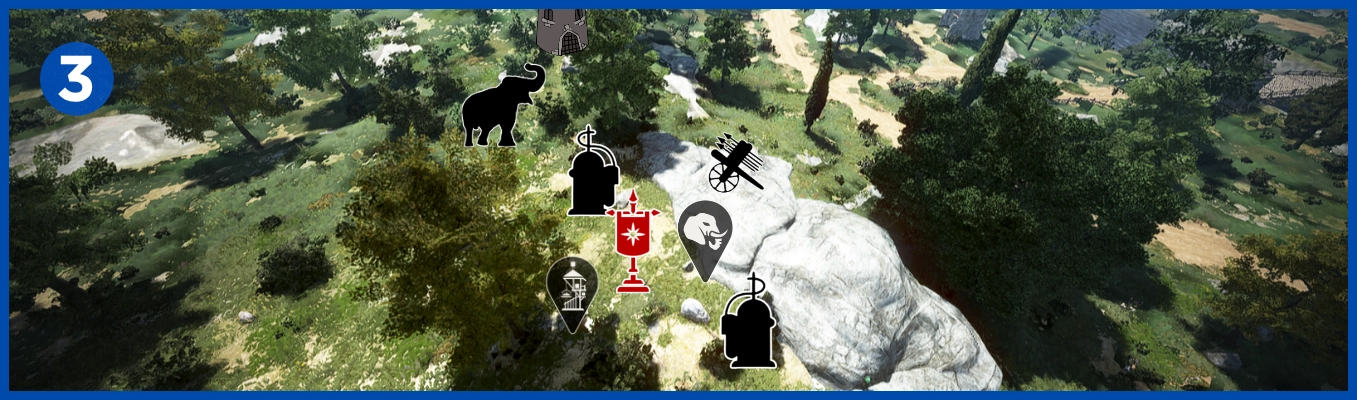
Natural borders / flexible position / challenging / perfect fort pressure / perfect hwacha
Another strong position with good nautral borders, very flexible with flames and flag position, depends how much defensive/offensive you wanna play, small rock and hill protect you from one flank, with good coordination very strong position just like the a north spot.
4. NORTH - WEST
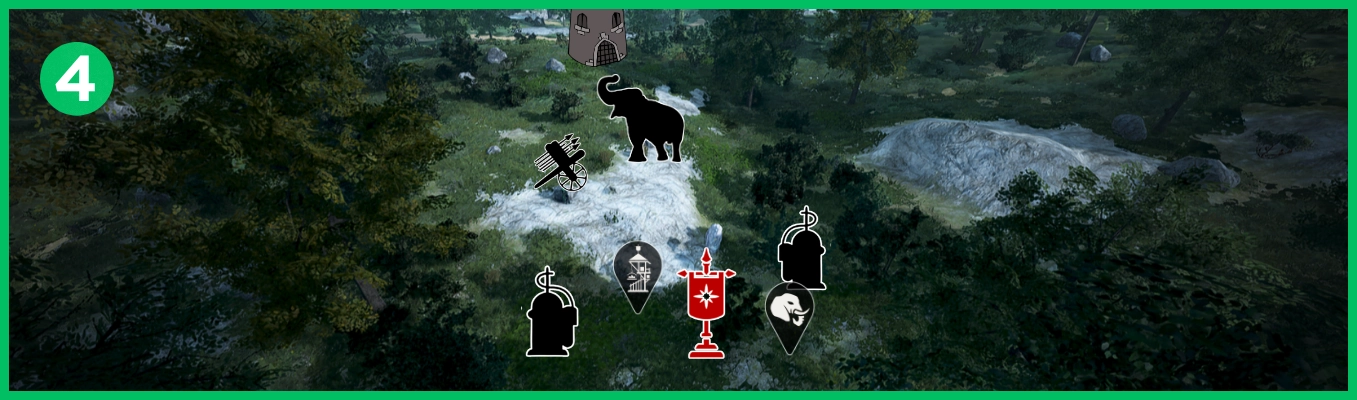
Open environment / olvia spawn behind / challenging / good fort pressure / good hwacha
Wide open environment, close to olvia respawn so a lot of random enemies can bomb you from behind, with two defensive flames on flag you can protect from that, good vision and option to keep pressure around the fort, very good hwacha placement too, with good coordination it's good enough to trade for a win.
MAP KEY
 |
FORT | FORT LOCATION |  |
 |
FLAG FACTORY | FLAG STRUCTURE - REQUIRE TO START (3MIN CD) |  |
 |
ELEPHANT NURSERY | ELEPHANT STRUCTURE - REQUIRE TO START (5MIN CD) |  |
 |
FLAG | RESPAWN LOCATION |  |
 |
SUPPLY DEPOT | REPAIR / REVIVE HORSE / BUY SUPPLIES FOR NODEWAR (TRAPS ETC) |  |
 |
FLAME TOWER | DEFENSIVE TOWER - CC/DEBUFF ENEMIES AND DEAL A BIT OF DPS |  |
 |
HAWACHA | DEFENSIVE / OFFENSIVE MACHINE - CC AND DEAL DECENT DPS |  |
 |
ELEPHANT | DEFENSIVE / OFFENSIVE MOUNT - CC AND DEAL A BIT OF DPS |  |