OCCUPATION - SERENDIA FORT LOCATIONS

By justamadmad
Published: Jun 03, 2026
Updated: Jun 15, 2026
7,060
6
SERENDIA MINIMAP
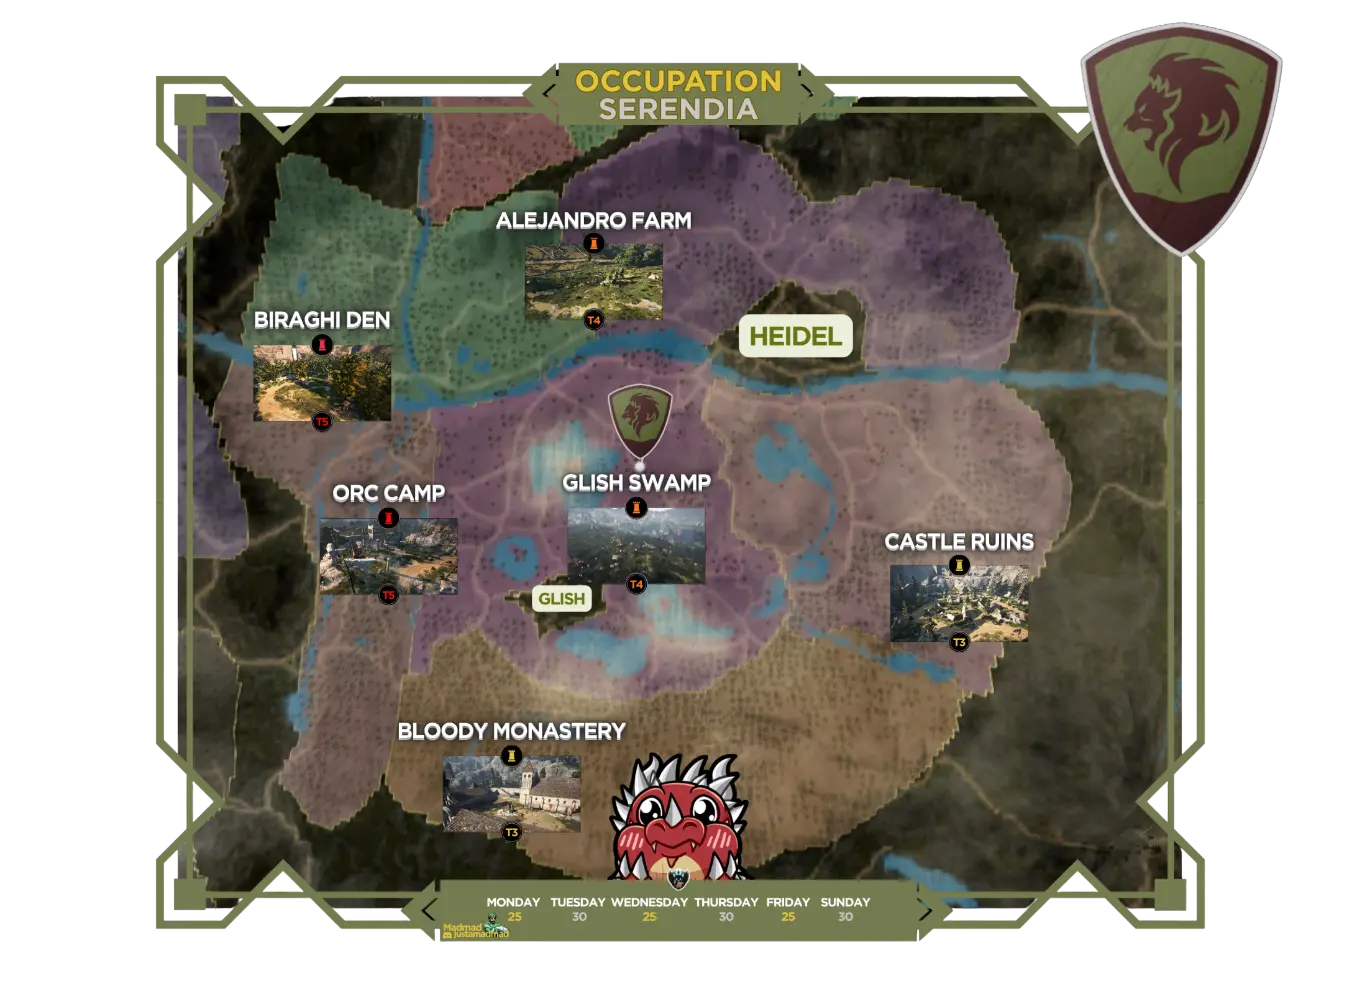
Serendia OCCUPATION mode map with fort locations:
- TIER 5 - BIRAGHI DEN and ORC CAMP
- TIER 4 - ALEJANDRO FARM and GLISH SWAMP
- TIER 3 - BLOODY MONASTERY and CASTLE RUINS
TOWN SPAWN - HEIDEL or GLISH
This guide is intended to share knowledge gained from years of experience to help improve the PVP scene and make it become more competitive. The information below is common location used by best guild/alliances that contest a specific fort – that is not the only correct way to play on each location. Every guild has its own playstyle, so find yours and adjust it to your preferences. See you on the battlefield.
MADPOT - the location that offers the biggest potential to increasing your chances of fighting effectively around the fort - secure a stick, defend it from others and keep offensive pressure on it.

IF YOU NEED GOOD RESOLUTION PHOTOS JOIN OUR DISCORD - https://discord.gg/npNygq8ZaF
BIRAGHI DEN
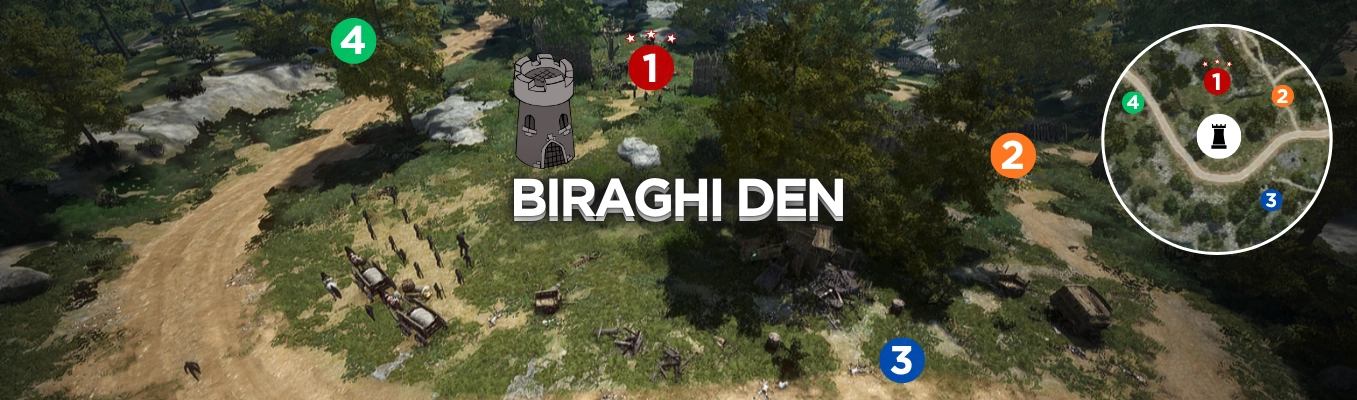
1. NORTH - MADPOT
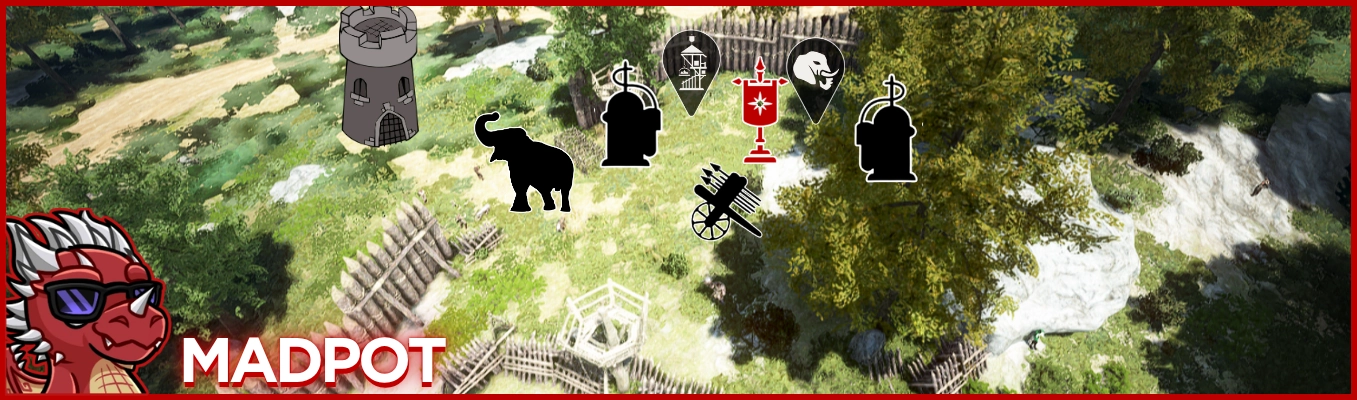
Natural borders / hazardous location / challenging / perfect fort pressure / perfect hwacha
Very strong position, super rewarding with proper gameplay but riskt at the same time with poor coordination. If you are not strong enough, enemies will push you out from this location, you set the pace all around, flame and elephant stomp go through the wooden wallas so be sure to use it before enemy from other side.
2. NORTH/EAST
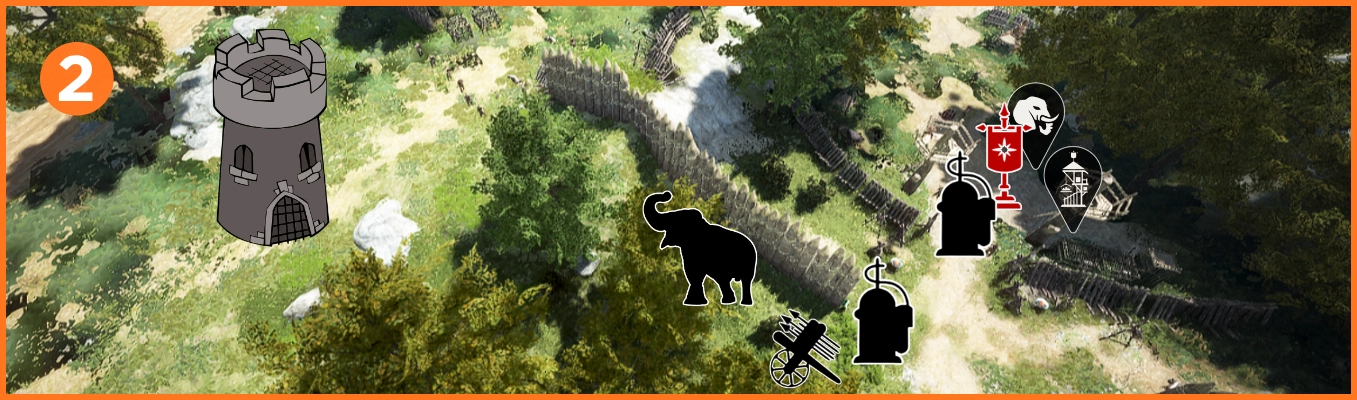
Natural borders / hazardous location / challenging / good fort pressure / decent hwacha
Another strong position with good nautral borders, keep in mind the guild in the north position can abuse terrain to harras you before pushes, with proper coordination very rewarding spot. (Hwacha might have issues) With proper coordination and vision very rewarding place, whole east side can be occupied only by you.
3. SOUTH
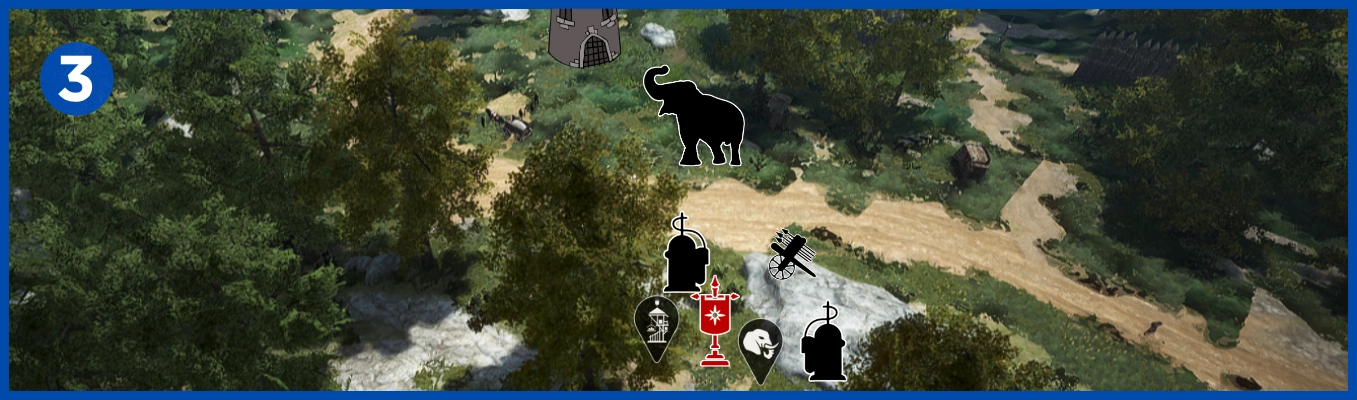
Open environment / challenging / good fort pressure / perfect hawacha
Wide open location, without any special natural borders, there is plenty of space for few bases, keep in mind that any guild which joins the fight might try push you from behind, with proper setup around the road should be easy to keep pressure on fort and be competitive with other guilds from north side.
4. NORTH - WEST
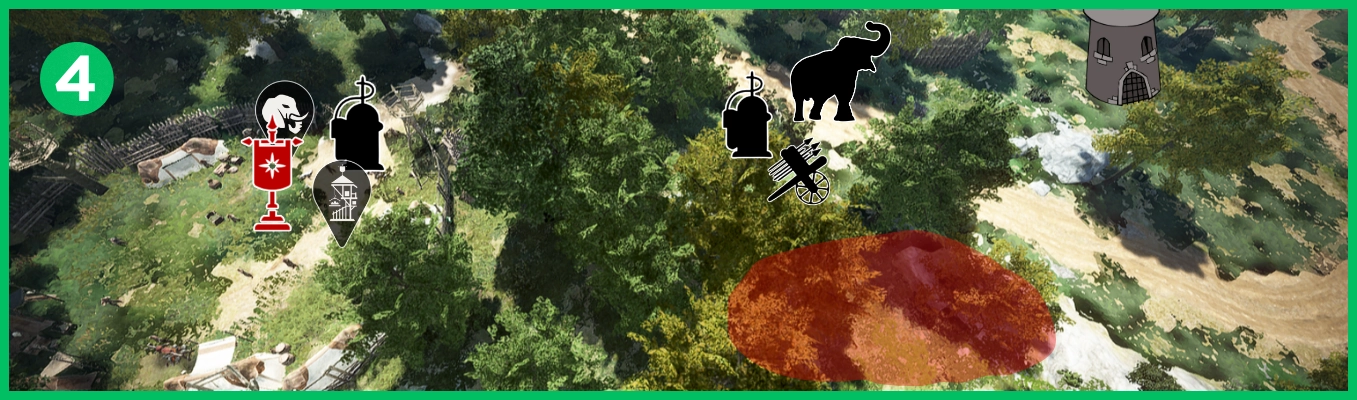
Natural borders / challenging / good fort pressure / perfect hwacha
Very safe option with otpimal balance between defense and offense, flag with one flame far enough from fort to avoid hard push and offensive flame with hwacha giving advantage near fort to attack, you can also relocate your flag with other structures near red area to be a bit closer to main fight.
ORC CAMP
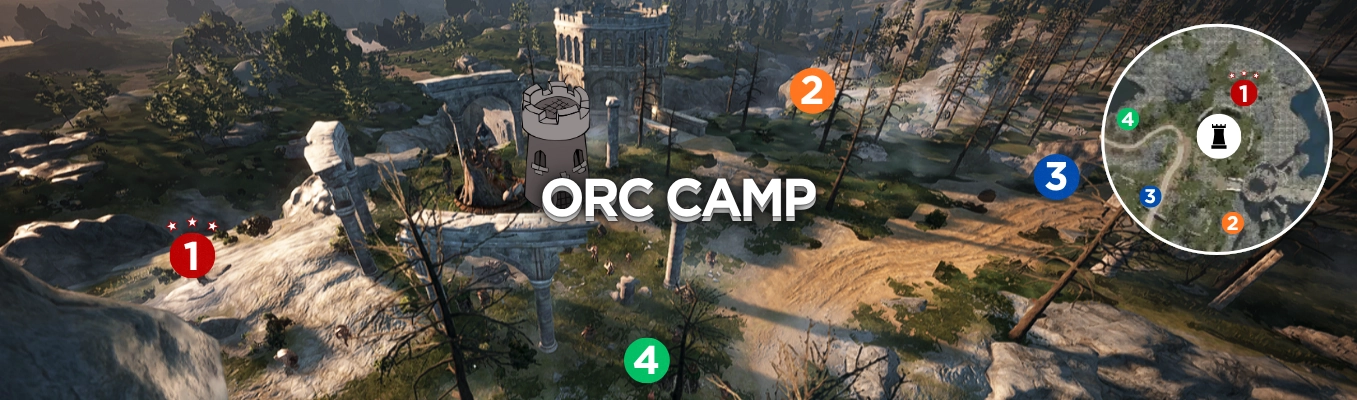
1. NORTH/EAST - MADPOT
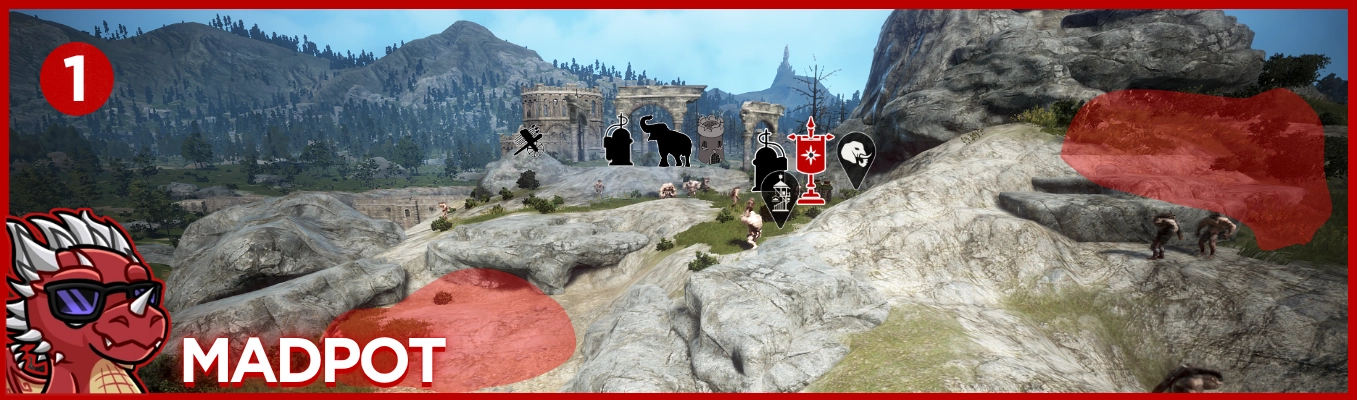
Natural borders / challenging / flexible location / perfect fort pressure / perfect hwacha
Very flexible spot, you can play offensive or place your structures a little further on north side - abuse terrain for maximum defense. Easy to keep ressure on stick, perfect vision helps to avoid enemy raid in push scenerio, with good coordination best spot around to be competitive and set a pace around the fort.
2. SOUTH/EAST
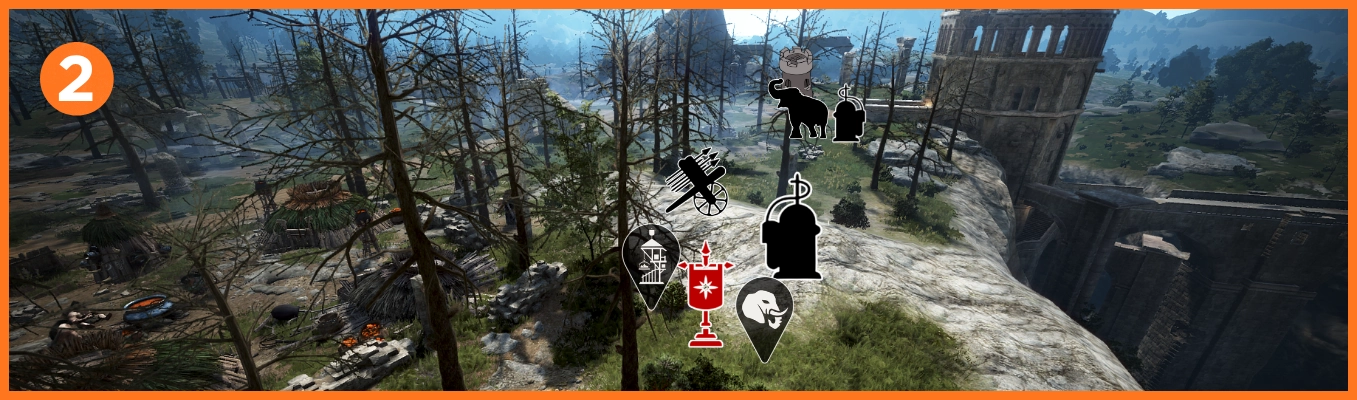
Natural borders / hazardous location / challenging / good fort pressure / good hwacha
Offensive and risky position, lack of space can force you to retreat, keep your scout on west side to avoide surprise flank, with offesnive flame and elephant very easy to keep pressure on fort, good vision and potential to keep fort for yourself.
3. SOUTH/WEST
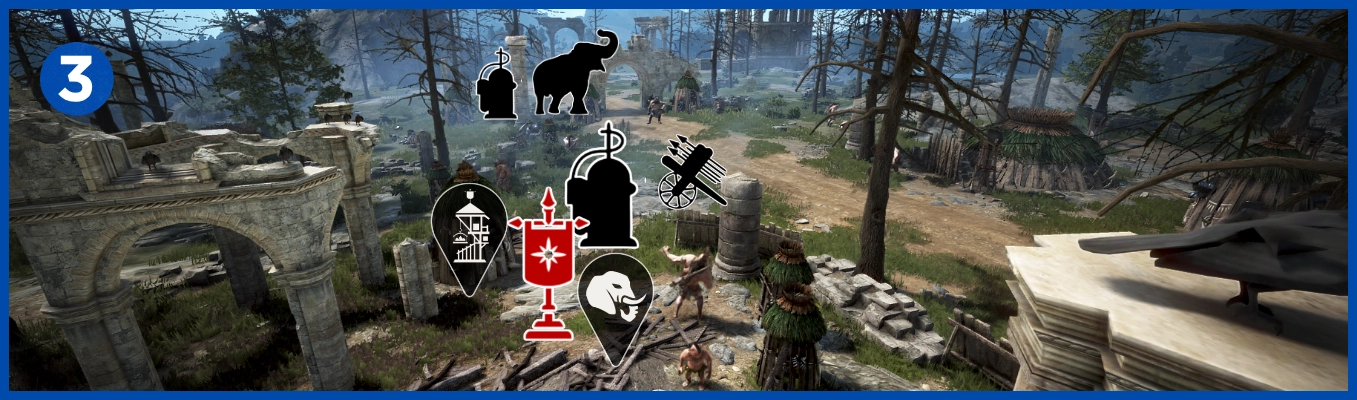
Natural borders / flexible location / challenging / decent fort pressure / decent hwacha
Not a first choice if you come before everyone else, decent location but with many flank options from enemy on your minibase, if you handle place hwacha and offensive flame, very good angle to keep at least range pressue, abuse ruins around as natural protection for your structures.
4. NORTH/WEST
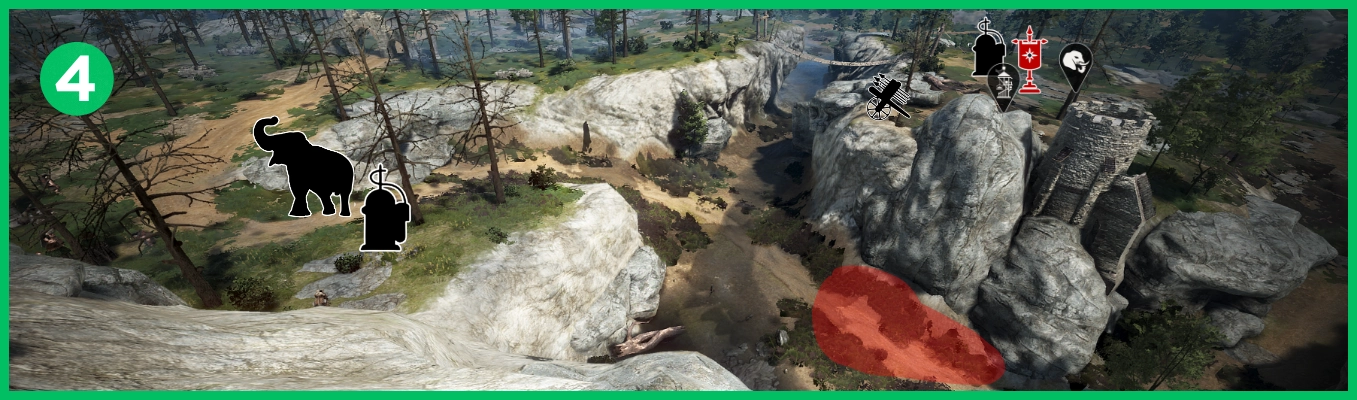
Natural borders / defensive spot / flexible location / decent fort pressure / perfect hwacha
Another flexible spot, you can place whole minibase down hill [red area] far enough to avoid enemy pushes with spawn protection, most of the time free - offers you a option to join a fight, pressure angle depends on your offeisive flame na elephant gameplay, be aware of choke in way up.
ALEJANDRO FARM
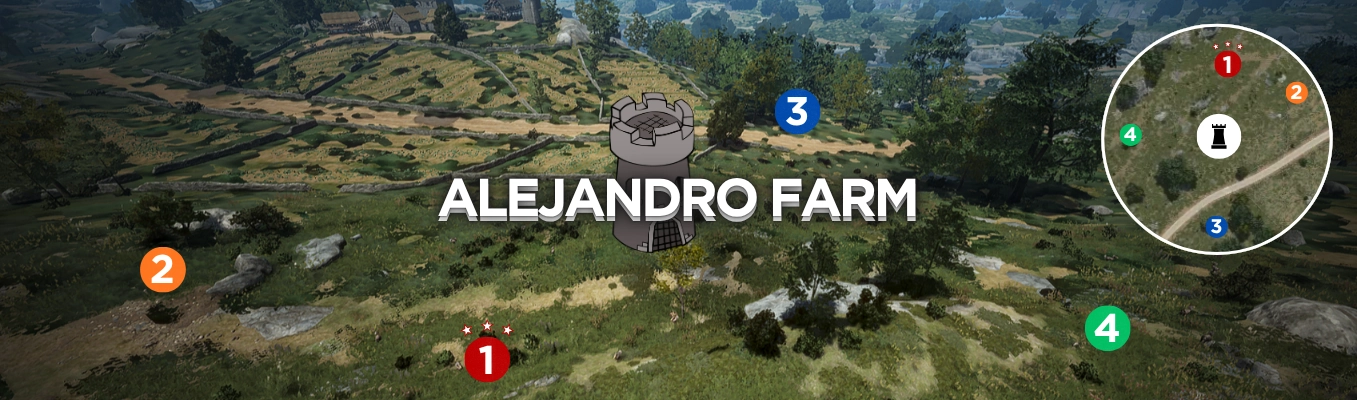
1. NORTH - MADPOT
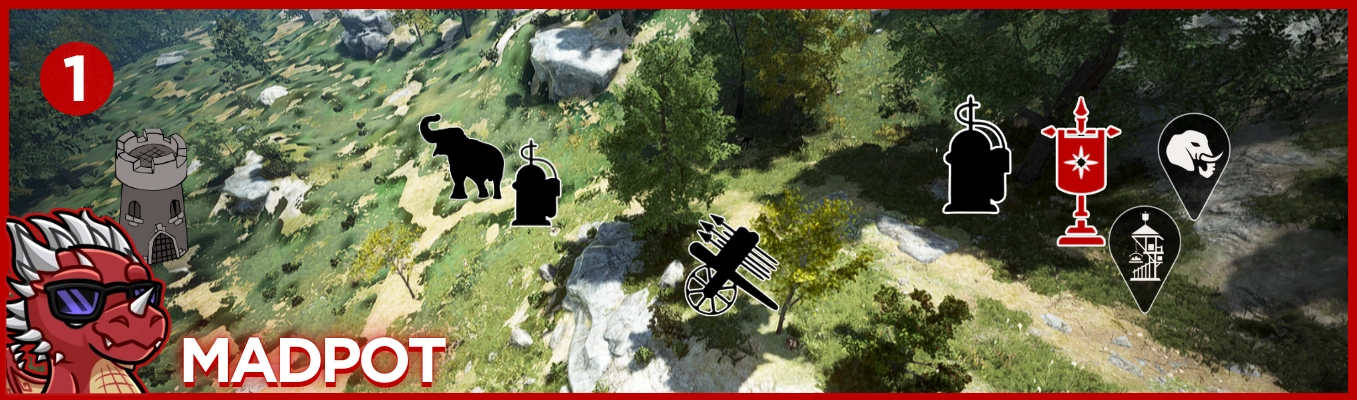
Natural borders / challenging / highground / perfect fort pressure / perfect hwacha
Very strong position, easy to defend with proper structure placement, close to spot no.1 which is biggest threat. during a fight for pressure try push out offensive structures of guild from position no. 3, big advantage of highground, very good vision that makes you very dangerous around the fort.
2. NORTH/EAST
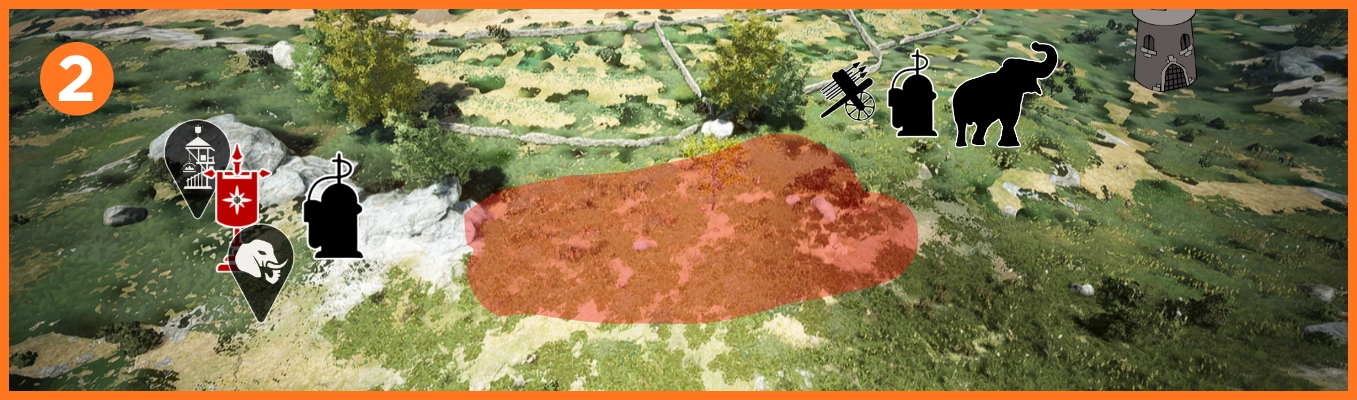
Some natural borders / flexible position / challenging / good fort pressure / perfect hwacha
Flexible location, depends on your need and enemies around you can choose how far away form fort you place flag with other structures, farm side are unable to build but you still need care of potential enemy blob, decent place to keep pressure and be competitive by set a pace around the fort.
3. SOUTH
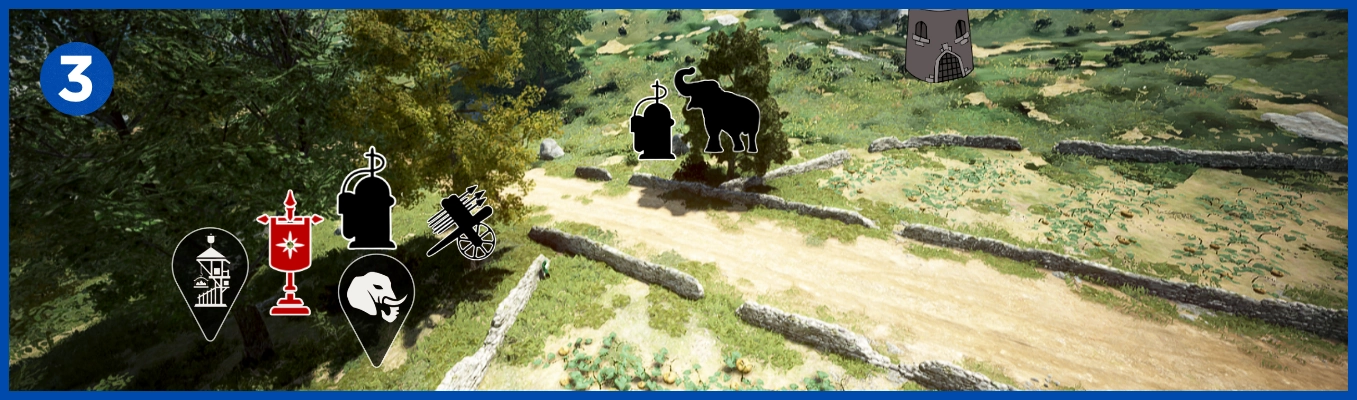
Small east border / hazardous location / challenging / good fort pressure / decent hwacha
Best position from road side, safe enough from fort spawn pushes, you can rotate with blob around farms to switch a bit angle of pressure, look out for potencial danger because position is pretty open from south side when new guilds can try place own minibase, good to keep pressure on the fort and hold whole south side.
4. NORTH/WEST
Natural borders / highground / flexible position / perfect fort pressure / perfect hwacha
Another strong position with good nautral borders, your pressure potential depends of how far you place offensive flame and hwacha, two options to push, very rewarding place that gives you chance to become main player here, be mindful of enemy flags from the top of the mountain
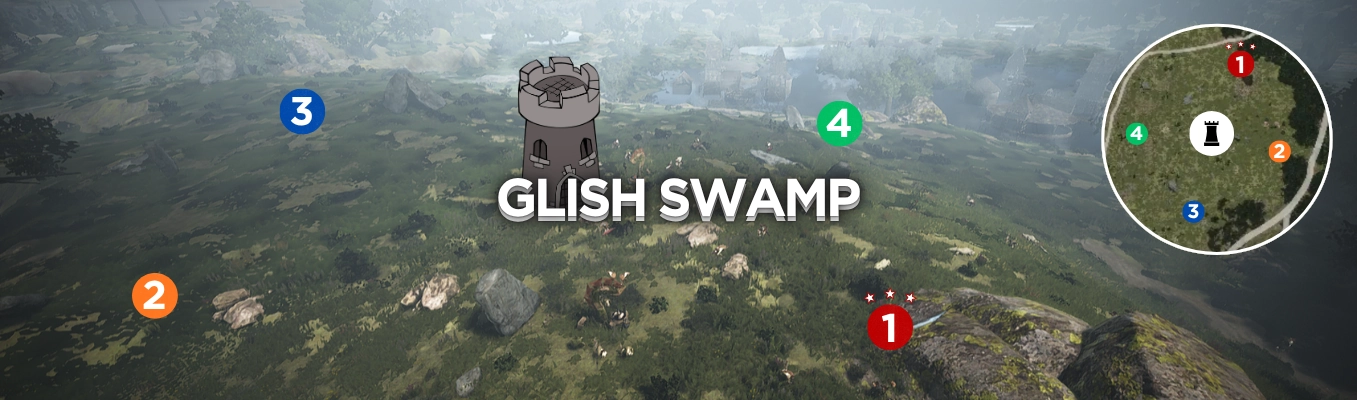
GLISH SWAMP
1. NORTH - MADPOT
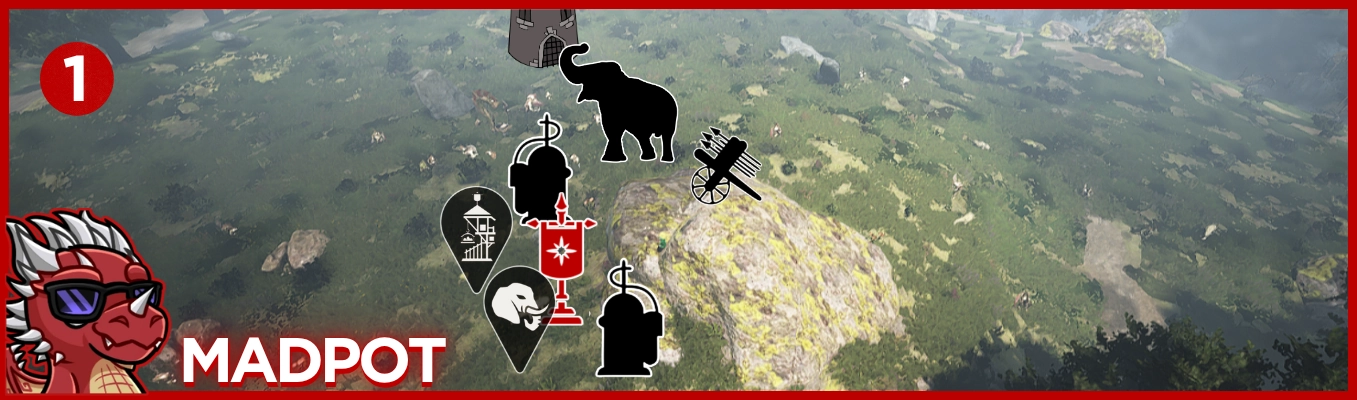
Rock as natural barricade / flexible location / challenging / perfect fort pressure / perfect hwacha
North side gives you advantage by using a rock as a natural barricade from enemy blob pushes, you can place setup a bit more on north far away from fort, very good vision and hwacha on rock that give you a bit more range compare to other spots, instead of offensive flame you can place both on flag.
2. EAST
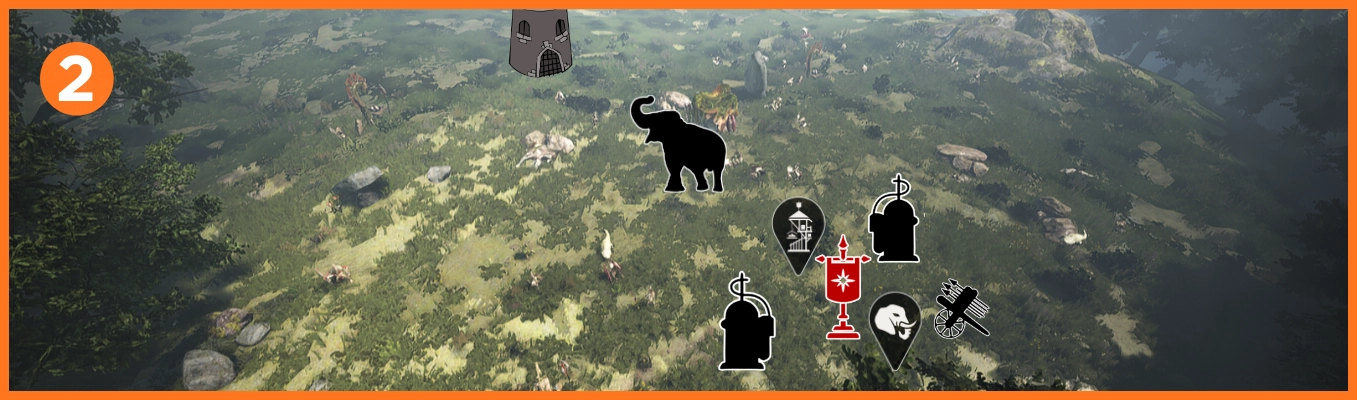
Open environment / challenging / flexible position / good fort pressure / good hwacha
Wide open location, without any special natural borders, there is plenty sapce for few bases, keep in mind any guild that joins the fight might try push you from behind, place two flames around flag for better protection and hwacha around it, easy fort pressure and good vision around.
3. SOUTH
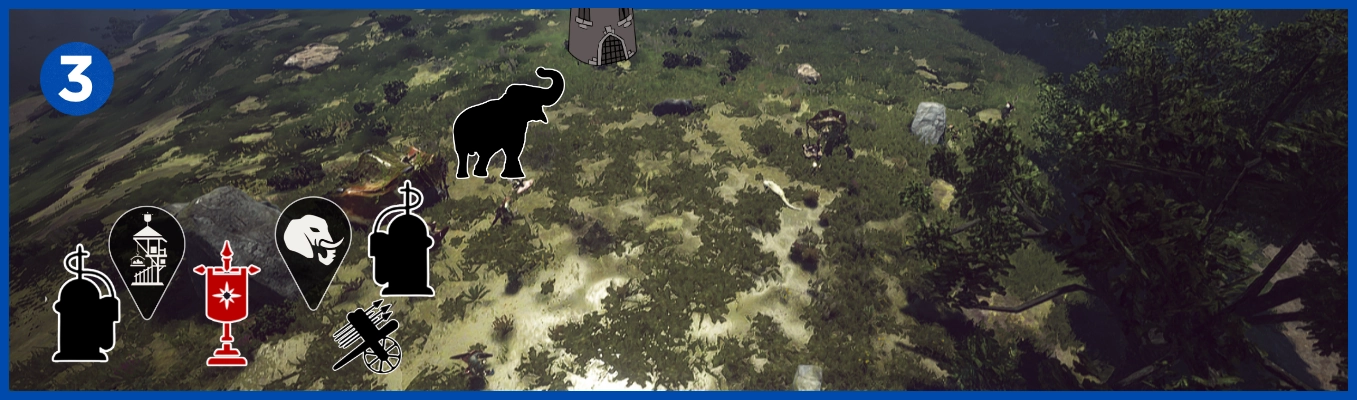
Rock as natural barricade / flexible position / challenging / good fort pressure / good hwacha
Small rock that can be used as a natural barricade, another flexible location that you can use for your needs, good vision, wide open terrain gives you more space to rotate with main blob, good hwacha spot that provide big amount of cc before engage, two flames that protect flag and offensive elephant.
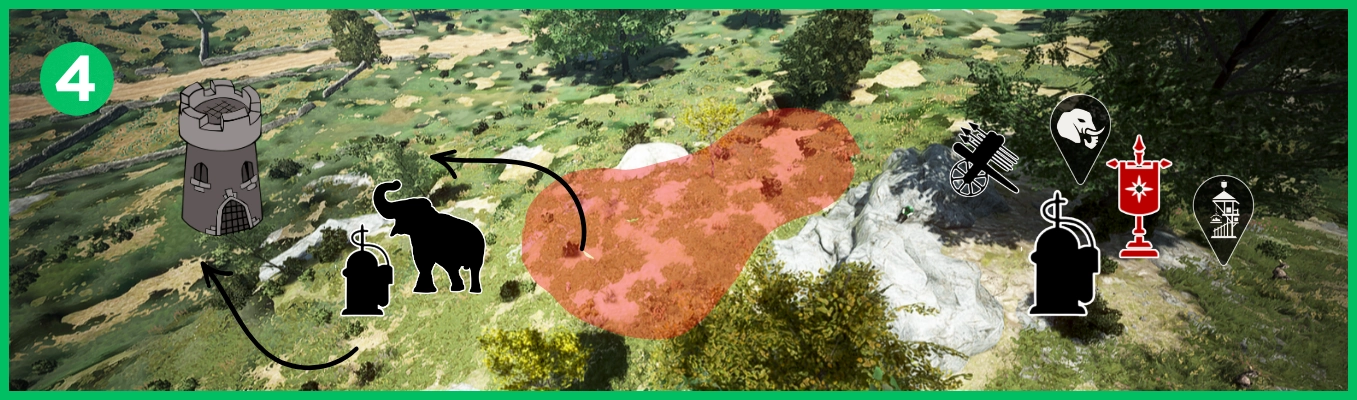
4. WEST
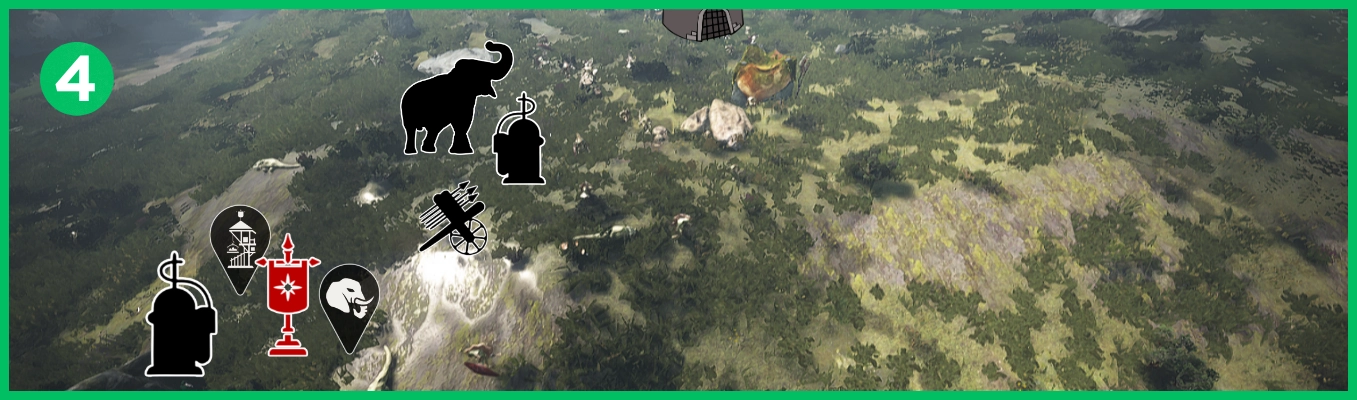
Wide open location / lowground / flexible position / good fort pressure / good hwacha
This base location doesn't deliver any special terrain around, on west side you got a bit of natural rocks that can be helpful in defense, good location for keep pressure on fort also plenty space to rotate and replace a structures for your needs, good vision and decent hwacha that can help in pushes and fights.
BLOODY MONASTERY
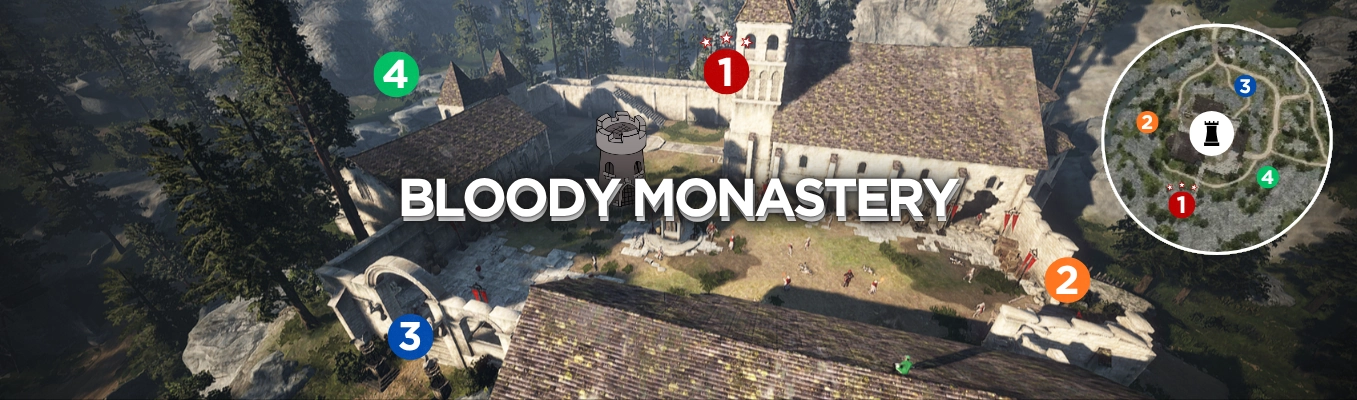
1. SOUTH - MADPOT
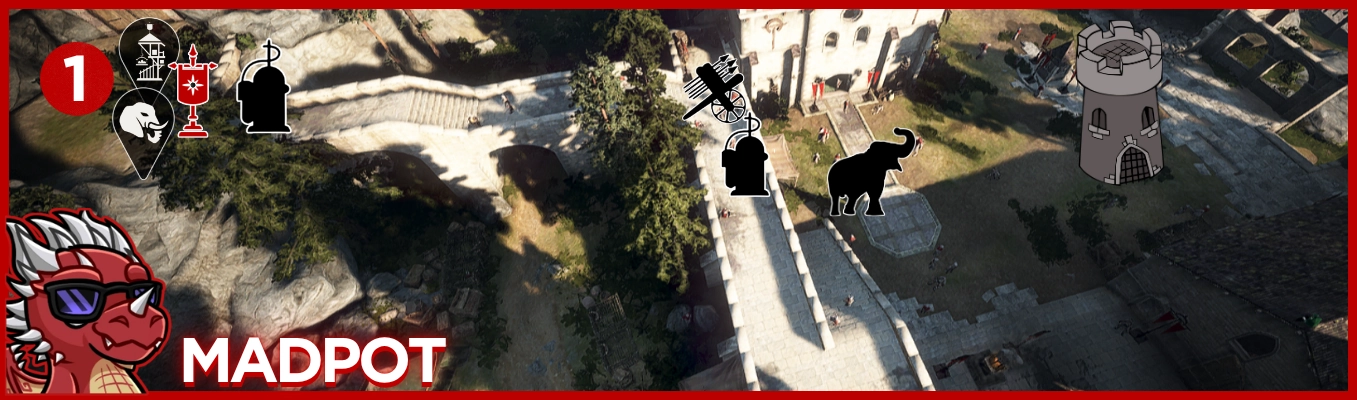
Natural borders / hazardous location / challenging / perfect fort pressure / perfect hwacha / choke
Tiny but very hard to push, recommended only for strong guilds - you calling the shots with proper setup here, rangers can abuse church roof, with good coordination you lock gate side and can push west side by inisde the church, perfect vision and very flexible position to move around the fort
2. WEST
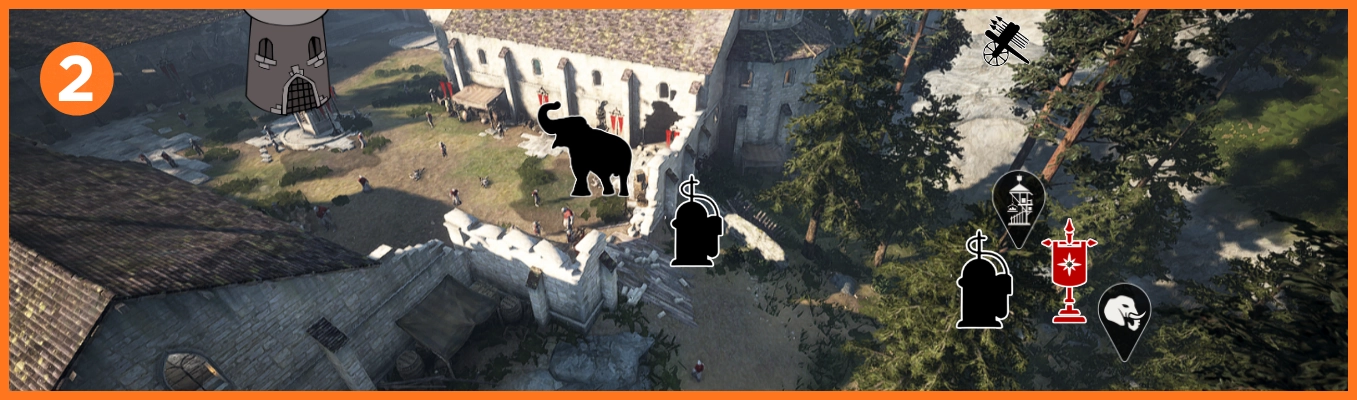
Natural borders / challenging / flexible position / bad hwacha / good fort pressure / choke
Another strong position to defend, abuse the choke in case of pushes, with offensive flame and elephant inside you have plenty of space to fight and keep pressure on the fort, decent vision inside with another instinctive hwacha shoots, care of roofs and keep your eyes from behind
3. NORTH
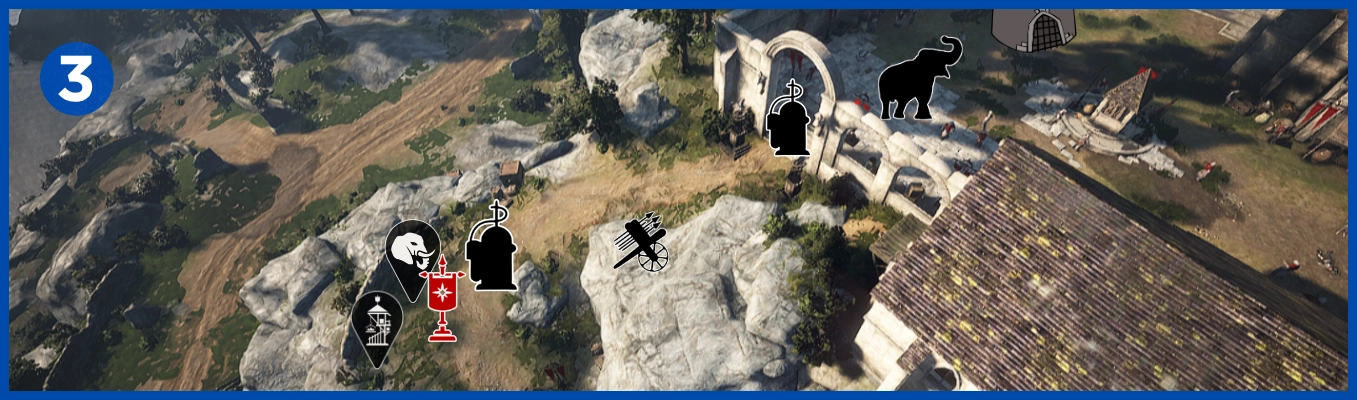
Natural borders / challenging / perfect fort pressure / good hwacha / choke
Strong position to keep pressure on fort if all offensive structures are up, narrow space after a choke make this location a bit dangerous for you vs stronger guilds, try abuse roofs with rangers, hwacha and flame can be bodythrowed by respawn protected enemies
4. EAST
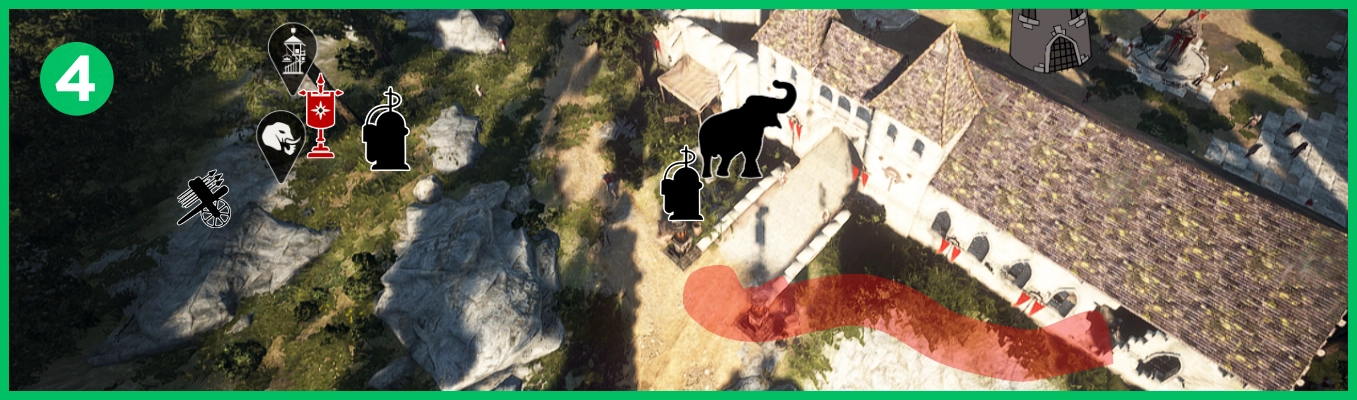
Natural borders / defensive / challenging / flexible position / bad fort pressure / bad hwacha
Very defensive spot, hard to push fort by gate if madpot guild abuse wall around and place elephant near the gate, with good coordination and abuse whole in building you can find a space to flip a fort, hwacha needs to shoot blind, poor vision and lack of space when you already in
CASTLE RUINS
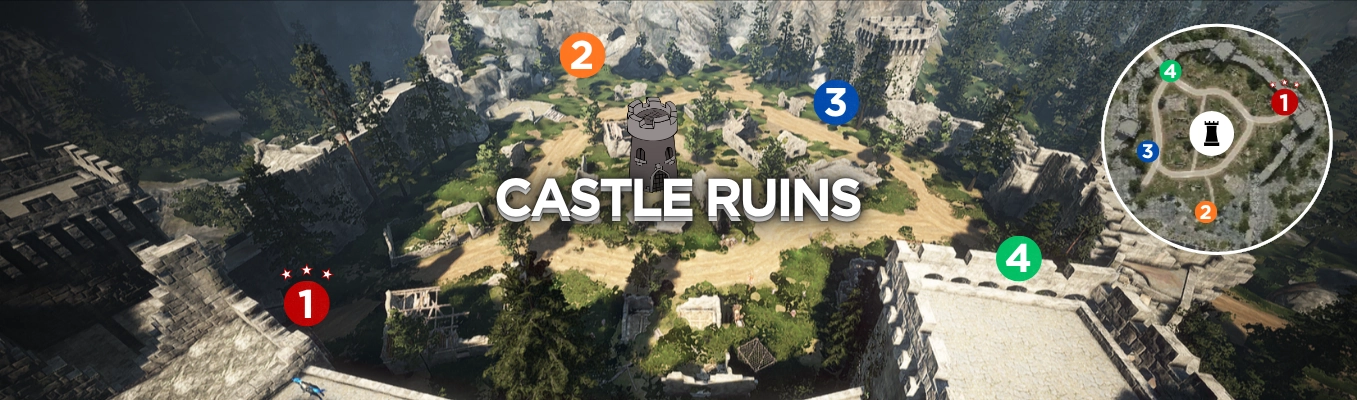
1. NORTH - MADPOT
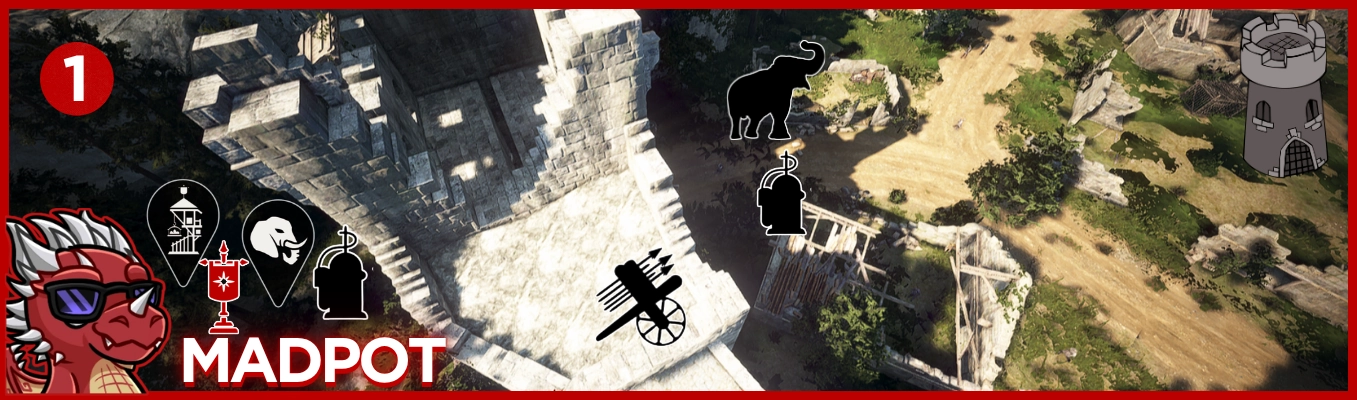
Natural borders / challenging / gate choke / perfect fort pressure / perfect hwacha
Very strong position, gate as a choke is impossible to push from fort side, you can also relocate your flag inside the castle if you protect it with two flames, best hwacha location with full vision around the stick, easy to keep pressure and push out enemies, care of new enemies outside castle from moutains side.
2. SOUTH
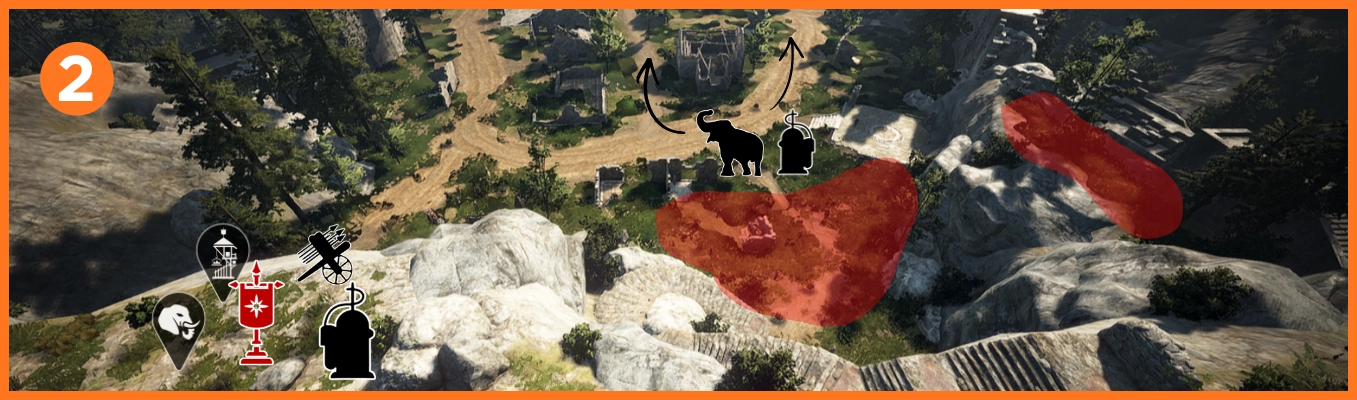
Natural borders / highground / flexible position / very defensive location / good fort pressure / good hwacha
The safest location around, highground and choke on stairs are almost impossible to push, with proper offensive flame and elehpant whole south-east road are open to keep pressure around the fort, easy to disengage and flexible enough to change your playstyle from defensive into offensive in couple seconds.
3. WEST
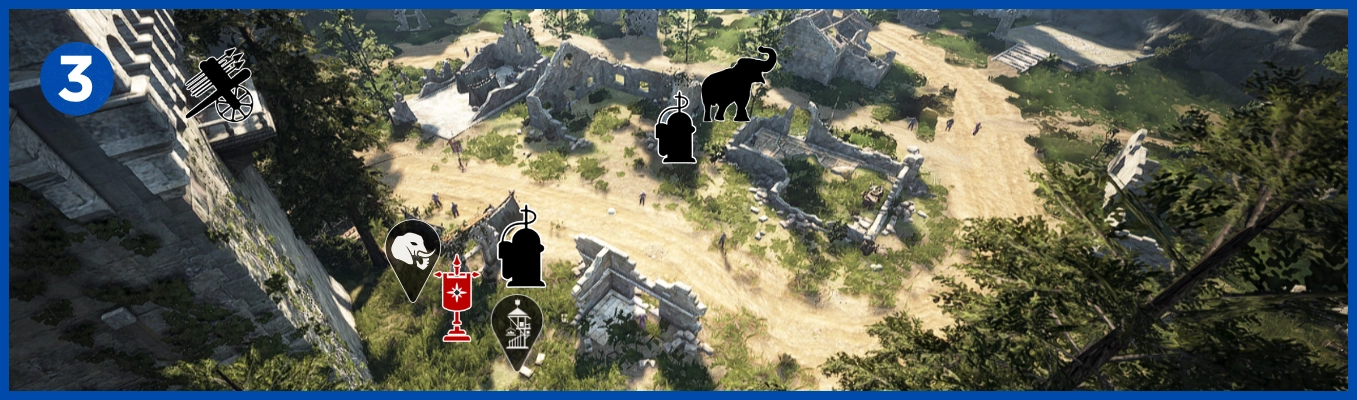
Natural borders / hazardous location / challenging / good fort pressure / good hwacha
Very hazardous location, it offers an excellent angle for an attack, but then it comes to defense, the lack of space can be a problem, requires good organisation to avoid being sandwiched, a lot of natural borders that can be used as a shield to avoid enemy dps and blob pushes, you can also place two flames around flag.
4. NORTH/WEST
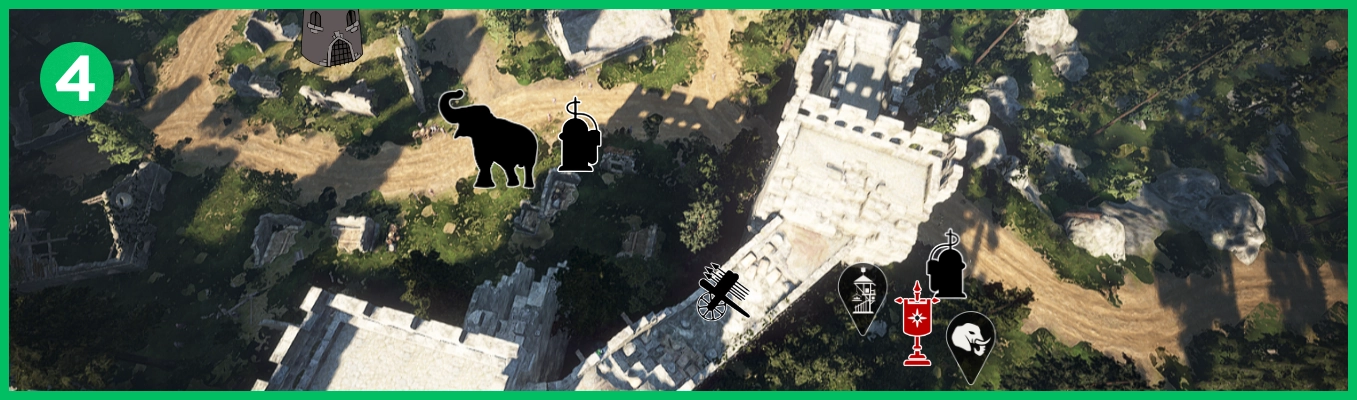
Natural borders / gate choke / challenging / flexible position / perfect fort pressure / perfect hwacha
Mirror location to madpot, strong defense by choke in gate, easy to keep pressure around the fort with offensive flame and elephant, you can also relocate flag inside the caslte to avoid push from ourside the castle, perfect hwacha on top of the walls, require decent organization to keep the minibase safe
MAP KEY
 |
FORT | FORT LOCATION |  |
 |
FLAG FACTORY | FLAG STRUCTURE - REQUIRE TO START (3MIN CD) |  |
 |
ELEPHANT NURSERY | ELEPHANT STRUCTURE - REQUIRE TO START (5MIN CD) |  |
 |
FLAG | RESPAWN LOCATION |  |
 |
SUPPLY DEPOT | REPAIR / REVIVE HORSE / BUY SUPPLIES FOR NODEWAR (TRAPS ETC) |  |
 |
FLAME TOWER | DEFENSIVE TOWER - CC/DEBUFF ENEMIES AND DEAL A BIT OF DPS |  |
 |
HWACHA | DEFENSIVE / OFFENSIVE MACHINE - CC AND DEAL DECENT DPS |  |
 |
ELEPHANT | DEFENSIVE / OFFENSIVE MOUNT - CC AND DEAL A BIT OF DPS |  |